
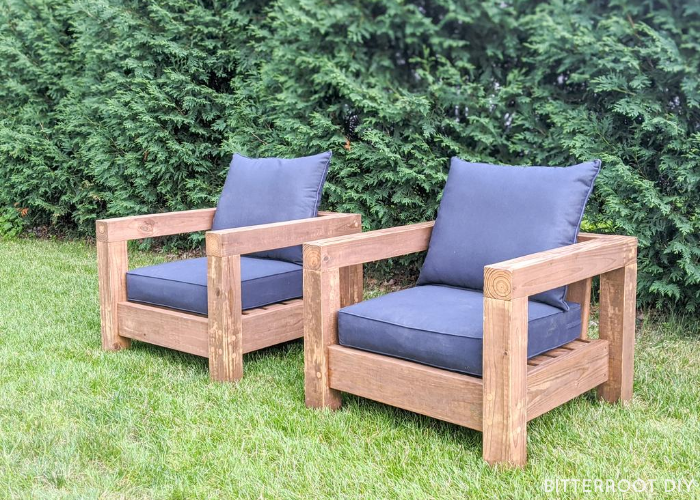
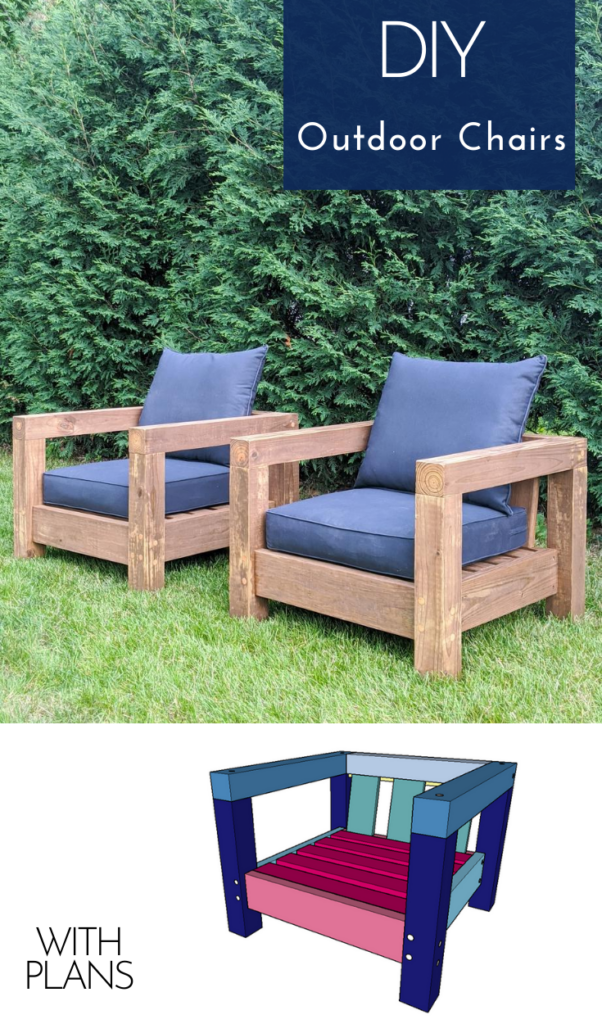
Build your own DIY outdoor patio chairs with these plans.
This post may contain affiliate links. If you make a purchase from one of the links, I may make a small commission at NO EXTRA COST to you. This helps keep the tutorials and plans free here at Bitterroot DIY. Thank you for your support! See my full disclosure here.
Soooo ... Let me just start by saying the wind is definitely NOT going to blow these chairs away. They're basically built like a brick sh** house. Looking back, I'm not really sure why I decided to use treated lumber. I guess I didn't realize how much heavier it is than regular pine or cedar. But, alas, here we are.
These will definitely stand up to the elements, but they're pretty difficult to move around - it's a two person job for sure. So I think I'd encourage you to consider using cedar (which resists rot and weathers well like treated lumber) or even just regular pine. Just make sure to seal it with a good outdoor finish. I used Cabot Australian Timber Oil on these treated chairs (probably overkill again ... I told you, these things are going to last as long as the pyramids) but I've also used it on exterior furniture that I built from regular pine and have had good luck with it.
Tools & Supplies
- Deep Seat Outdoor Patio Chair Cushions
- Miter Saw
- Orbital Sander
- Brad Nailer
- Pull Saw
- Drill
- Drill Bits
- ¾" Forstner Bit
- 5″ Exterior Lag Screws
- 2 ½" Exterior Screws
- 2" Exterior Screws
- 2" Brad Nails
- Cabot Australian Timber Oil
- Kreg Pocket Hole Jig (*optional for this project*)
- Wood Glue
- Tape Measure
- Pencil
- Safety Glasses
- Ear Protection
Lumber List
- 4 | 4x4 @ 8' (legs & top frame)
- 3 | 2x6 @ 8' (bottom frame)
- 4 | 2x4 @ 8' (seat slats)
- 1 | 1x6 @ 8' (back)
- 1 | 2x2 @ 8' 1(seat slat support)
- 1 | 1x2 @ 6' (back support)
- 2 | ¾" dowel @ 3' (dowel plugs)
Cut List
- 8 | 4x4 @ 20 ½" (legs)
- 4 | 4x4 @ 31 ½" (arms)
- 2 | 4x4 @ 25" (back arm)
- 4 | 2x6 @ 24 ½" (side frame)
- 4 | 2x6 @ 25" (front & back frame)
- 10 | 2x4 @ 25" (seat slats)
- 6 | 1x6 @ 10 11/16" with 10° parallel miter (seat back)
- 2 | 1x2 @ 25" (seat back support)
- 4 | 2x2 @ 23 ½" (seat slat cleats)
** Lumber & Cut Lists are for 2 chairs. Adjust accordingly.
Step 1.
Build the first arm frame as shown. Position the bottom 2x6 flush with the inside edge of the legs.
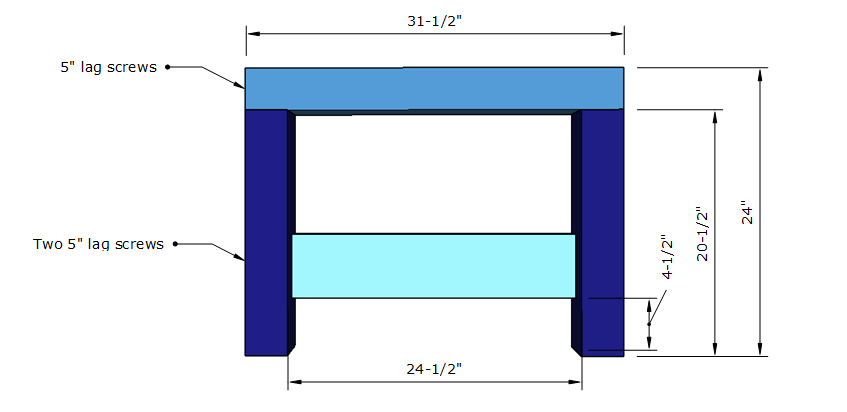
Use wood glue and one 5" lag screw to attach the top arm to the legs. Use wood glue and two 5" lag screws through the legs into the 2x6 bottom frame on each end. Pre-drill holes for all 5" lag screws to prevent splitting the wood, and use a ¾" forstner bit to drill a countersink hole about 1 ¼" deep for the head of the screw. Drill the countersink first so the forstner bit grabs the wood correctly and doesn't wander.
You'll use two lag screws through the opposing side of the legs to attach the front and back frame, so stagger them slightly off-center so they don't collide. I drove these front lag screws so they're centered in the 2x6 horizontally, but just slightly off-center vertically.
Build two frames. You can see the location for the lag screws a little better in the diagram below:
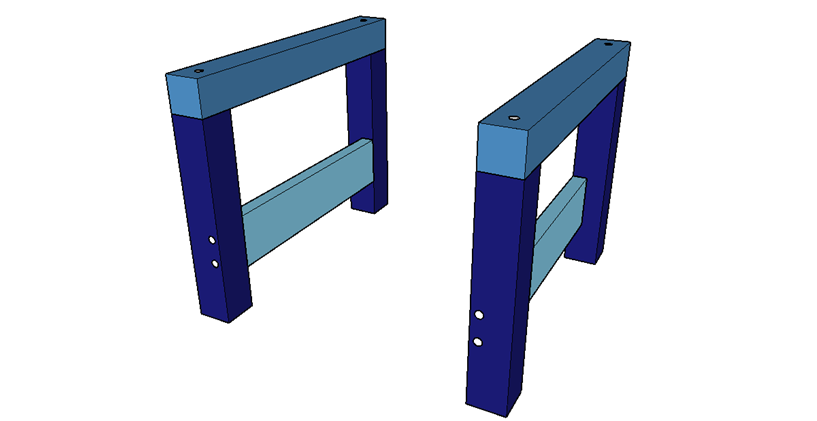
I had someone ask why I decided to put the arms on top of the legs, which means you end up drilling down into the end grain of the legs (usually a no-no). Honestly, I just like the look. And since it's not really a load-bearing situation, the big lag screws and wood glue are plenty strong even though they're in the end grain. The only time the arms bear weight is when you move the chairs and that's not enough to pull the lag screws out. Trust me. Not even with the super heavy treated lumber.
Step 2.
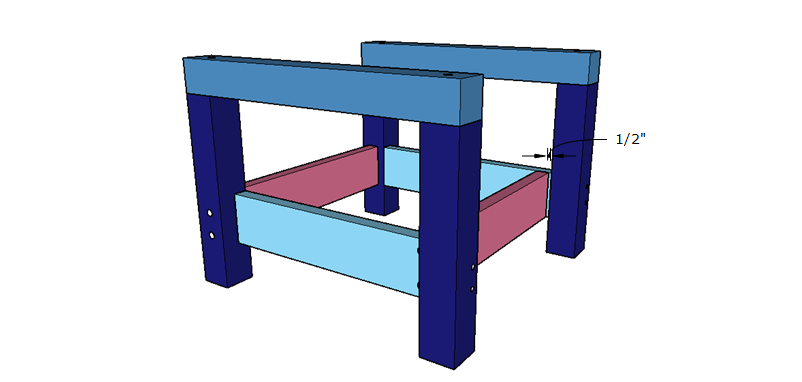
Attach both frames together with 2x6s in the front and back. Position the front 2x6 board 1" back from the front of the legs. Position the back 2x6 board ½" to the inside of the side frame (see diagram below).
Use wood glue and two 5" lag screws on either end of the front 2x6 to attach it to the legs. Again, stagger the screws just off-center vertically to avoid hitting the screws you used to build the side frames.
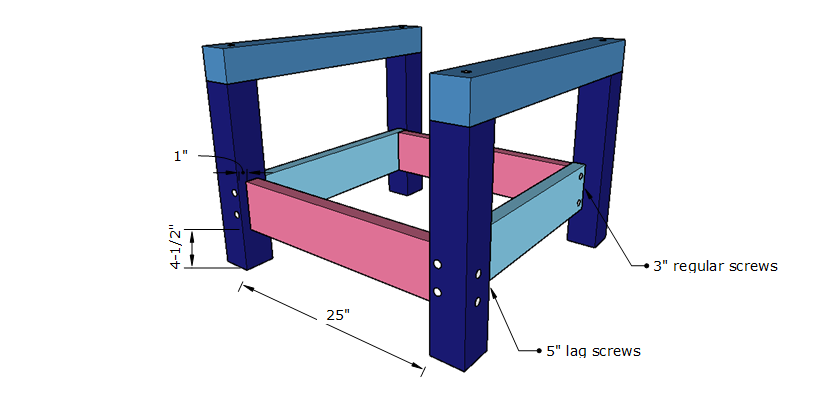
Pre-drill all 5" lag screws to prevent splitting the wood, and use a ¾" forstner bit to drill a countersink hole about 1 ¼" deep for the head of the screw. Drill the countersink first so the forstner bit grabs the wood correctly and doesn't wander.
Use wood glue and two 3" regular screws through the 2x6 side frame into the back 2x6 to attach it.
Here's a view from the back so you can see where that back 2x6 should be:
Step 3.
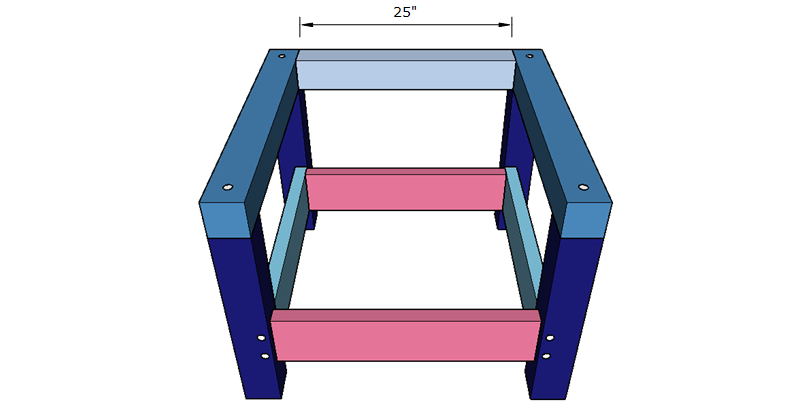
Attach the back arm.
Use wood glue and one 5" lag screws on either end of the arm to attach it to the legs. Stagger the screws just off-center to avoid hitting the screws you used to build the side frames.
Pre-drill the 5" lag screws to prevent splitting the wood, and use a ¾" forstner bit to drill a countersink hole about 1 ¼" deep for the head of the screw. Drill the countersink first so the forstner bit grabs the wood correctly and doesn't wander.
Step 4.
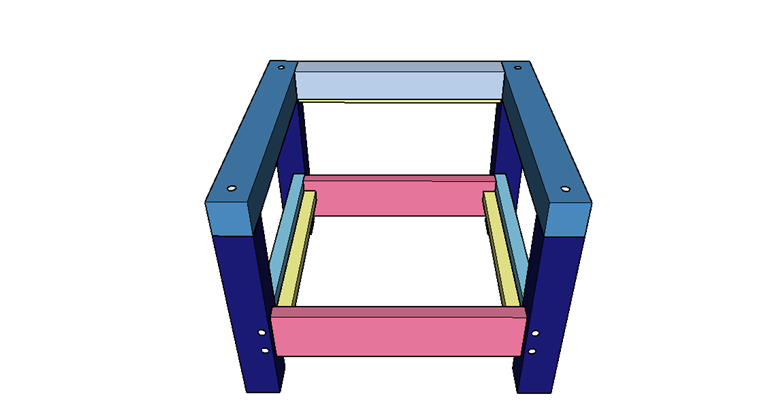
Use wood glue and 2 ½" screws to attach the 2x2 cleats to the inside of the frame. Position them so the seat slats sit flush with the top of the 2x6 frame boards.
Step 5.
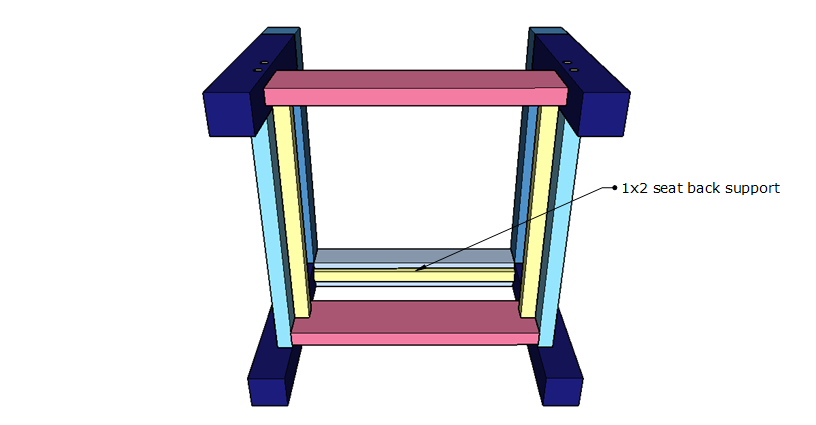
Use wood glue and 2" screws to attach the 1x2 seat back support to the bottom of the back arm. Place it ⅞ back from the front of the 4x4 so the seat back boards sit flush with the 4x4 once they're attached.
Step 6.
Cut the seat back 1x6s to fit. Use wood glue and 2" screws to attach them from the bottom.
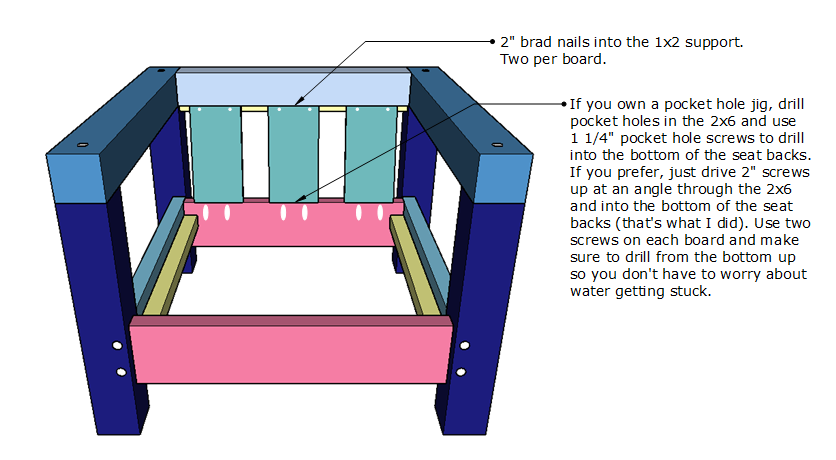
You can use 2" screws to attach them at the top as well, but I just drove a few 2" brad nails through them into the 1x2 support board (from Step 5) so I didn't have to worry about screw holes.
Step 7.
Attach the 2x4 seat slats to the 2x2 cleats with 2" screws. Attach them from the bottom to avoid water getting caught in any screw holes.
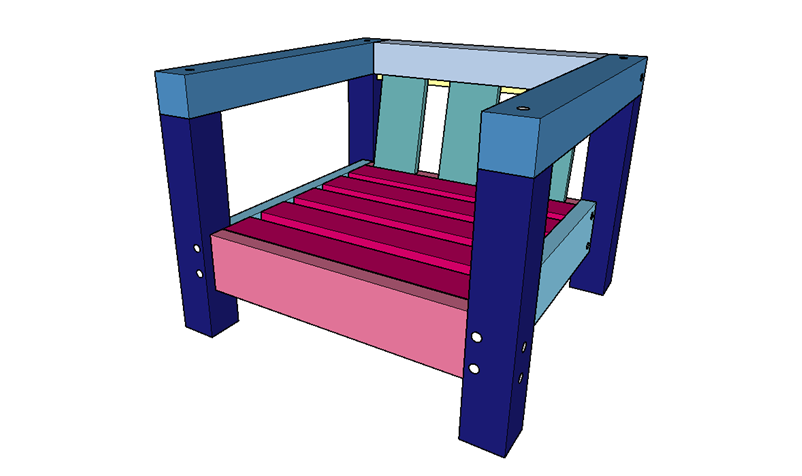
Once everything is assembled, fill all the large countersunk lag screw holes with ¾" dowels. Use wood glue to secure them. I just bought a long ¾" dowel and used a pull saw (also called a dovetail saw or flush cut saw) to cut them flush to the 4x4s.
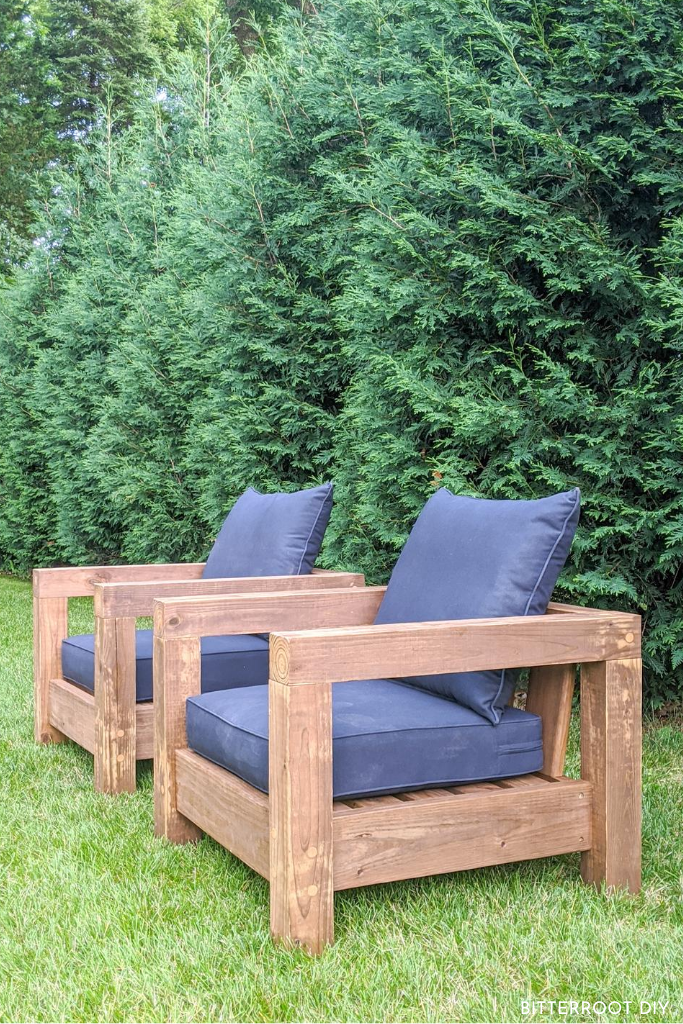
Sand everything smooth and seal with an exterior finish. Again, I used Cabot Australian Timber Oil in Natural.
I designed these outdoor patio chairs to fit standard 24 x 24 deep seat cushions, so finish them off with your favorite color cushions and you're ready for some patio sittin'! I used these navy blue cushions from Amazon and they're SO COMFY.
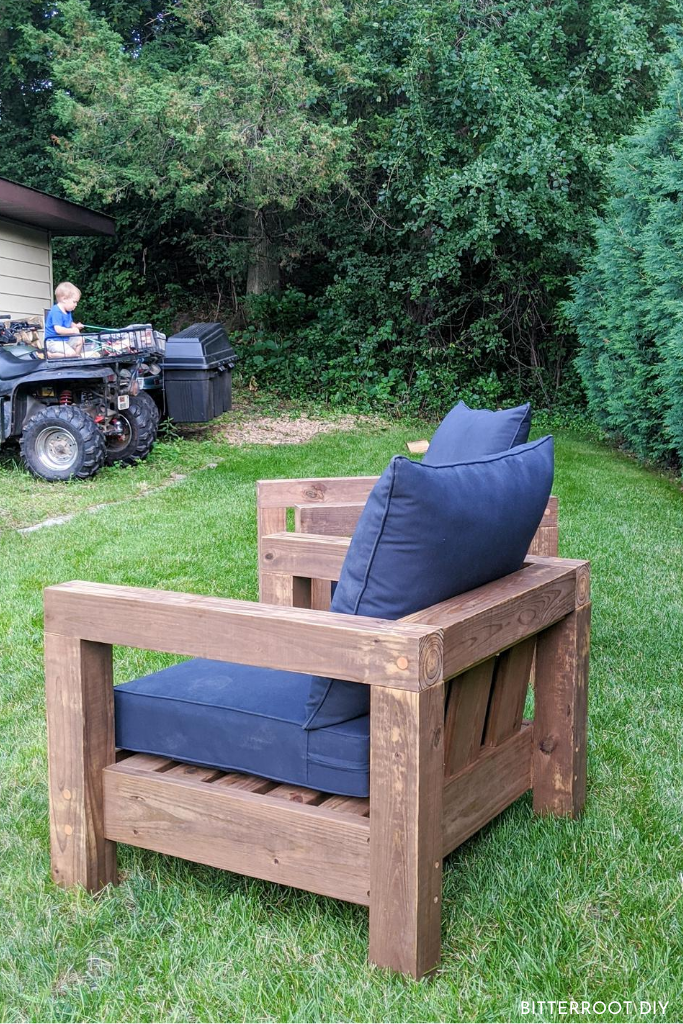
Please let me know if you have any questions and I'll get back to you as soon as possible.

Thanks for stopping by!
For more project ideas, you can find me on Pinterest. And to stay up to date with the latest shenanigans, follow me on Instagram.
Muy bonito amigo, le saludo desde ecuador.