
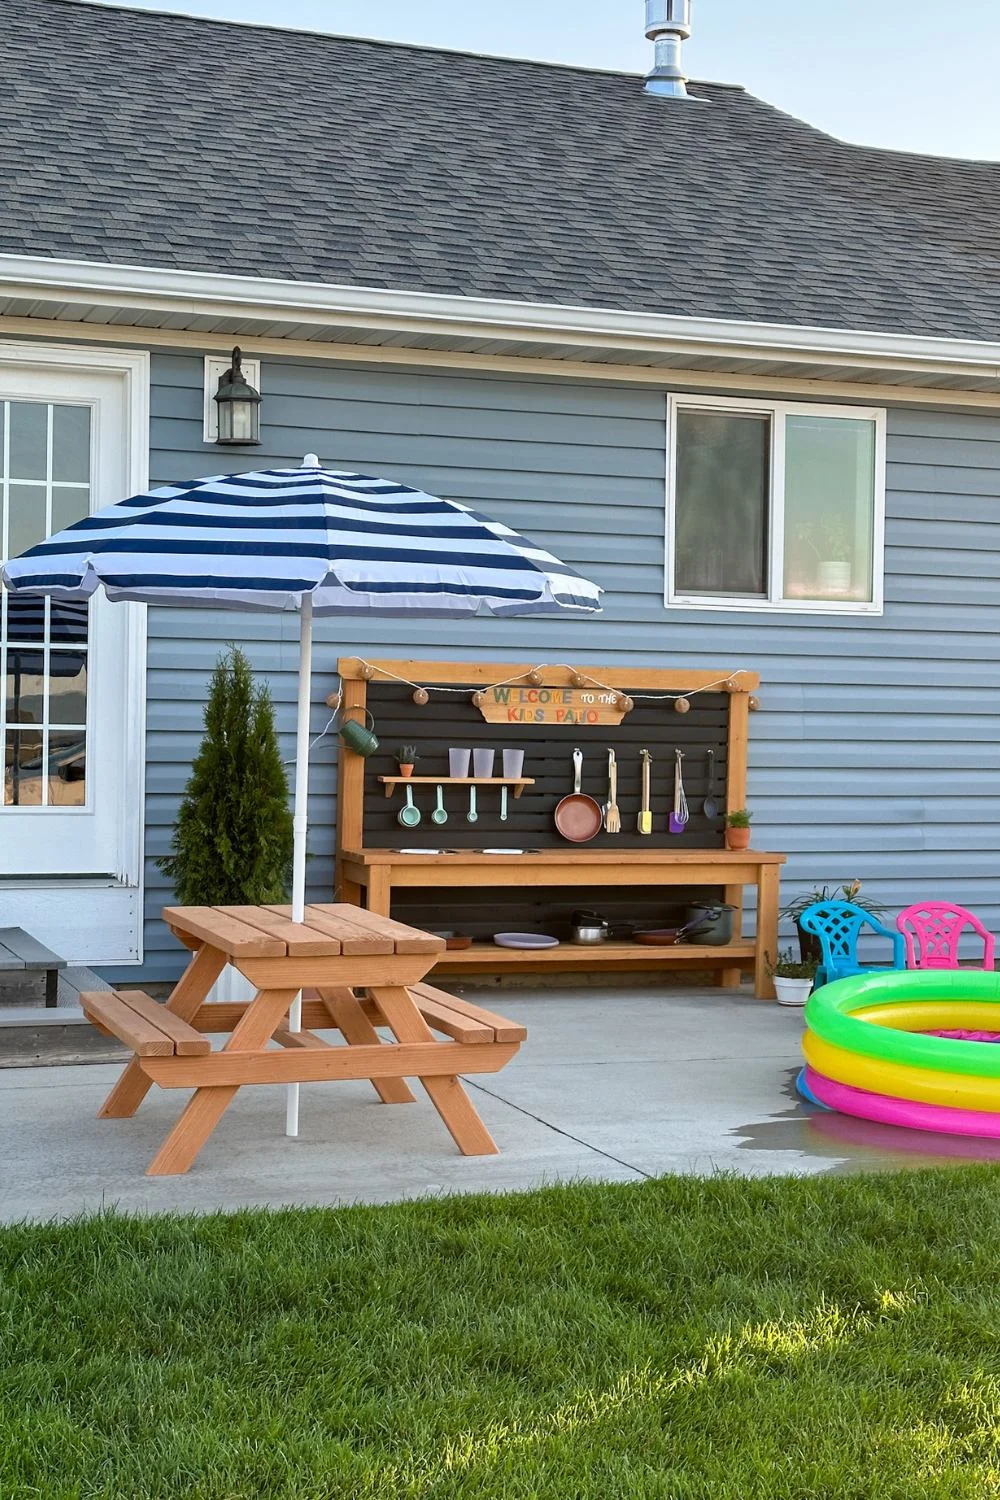
Create a special space for your little ones and make outdoor memories that last a lifetime with this DIY Kids Picnic Table!
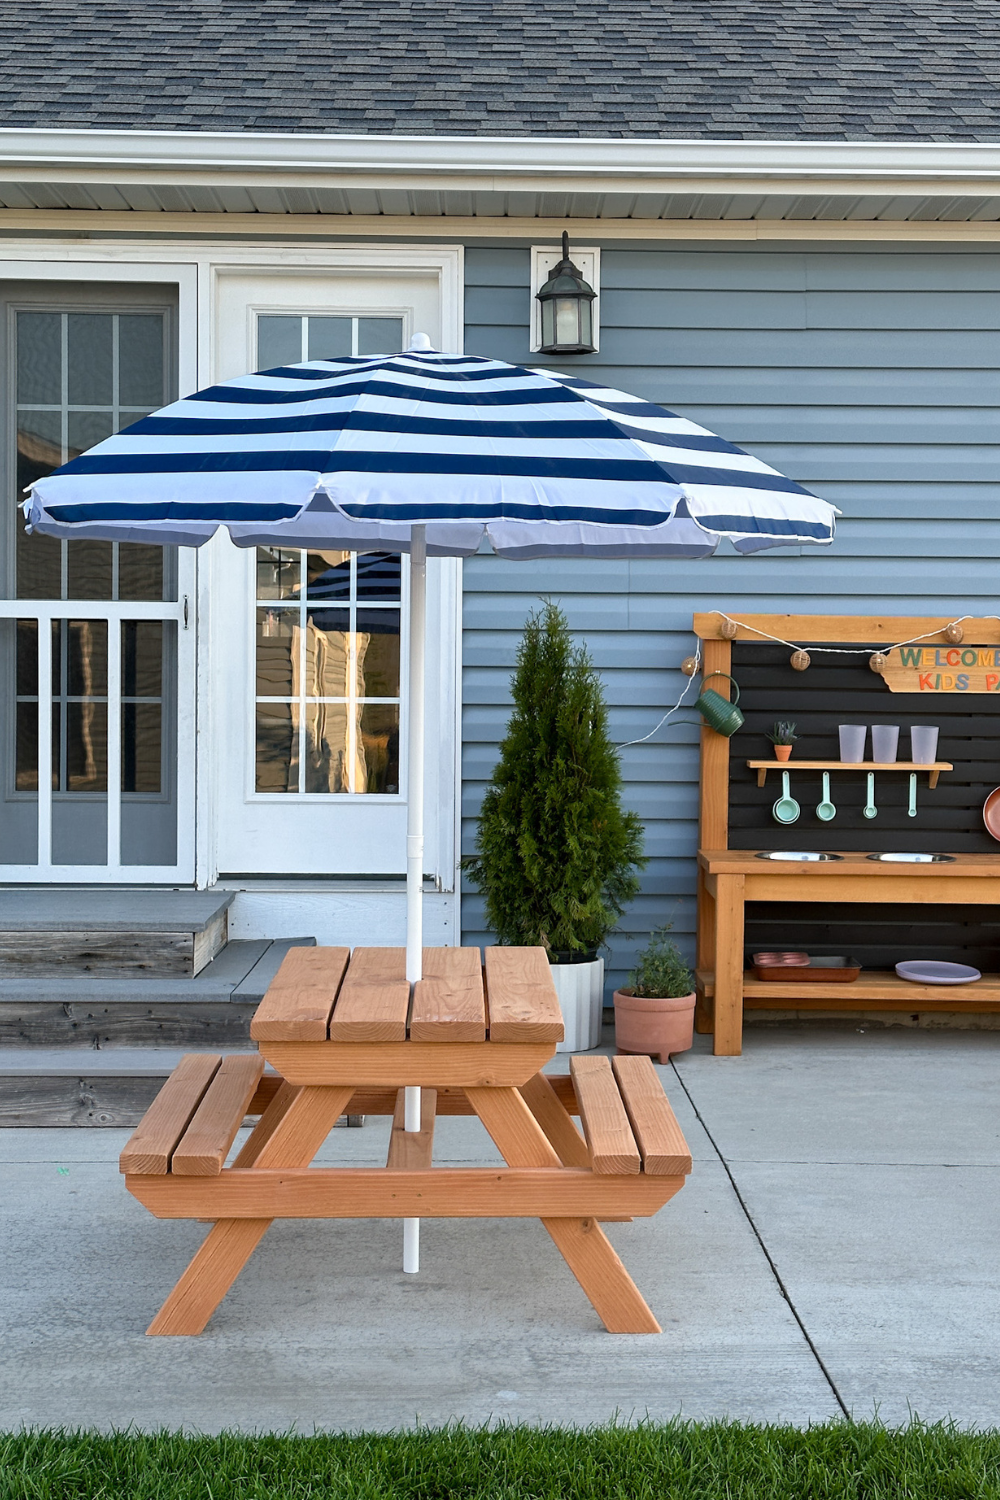

This summer the kids special requested a new picnic table. I built one for them a couple years ago, but we had to leave it behind when we moved from Minnesota (couldn’t fit it in the moving truck). Our oldest has been missing it ever since, so it was time to build a new one! Of course, as per usual with any project, it escalated into a whole kids patio area! Last week I shared the plans to build your own DIY Kids Mud Kitchen (grab the tutorial and plans here), and today I’ve got the Kids Picnic Table plans for you.
The original kids picnic table was pretty small to fit little kids. It was perfect for ages 2-3. I adjusted the dimensions on this one to be a little bit bigger, more toddler and kid size. I’d say it’s great for ages 4-8 ish. All three kids can sit at it comfortably (you could fit four toddlers – two on each side). Our youngest (2 yo) fits at it as well but his feet don’t touch the ground. But it’ll be great for them to all grow into!
And the plans for this toddler size picnic table are below! The overall dimensions are approximately 36″ long x 41″ wide x 24″ tall.
All sources for the kids’ patio area are linked at the bottom of the post.
If you’re interested in a picnic table for smaller kids, you can find those plans here: DIY Little Kids’ Picnic Table.
- Patio Umbrella
- Thomson’s Water Seal in Desert Tan Semi-Transparent (can also get it at Lowes)
- Jigsaw
- 1 1/4″ Spade Bit or Hole Saw (or can use a jigsaw)
- Miter Saw
- Orbital Sander
- Drill
- Tape Measure
- Wood Glue
- 2 1/2″ Exterior Wood Screws
- Pipe Clamps (optional but helpful)
- Level
- Speed Square
- Pencil
- Safety Glasses
- Ear Protection
LUMBER
- 2 x 6 | 2 @ 8′
- 2 x 4 | 6 @ 8′
- 2 x 2 | 1 @ 8′
CUTS
- 2 x 6 | 4 @ 36″ (tabletop)
- 2 x 4 | 4 @ 36″ (seats)
- 2 x 4 | 4 @ 26″ with ends cut at 30° parallel (legs)
- 2 x 4 | 2 @ 22 1/2″ with corners on the ends cut off at 45° to soften the exposed edges (tabletop stringers)
- 2 x 4 | 2 @ 41″ with corners on the ends cut off at 45° to soften the exposed edges (seat stringers)
- 2 x 4 | 1 @ 31″ (bottom support)
- 2 x 2 | 2 @ 22 1/2″ with corners on the ends cut off at 45° to soften the exposed edges (tabletop supports)
- 2 x 2 | 4 @ 6 1/2″ with corners on the ends cut off at 45° to soften the exposed edges (seat supports)
** you can see how I cut the corners off the ends of the stringers and support boards in the photos below. I measured 1″ in from the long edge of the board and cut to it at 45° – that gives you a nice soft end with just 1″ left that’s perpendicular to the tabletop and seat.
Step 1.
Start by building the sides of the picnic table.
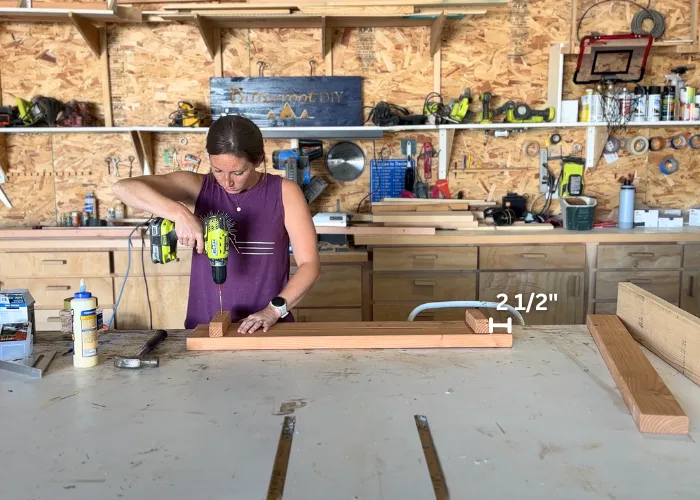
I found it easiest to assemble the sides while they were lying on the workbench. Position the seat stringer so it is 9″ from the ground and 9″ overhang on each side. I cut two scrap pieces of 2×6 to 9″ to use as blocking and and set them up against another scrap 2×6 across the bottom (basically forming a box). The bottom 2×6 imitates the ground to make sure the legs are at the correct angle to sit flat once it’s upright.
Use wood glue and 2 1/2″ screws to attach the seat stringer to the legs.

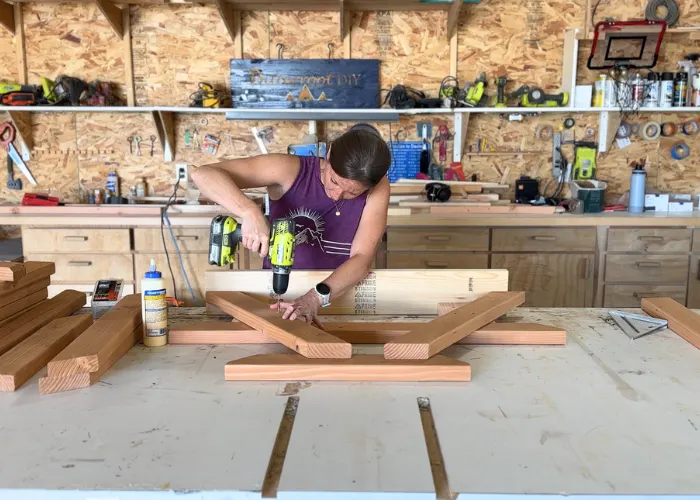
Next, center the tabletop stringer on the legs and flush with the top. Attach with wood glue and 2 1/2″ screws.


Repeat for both sides of the picnic table.


You can see here that one of the legs is a little off along the top of tabletop stringer – I didn’t quite get it lined up perfectly when I attached the seat stringer and it threw it off by about a 1/4″.
It’s fine for a kids picnic table. I erred on the side of keeping things level so the tabletop is flat (just a small gap if you were to ever look underneath the tabletop). But make sure to get those measurements right on so it doesn’t get too whacky – the angles throw things off quickly!
Step 2.
This is an optional part of the design, but a quick and simple way to avoid driving screws through the top of the tabletop boards.
Add another 2×2 support along the inside edge of the legs so you can attach the tabletop boards from the bottom. Center the 2×2 support on the legs and flush with the top of the legs. Use wood glue and 2 1/2″ screws to secure it to the legs.
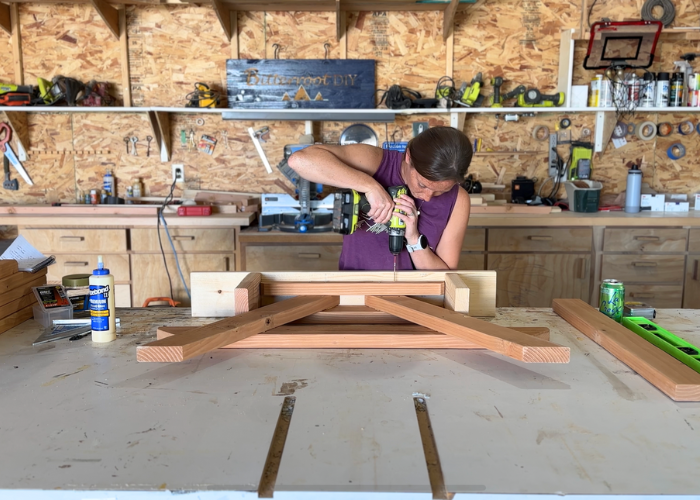

I used those same scrap 2x6s again to make sure everything was lined up flush along the top and sides – avoid measuring and things don’t move around as much when you’re trying to drive the screws!
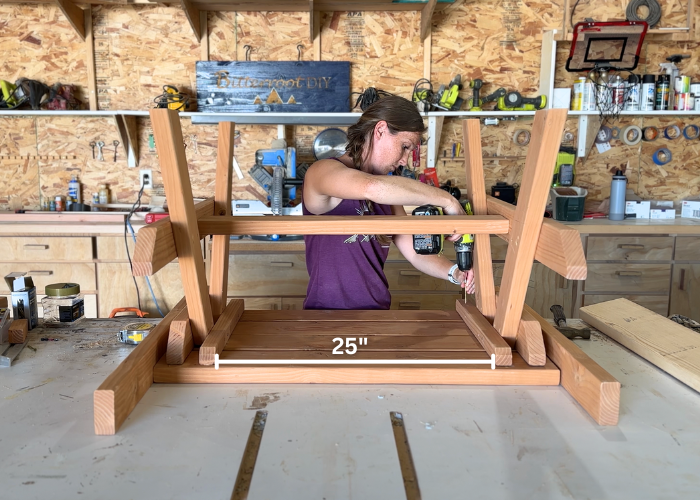
Step 3.
Stand both sides up and attach the bottom 2×4 to bring them together. Center the 2×4 on the seat stringers and secure it with wood glue and 2 1/2″ screws.


There’s the base of your table!
Step 4.
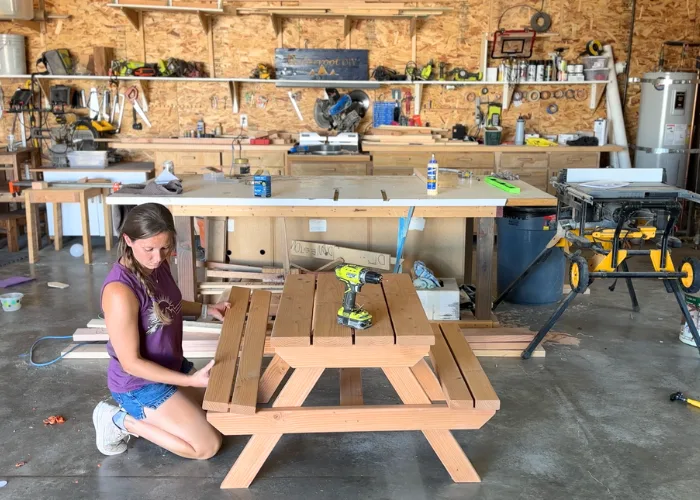
Line the tabletop boards up on your workbench with 1/4″ gap between each board and flat along both ends (scrap board are helpful to get them lined up evenly). Center the base of the picnic table over the tabletop boards and drive 2 1/2 screws through the 2×2 supports into the bottom of the tabletop boards. Use two screws per 2×6.

Step 5.
On to the seats!
Line the 2×4 seat boards up with a 1/2 gap between them and flat along the ends. Center the small 2×2 seat supports on the boards and 2 1/2″ in from the ends. Attach with 2 1/2″ screws – two screws per 2×4.

Step 6.
Set the seats onto the picnic table and secure to the seat stringers with 2 1/2″ screws (drive the screws through the small 2×2 supports into the 2×4 stringers from the inside edge).

Step 7.
If you’d like to add the umbrella, drill a hole through the center of the bottom 2×4 and center of the tabletop with a spade bit or hole saw.
The umbrella I used [HERE] fits a 1 1/4″ hole.


I switched to the jigsaw to cut the hole in the tabletop. There’s a gap in the middle of the tabletop so there isn’t a good place for the spade bit or hole saw to drive into to stay centered. You have a lot more control with a jigsaw in this situation.


Of course the umbrella is optional, but it’s been wonderful to have a little shade in this area! And – bonus – it’s cute!
There were quite a few options for kids picnic tables that come with umbrellas, but there weren’t many options to just buy a small umbrella on it’s own or even replacements for kids picnic table umbrellas. But I found this smaller one on Amazon [HERE]. It was a little tall, so I used a hacksaw to cut 6″ off the bottom of the post and now it’s perfect!


We put it down if it’s windy or stormy, and so far so good. I went back and forth on whether to add it or not, and I’m so glad I did.
It makes all the picnics out here so much more enjoyable in the summer heat!

Please let me know if you have any questions and I’ll get back to you as soon as possible!
SOURCES
- Patio Umbrella
- Outdoor Mini Globe Lights
- Metal Mixing Bowls
- Measuring Cups
- Plastic Tumblers
- Plastic Plates
- Spatulas
- Small Watering Can is Hobby Lobby
- Pots & Pans from thrift store

This post contains affiliate links. If you make a purchase from one of the links, I may make a small commission at NO EXTRA COST to you. Thank you for your support! See my full disclosure here.
| Tylynn |