
Plans and tutorial to build the ultimate kids outdoor mud kitchen. Inspire your kids’ creativity and keep them entertained for hours on end!


We’ve rearranged and switched furniture around so many times on this back patio. It’s kinda been the catch-all patio. We’ve had a little bistro set here, a wicker conversation set, the smoker, the kids’ pool … you name it. The other patio (to the left) is covered with a pergola, so we typically patio-sit over there, which leaves this patio open a lot of the time. And it hasn’t ever felt quite right. We definitely haven’t been using it to it’s fullest potential.
So when the kids requested a picnic table this summer, I knew exactly where to go! Things kind of escalated, as you can see. We ended up with an entire kids’ patio space 😅. They have been LOVING it! No ragrets … (if that reference doesn’t make sense, just pretend it never happened haha). There have already been countless meals and tea parties. I’m pretty sure my heart melted seeing how excited they were to play with the mud kitchen for the first time. What a joy to be able to build this for them.
Today I have the mud kitchen plans for you (picnic table plans coming soon). You can find the full YouTube video here: Building a Kids Mud Kitchen.
All sources are linked at the bottom of the post.
Happy building!
- Kreg Pocket Hole Jig (there are a lot of models, depending on your budget)
- Miter Saw
- Orbital Sander
- Drill
- Brad Nailer
- Tape Measure
- Wood Glue
- 2 1/2″ Pocket Hole Screws
- 1 1/4″ Brad Nails
- Pipe Clamps (optional)
- Level
- Speed Square
- Pencil
- Safety Glasses
- Ear Protection
- Thomson’s Water Seal in Desert Tan Semi-Transparent (can also get at Lowes)
- Behr Solid Color Exterior Wood Stain & Sealer in Slate
LUMBER
- 1 | 4 x 4 @ 10′
- 1 | 2 x 6 @ 8′
- 11 | 2 x 4 @ 8′
- 3 | 2 x 2 @ 6′
- 1 | 1 x 4 @ 8′
- 16 | 1 x 3 @ 6′ (use 1×3 furring strips to save $$)
- 2 | 1 x 2 @ 6′ (can also use furring strips here)
CUTS
- 2 | 4 x 4 @ 4′ 6″ (wall)
- 1 | 2 x 6 @ 6′ 1″ (bottom shelf)
- 6 | 2 x 4 @ 6′ 1″ (tabletop and bottom shelf)
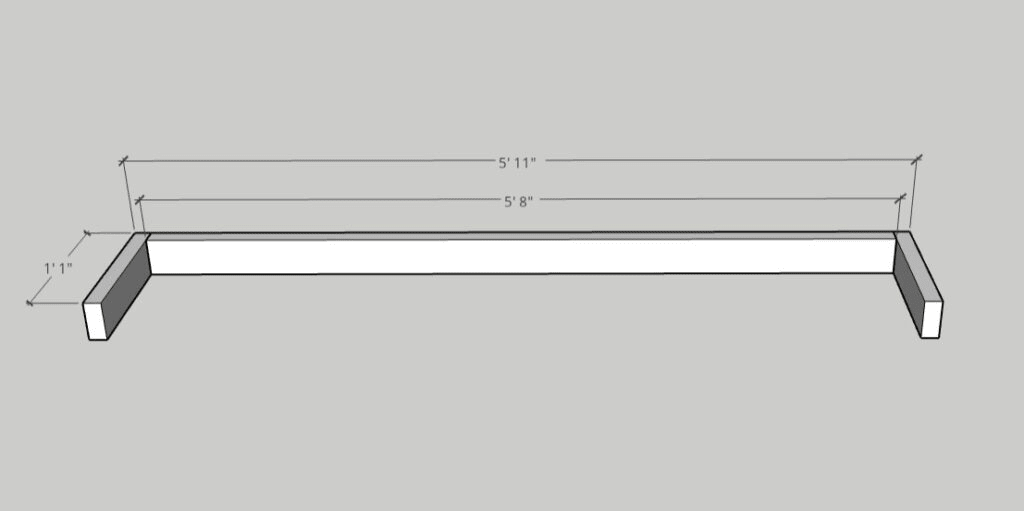
- 3 | 2 x 4 @ 5′ 8″ (frame)
- 4 | 2 x 4 @ 13″ (frame)
- 2 | 2 x 4 @ 22 1/2″ (legs)
- 2 | 2 x 2 @ 5′ 4″ (back wall frame)
- 1 | 2 x 2 @ 3′ 11 1/2″ (back wall frame)
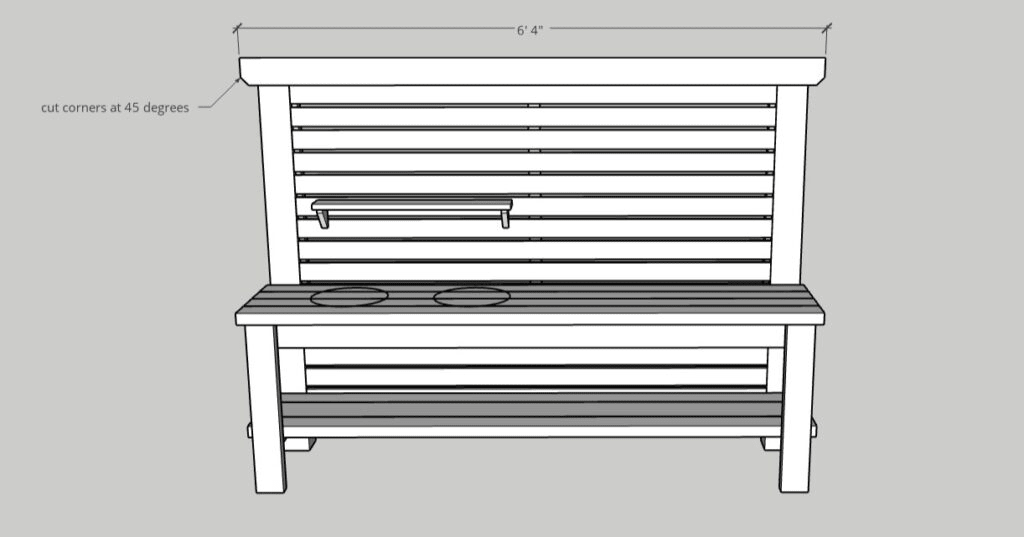
- 1 | 1 x 4 @ 6′ 4″ (back wall top trim) cut corners off for softer edge (see diagram in step)
- 16 | 1 x 3 @ 5′ 4″ (back wall)
- 2 | 1 x 2 @ 3′ 11 1/2″ (cleats for back wall slats)
Step 1.
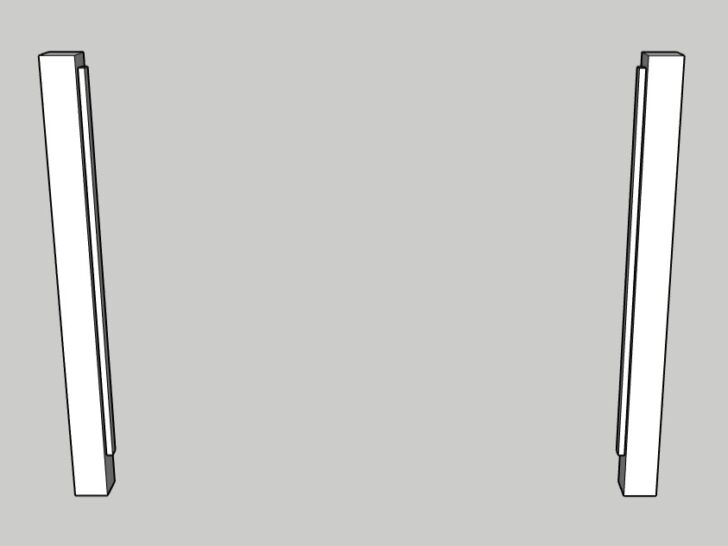
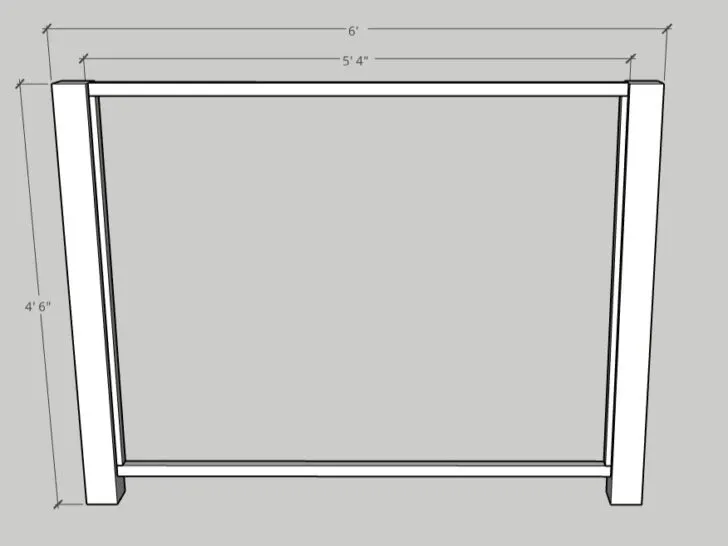
Use wood glue and brad nails to attach the 1×2 cleat to the 4×4 legs. Position it as shown below – make sure to leave enough room (1 1/2″ as shown) to attach a 2×2 along the top.

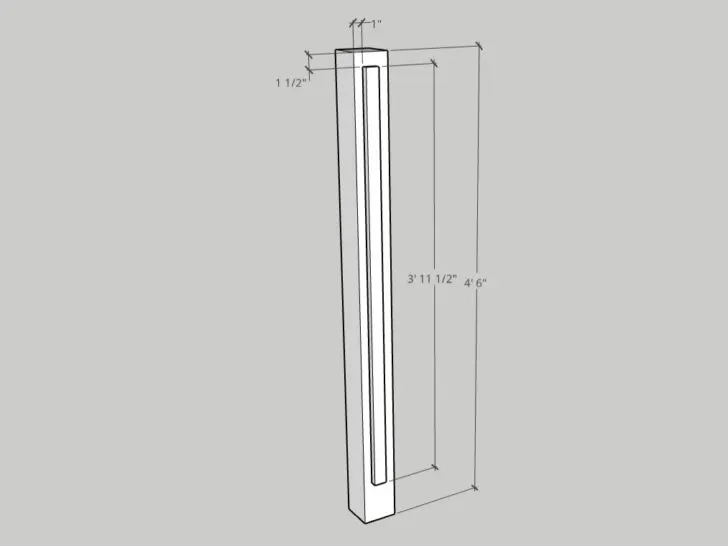
Repeat for the other side.
Step 2.
Join the two sides together with 2x2s on the top and bottom. Use wood glue and 2 1/2″ pocket hole screws. Place pocket holes along the back of the 2x2s to best hide them.
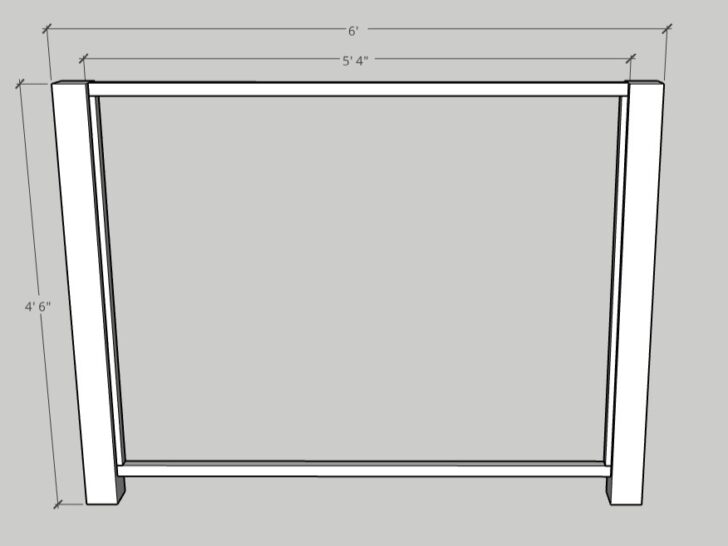
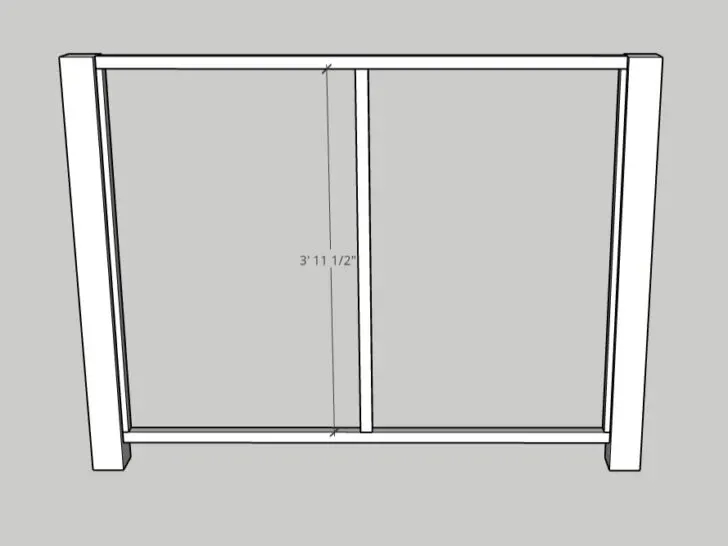
Step 3.
Add the center 2×2 brace along the back. Again, use wood glue and put 2 1/2″ pocket hole screws along the back to hide them.

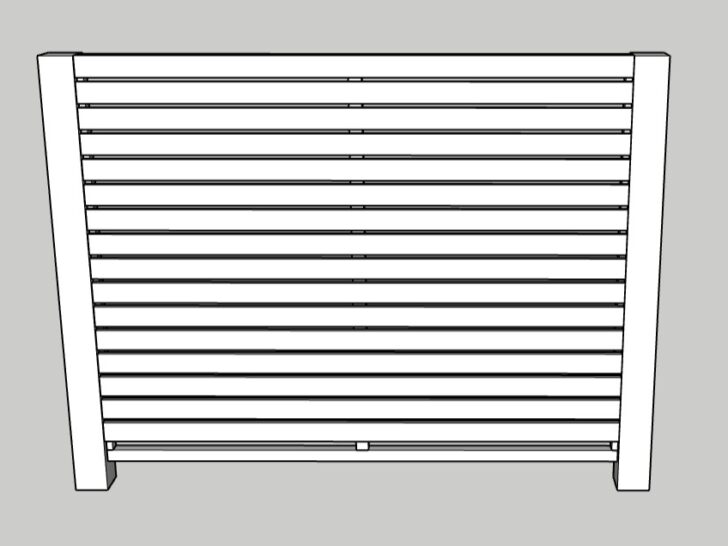
Step 4.
Finish the wall off with the 1×3 slats. Space them 1/2″ apart and use wood glue and brad nails to attach them to the 1×2 cleats on the legs.

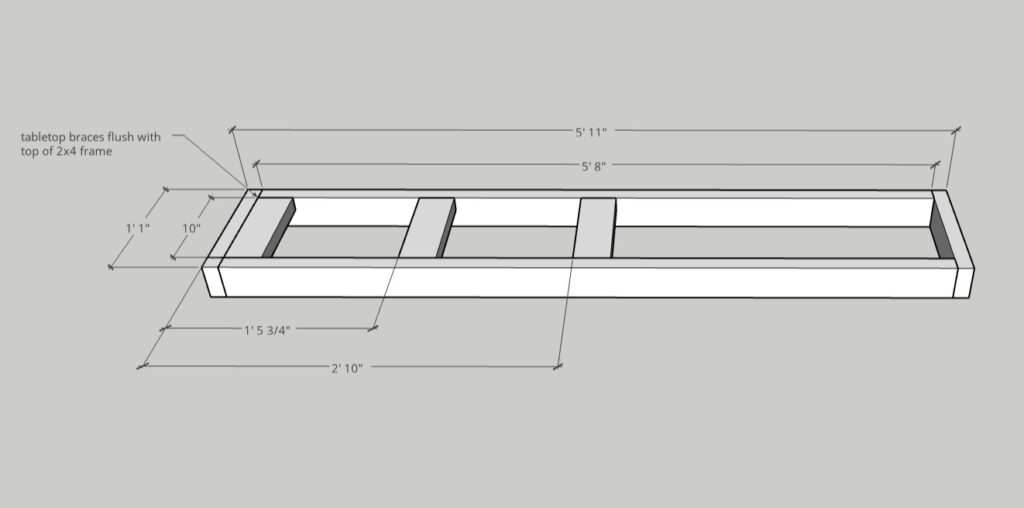
Step 5.
Assemble the frame for the tabletop. Use wood glue and two 2 1/2″ screws through the ends of each board to build the outer frame. Then use wood glue and 2 1/2″ pocket hole screws to add the inside supports (these will support the tabletop once you cut out the sections for the metal mixing bowls). Line the 2x4s up flush with the top of the outer framing and put the pocket holes on the bottom to hide them. You could also just drive the screws at an angle (toenail) if you don’t want to worry about pocket holes.

Step 6.
Assemble the bottom shelf frame the same as above – wood glue and two 2 1/2″ screws through either end.

Step 7.
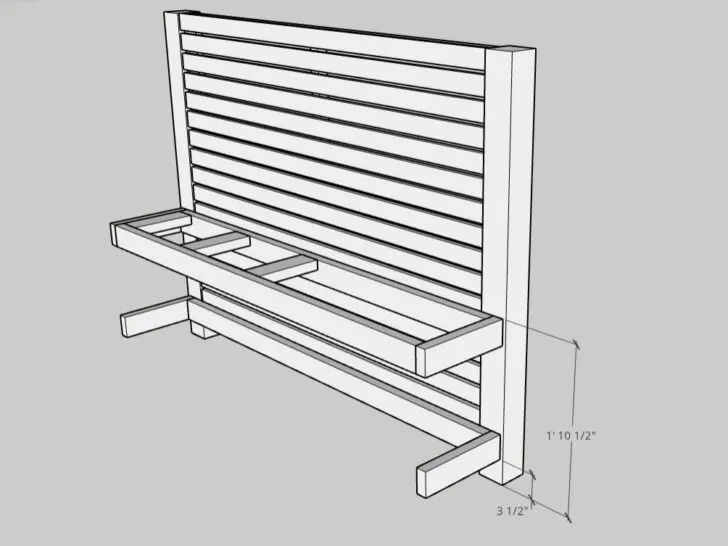
Center the bottom shelf frame and tabletop frame over the wall and attach them with wood glue and 2 1/2″ screws. Use two screws on each side. When the framing is centered, there should be a 1/2″ gap on either side.
I found it easiest to lay the back wall down and do this step on the floor.

Step 8.
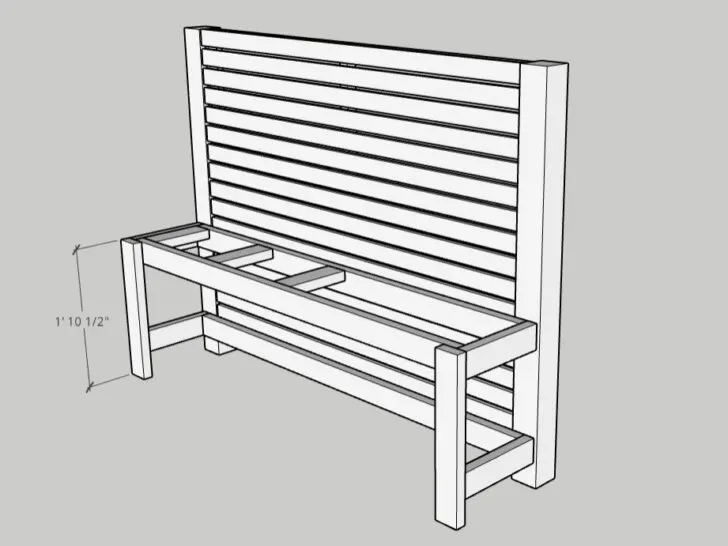
Line the legs up flush with the outside edge of the framing and secure to the frame with wood glue and 2 1/2″ screws.
It’s starting to look like a mud kitchen!

Step 9.
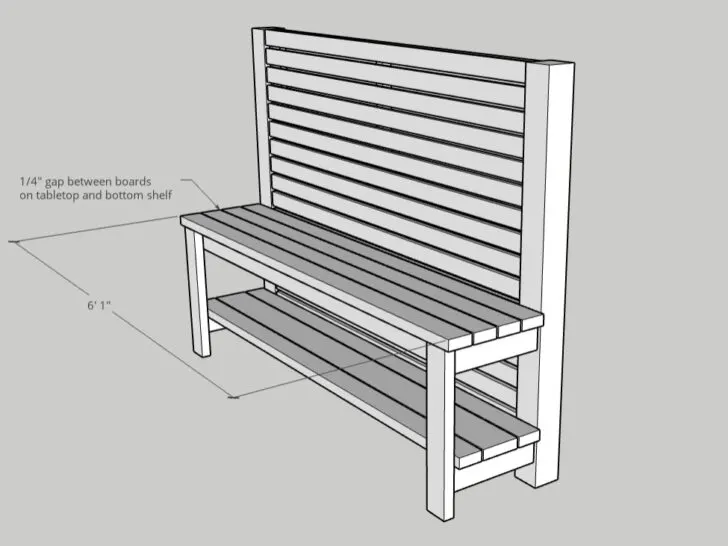
Add your table top and bottom shelf boards. You guessed it – wood glue and 2 1/2″ screws into the side framing.
Start with the top shelf. Once you’ve attached the boards on both ends, add 2 1/2″ screws through the bottom of those extra support 2x4s and into the bottom of the table top boards. These will support the boards now once you cut the holes out for the metal mixing bowls (see the YouTube video if that’s confusing – I tried to explain it as best as I could).
Once the tabletop boards are secured on both ends and to the extra supports, put the bottom shelf in. It’s just easier to save it for last since you have to attach some of the tabletop from underneath.

Step 10.
Cut the holes out for the mixing bowls. CUT TO FIT. Mixing bowls vary, so make sure to cut them to fit the bowls you have. You want to cut them to fit the inside dimension at the top so the lip will overhang the tabletop and the bowl doesn’t just fall right through. The dimensions shown are to the center of your circle. Adjust the diameter as necessary.
They’re a little bit farther back than center to account for the frame along the front. The tabletop isn’t exactly centered on the framing because of the back wall and you don’t want to run into that … ask me how I know haha. Jk – don’t ask 😉


Step 11.
I put the little shelf together with some scrap 1×4 that I had, but you can customize it however you think is best for your kiddos. I just cut corbels out of the 1×4 as well – cut at 45 degrees and then cut the corners off for a softer look.
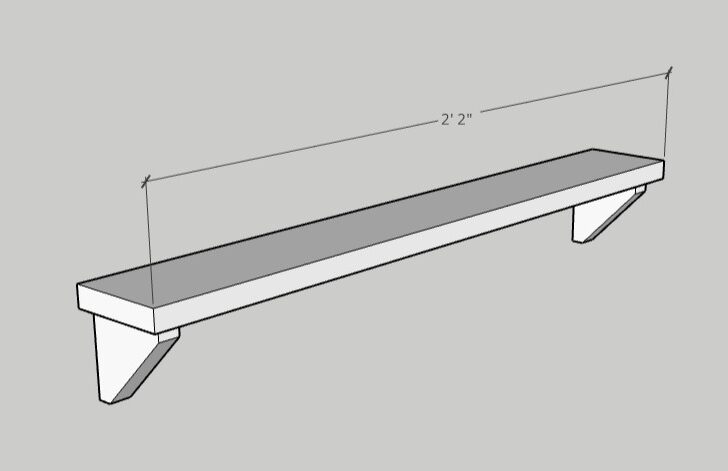

Step 12.
I attached the shelf to the back wall with a couple screws through the back of the slats and into the corbels. Keeping it simple! Just line it up with the top of the slat that somewhere around 11″ up from the tabletop. That seems to be a good height for the kids!
I finished it up with a 1×4 trim board across the top. Cut it to 6′ 4″ and then measure 1″ from the bottom edge and cut those bottom corners off at 45 degrees. I attached it to the frame, 1/2″ above the tops of the 4x4s, with wood glue and 1 1/2″ screws (or whatever length you have on hand that will work).

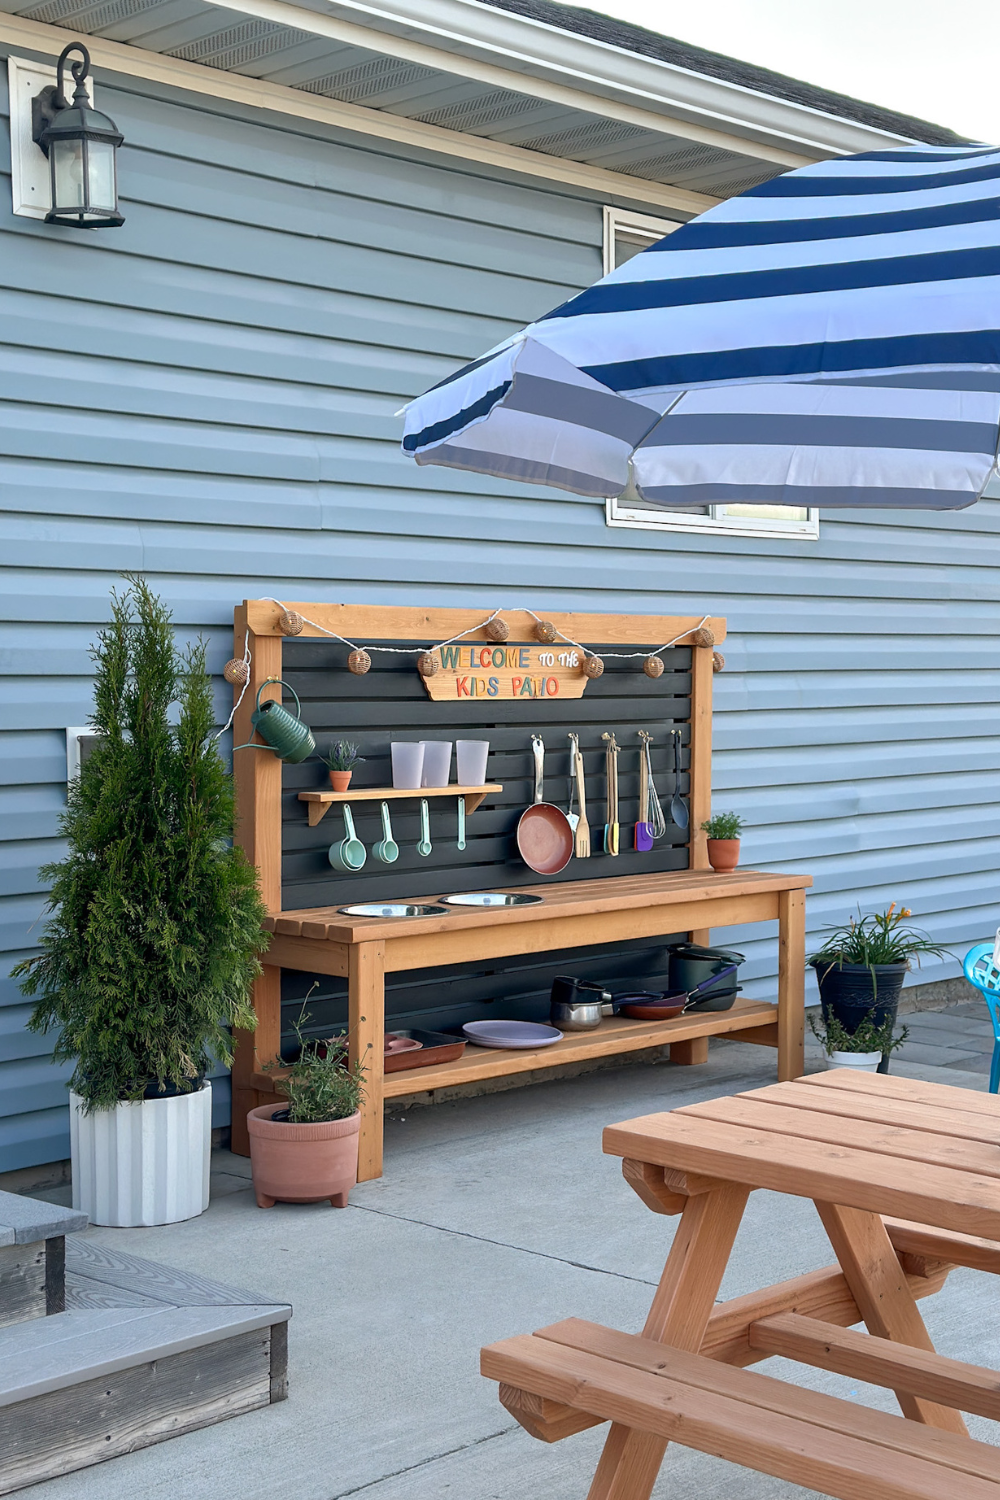
The Fun Stuff
Last, but certainly not least, the fun stuff!
I put together a little custom sign with a cedar board and wood letters from Hobby Lobby (you could easily cut one out if you have extra boards around). I painted the letters with some acrylic paint I had on hand, glued them to the cedar plank with some Gorilla super glue, and then sealed it all with an outdoor spar urethane.


Then I added few gold cup hooks along the bottom of the shelf and across the wall for all the kitchen gadgets and goodies and globe some string lights.
All the pots, pans, baking sheets, muffin tins, and pots were thrift finds – perfect an outdoor mud kitchen! I grabbed a handful of budget friendly server ware and utensils from Target. And voila!

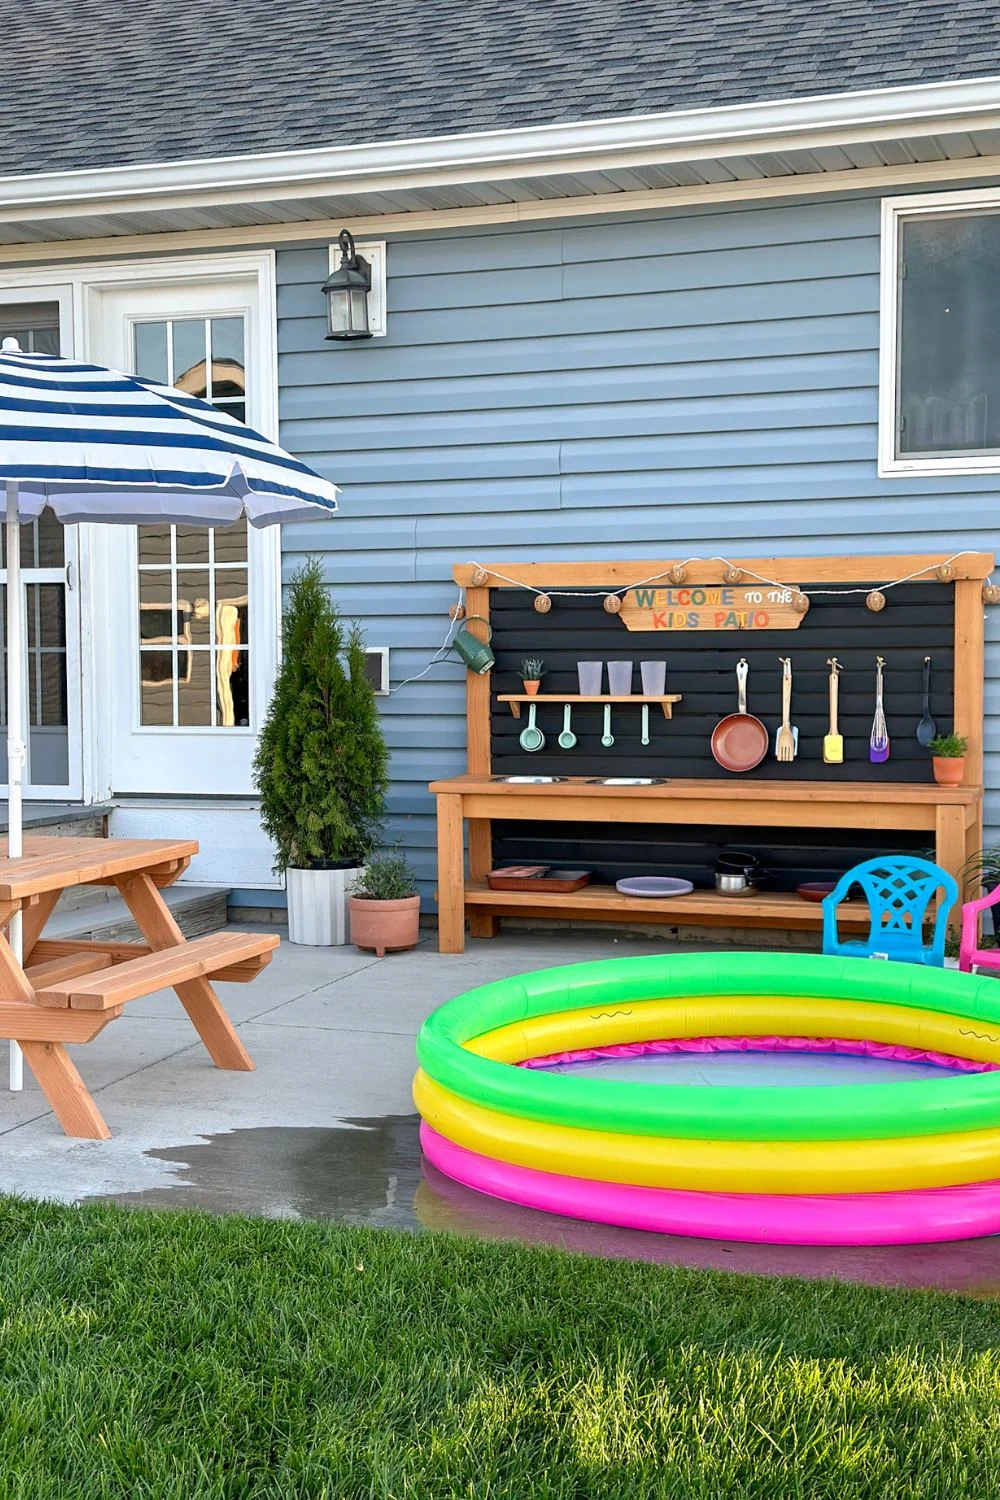
Endless entertainment!
And a great use of this patio space!


SOURCES
- Outdoor Mini Globe Lights
- Metal Mixing Bowls
- Measuring Cups
- Plastic Tumblers
- Plastic Plates
- Spatulas
- Small Watering Can is Hobby Lobby
- Patio Umbrella

Please let me know if you have any questions and I’ll get back to you as soon as possible.
| Tylynn |

This post contains affiliate links. If you make a purchase from one of the links, I may make a small commission at NO EXTRA COST to you. Thank you for your support! See my full disclosure here.