
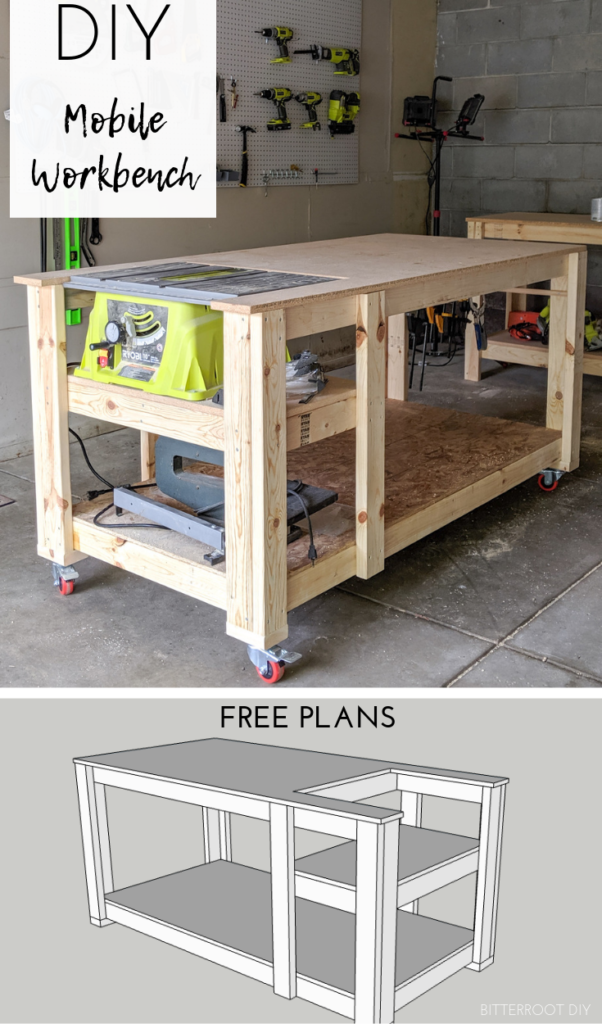
Build a DIY mobile workbench with space for a table saw with these step-by-step plans.
This post may contain affiliate links. If you make a purchase from one of the links, I may make a small commission at NO EXTRA COST to you. This helps keep the tutorials and plans free here at Terrace Place. Thank you for your support! See my full disclosure here.
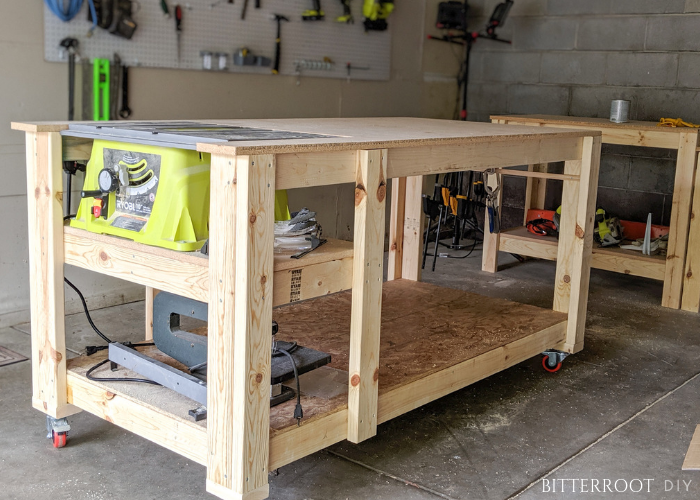
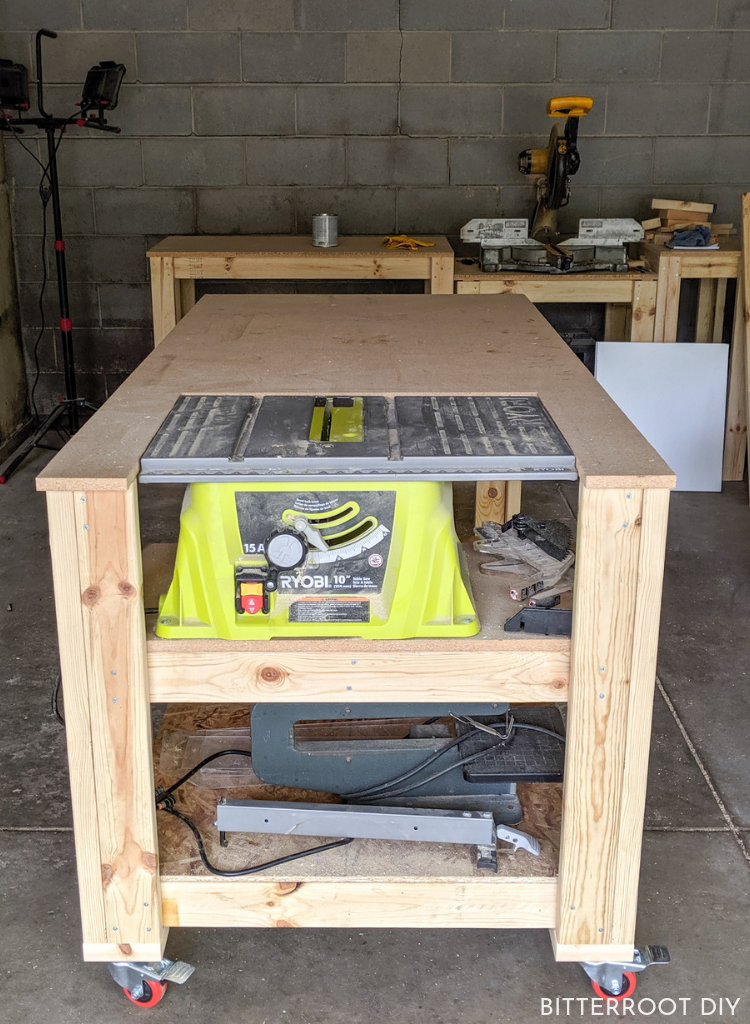
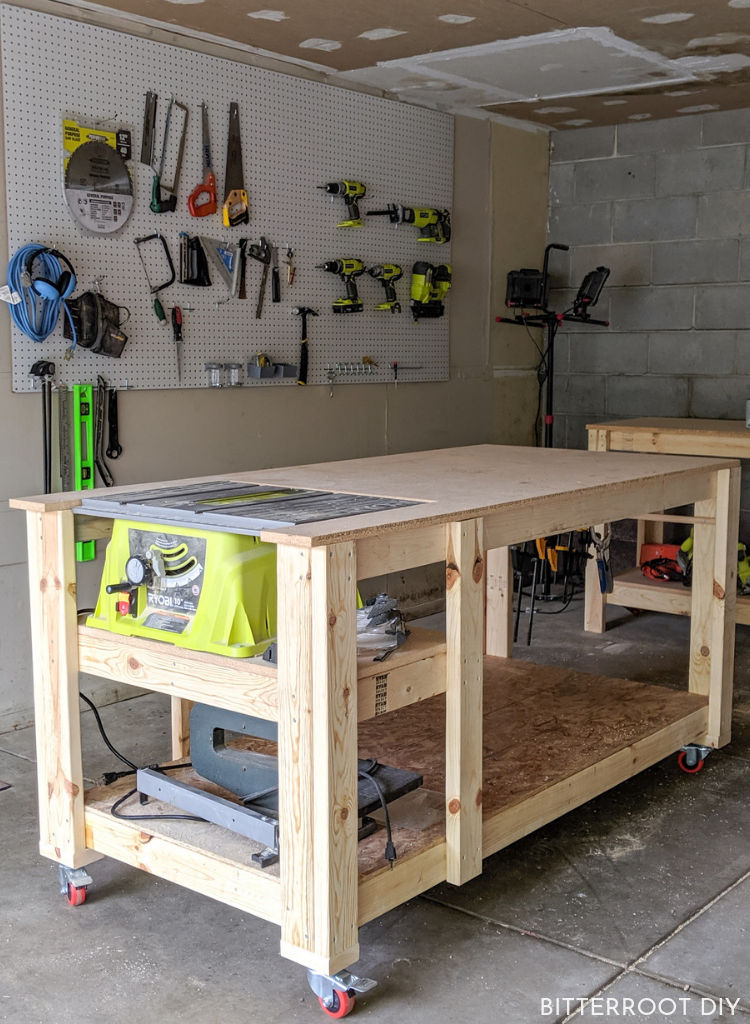
I've been working on getting my shop in order lately and finally built a couple workbenches. In case you missed it, last week I shared the plans for the new miter saw stand. My goal with the shop is to maximize space, but still be able to park the car in there when necessary. The miter saw stand is a permanent workbench at the back of the shop, but I also put together a DIY mobile workbench. It sits against the side wall when not in use (so the car fits), but I can move it anywhere in the shop when I'm working on a project. I built it around the table saw so it works as an out-feed table when I use the saw, but then I can lower the blade and use the whole table top. Win-win!
** UPDATE 9/24/20 - this update is sponsored by MicroJig
This workbench is HANDS-DOWN the most used table in my shop. I use it every day and assemble every. single. project on this thing. There have been so many times I've needed to clamp boards down in the middle of the tabletop, so this week I added some MicroJig dovetail clamps. They're awesome for those situations when your normal clamps can't quite reach far enough. I've already been using them like crazy, so I highly recommend adding them! See Step 11 for all the details.
Tools & Supplies
- Four 3" Locking Casters
- Miter Saw
- Jigsaw
- Circular Saw or Table Saw
- Drill
- Tape Measure
- Clamps
- Level
- Speed Square
- Pencil
- Safety Glasses
- Ear Protection
- 2 ½” Screws
- 1 ¼” Screws
Lumber List
- 10 | 2x4 @ 8' (legs & frame)
- 2 | ¾" Particleboard @ 4'x8' (tabletops & shelves)
Cut List
- 4 | 2x4 @ 5' 9" (long frame)
- 5 | 2x4 @ 2' 6" (short frame)
- 10 | 2x4 @ 2' 7 ½" (legs)
- 2 | 2x4 @ 2' 9" (long shelf frame)
- 4 | 2x4 @ 1' 3 ½" (short shelf frame)
- 4 | 2x4 @ 5" (blocks for casters)
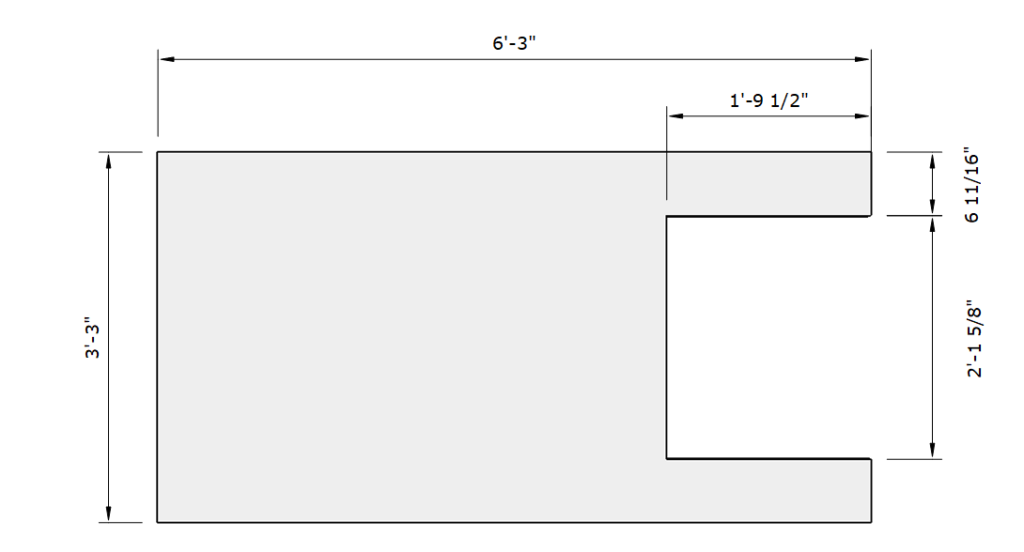
- 1 | ¾" Particleboard @ 3' 3" x 6' 3" (tabletop)
- 1 | ¾" Particleboard @ 2' 9" x 5' 9" (bottom shelf)
If you want to add the MicroJig Dovetail clamps, you also need:
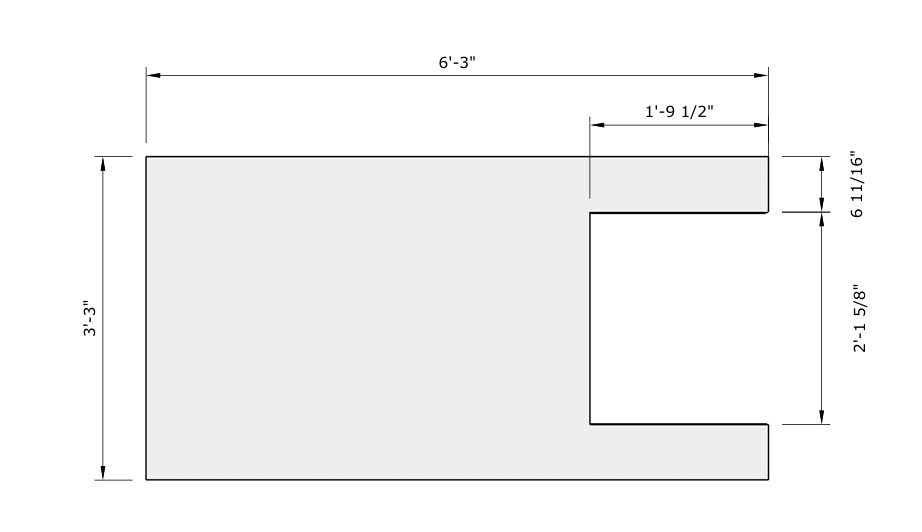
Plywood Cut Diagram for the Tabletop:
Step 1.
Assemble the bottom frame as shown below. Use 2 ½" self tapping screws through the frame to attach the 2x4s.
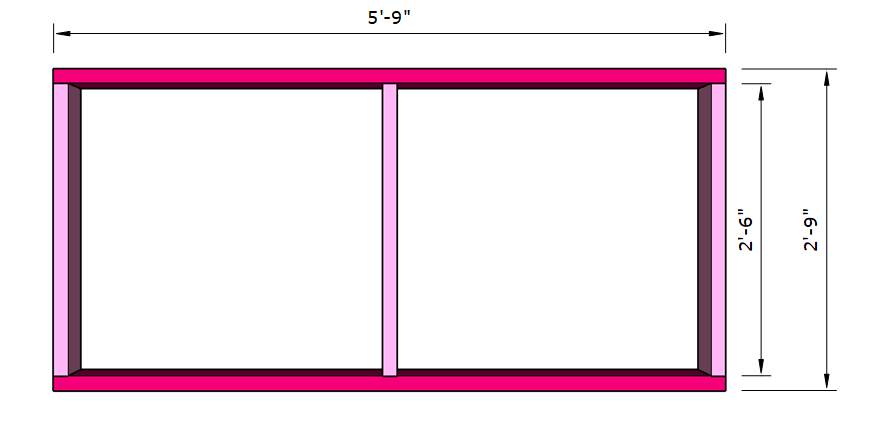
Pocket holes are a great option if you don't want to see the screws from the front of the bench. However, since this is just a workbench, I simply screwed through the frame into the shorter 2x4s.
Step 2.
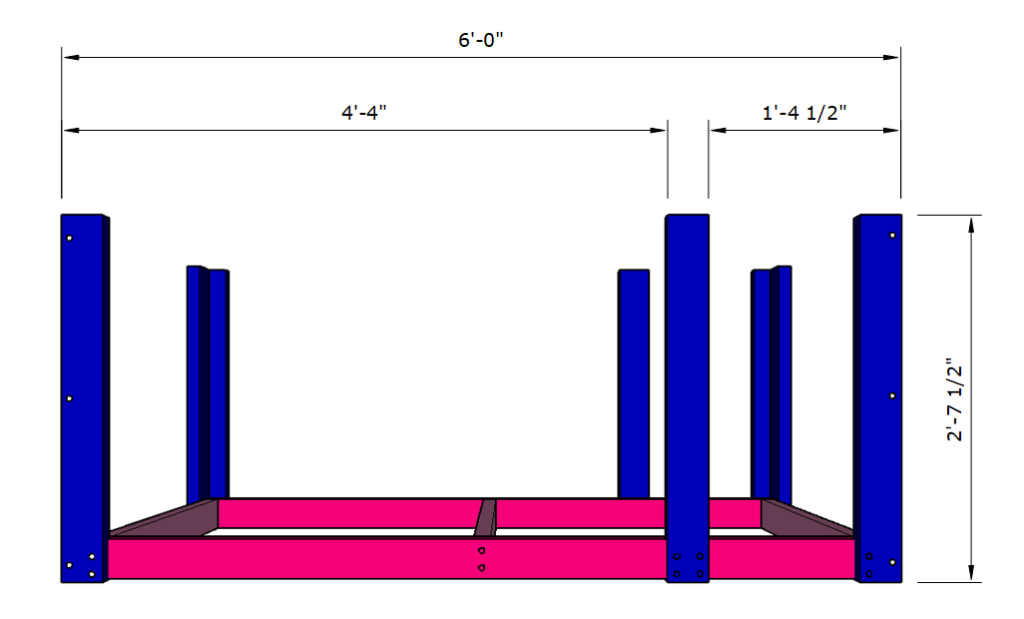
Attach the side legs to the bottom frame with 2 ½" screws. The bottom of the frame should sit flush with the bottom of the legs.
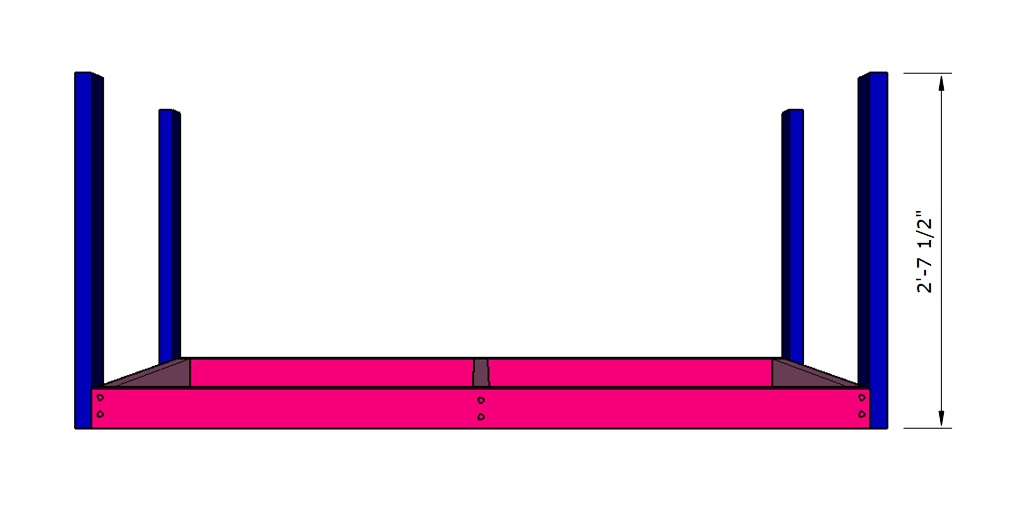
Attach the front and back legs to the frame and side legs with 2 ½″ screws. I attached the side legs to the frame first and then drove a couple screws through the legs into the narrow side of the front and back legs to secure them together. You can see the approximate location of the screws in the diagram below.
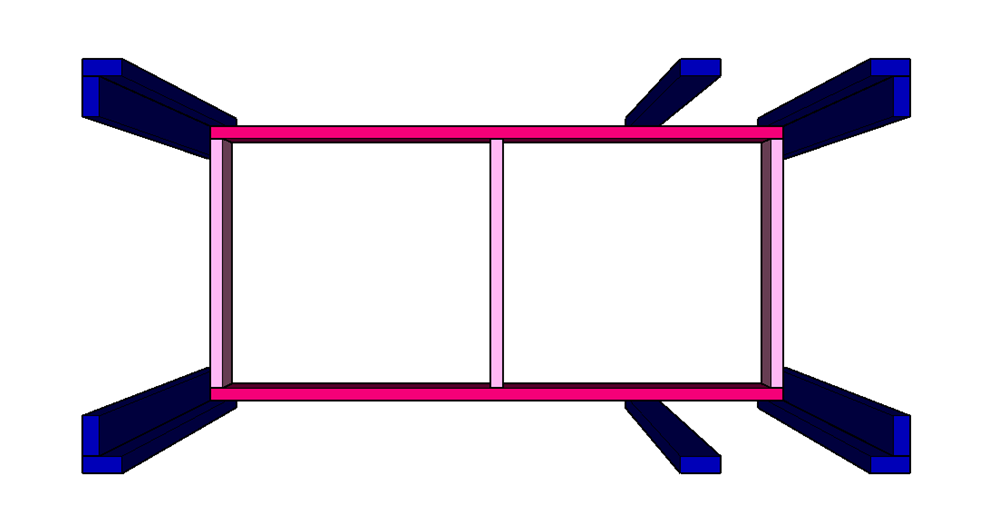
Here's a top view:
Put the bottom shelf in place on the bottom frame and attach with 1 ¼" screws. Countersink the screws so they won't get in the way.
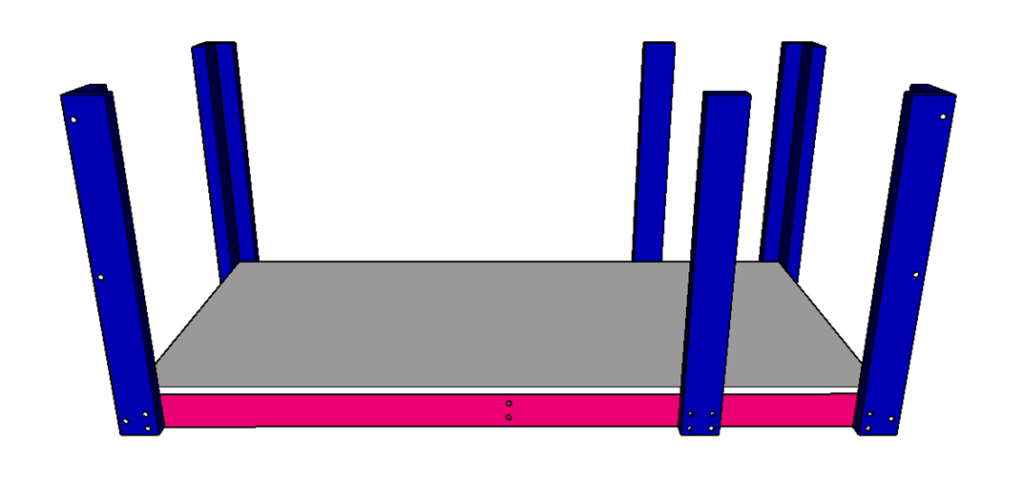
It's very difficult to put the bottom shelf in later (ask me how I know ...), so definitely put it in before attaching the top frame in Step 3.
Step 3.
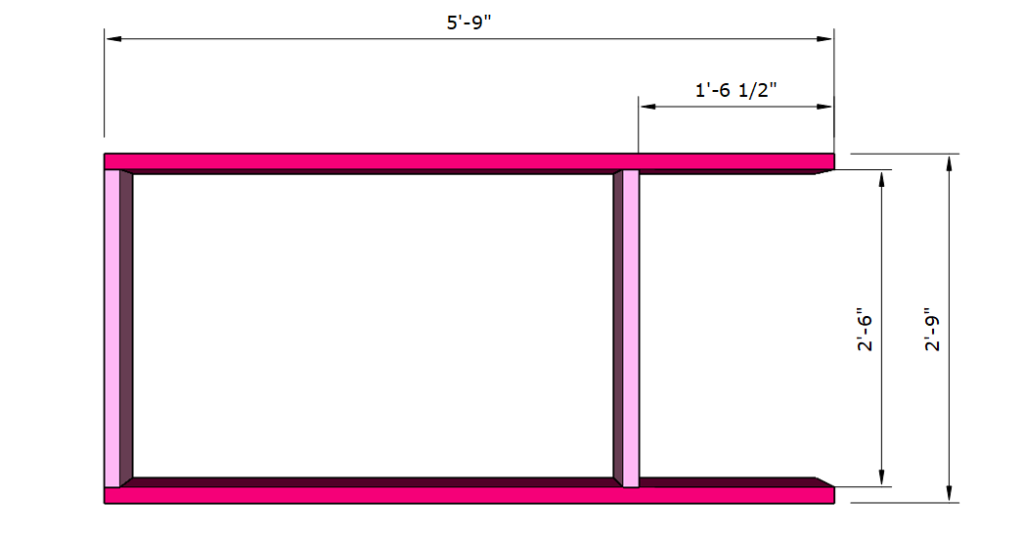
Build the top frame as shown. Use 2 ½" screws to attach the long sides to the supports.
Step 4.
Attach the top frame to the legs with 2 ½" screws.
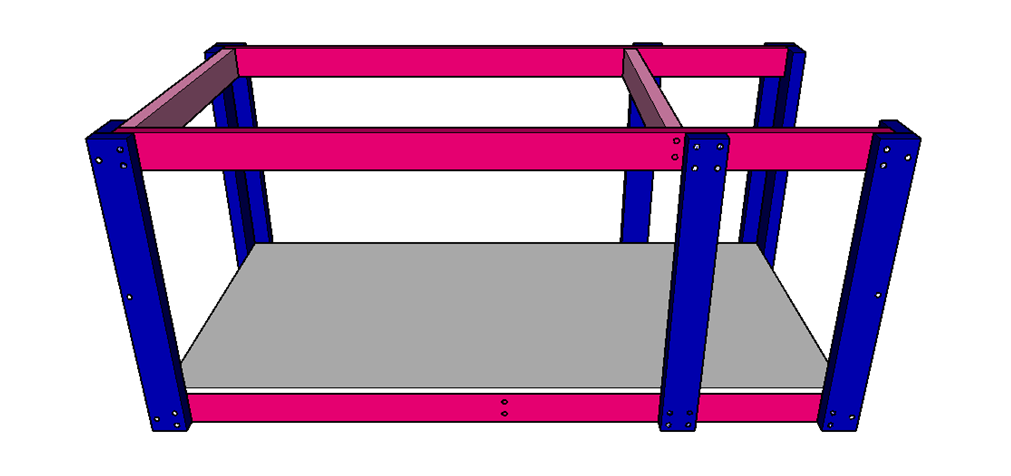
I assembled the frame upside down to get top frame flush with the tops of the legs. Simply flip the bench over, move the new top frame into place, make sure everything is sitting flat on the ground, and attach the legs to the frame. No need to worry about clamping or balancing the top frame in mid-air while you try to attach it!
Step 5.
Assemble the frame for the table saw shelf with 2 ½" screws. Place those two center 2x4 supports wherever necessary to support the base of your table saw.
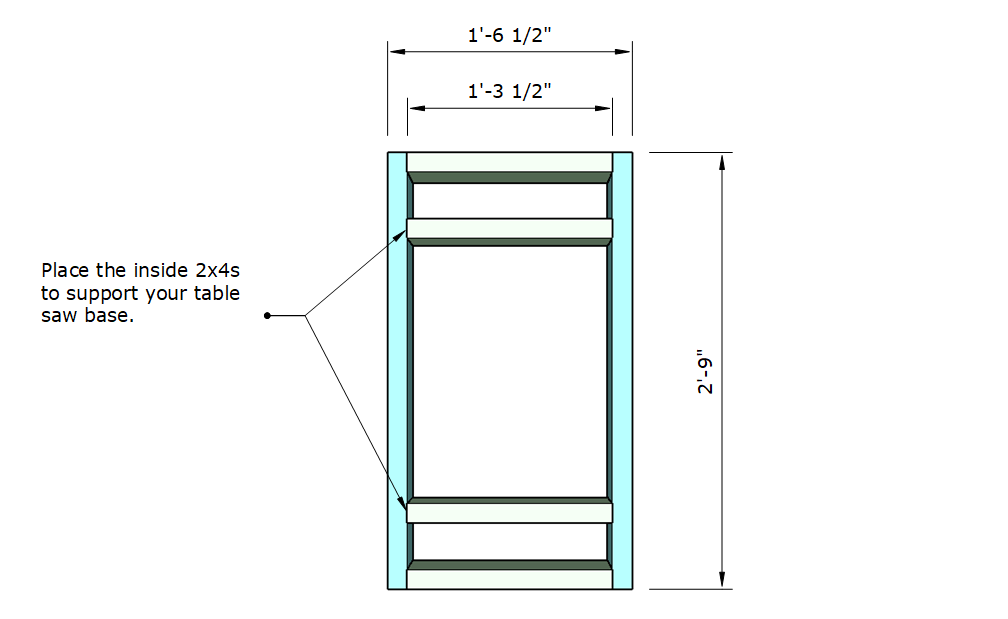
Step 6.
Place the shelf at the appropriate height for your table saw (mine was 11") and attach to the workbench frame with 2 ½" screws.
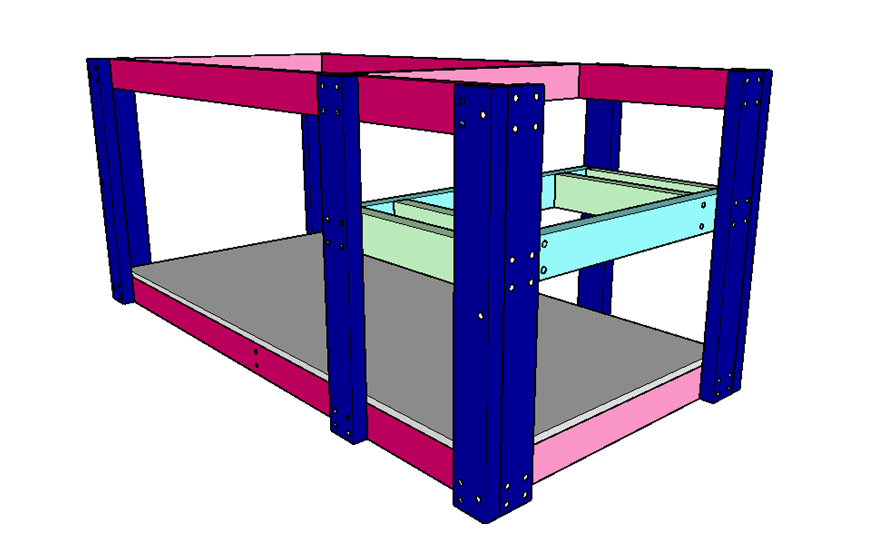
Here's a side view:
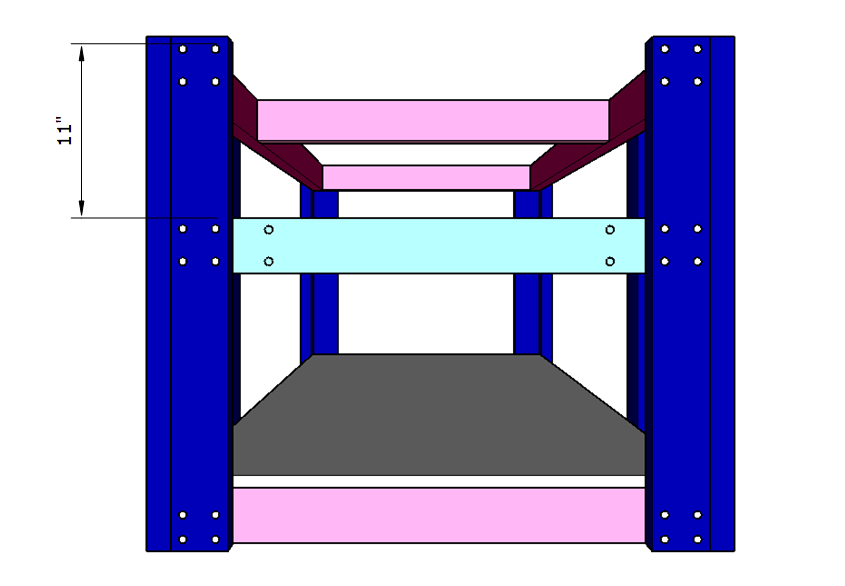
Step 7.
Use a jigsaw to cut the section for your table saw out of the table top. The dimensions shown work for my table saw. Adjust as necessary.
Step 8.
Attach the 2x4 feet to the legs with 2 ½" screws.
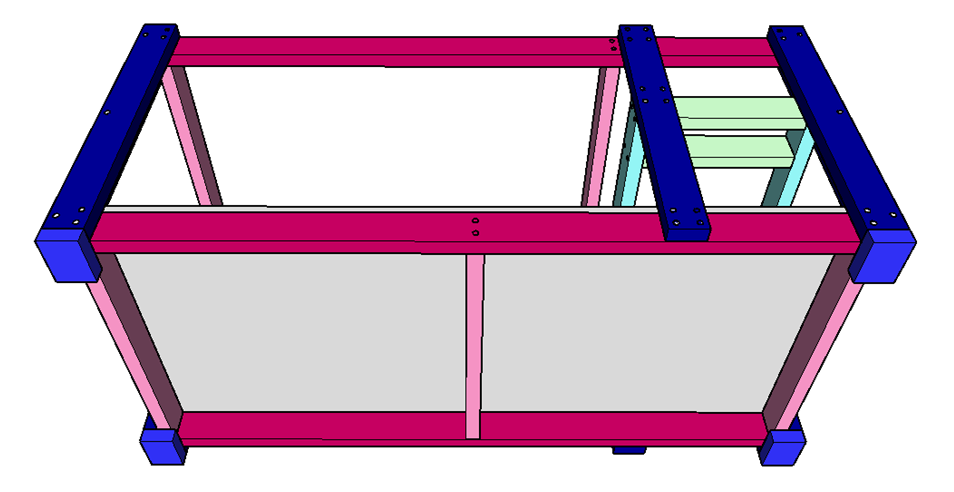
Fasten the locking casters to the feet with 1 ¼" screws. I used washers on each screw since the screw heads were smaller than the holes in the caster wheels. You could also use washer head screws.
Step 9.
Center the tabletop and attach it to the frame with 1 ¼" screws. There should be a 1 ½" overhang around the tabletop where it meets the legs.
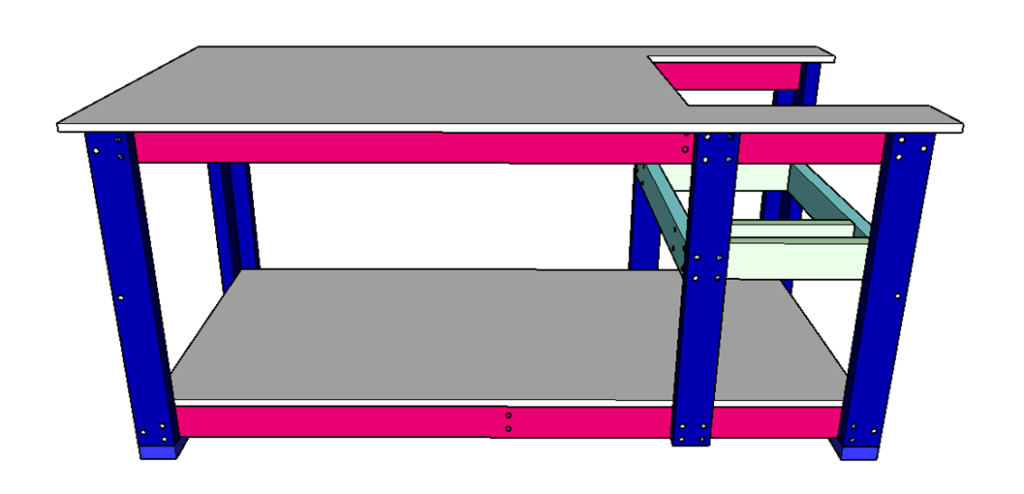
Countersink the screws into the particle board so they won't get in the way of your work.
Step 10.
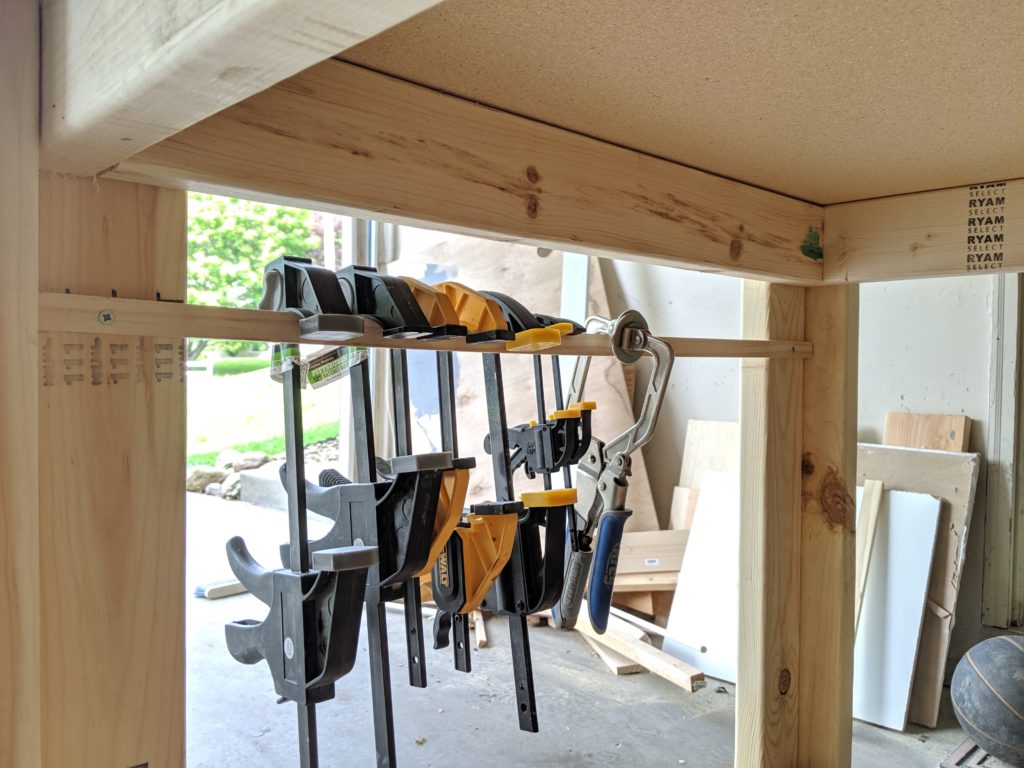
I added a simple clamp rack along one end once the bench was finished.
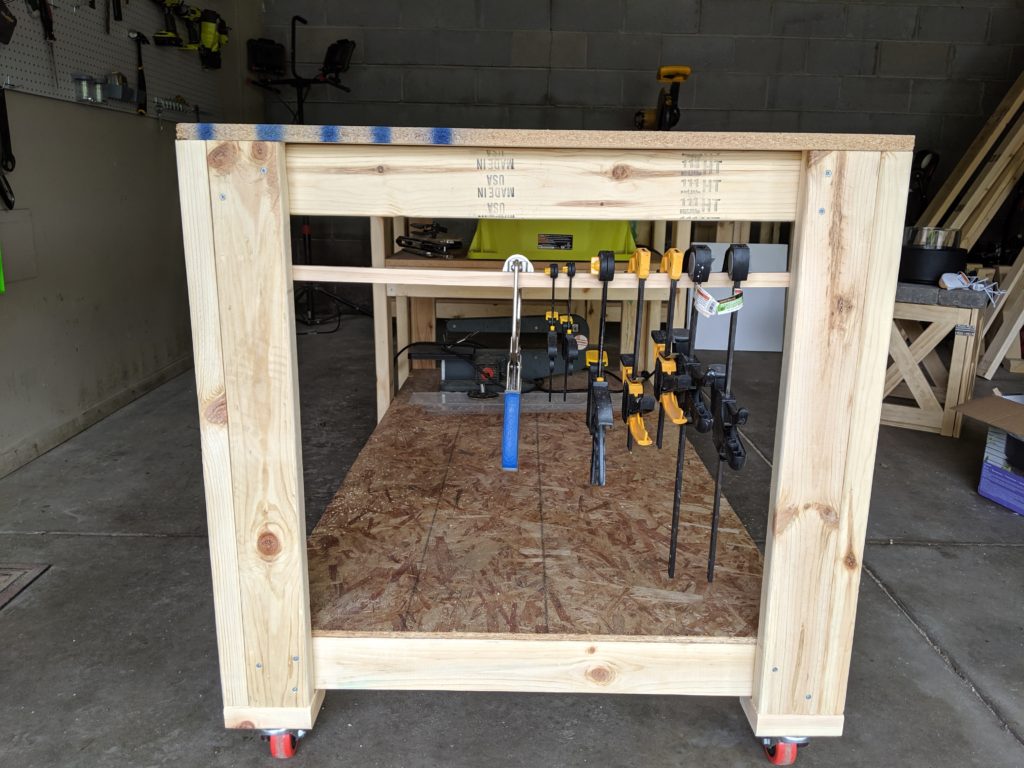
Simply attach a small scrap board to the inside of the legs.
Step 11.
**UPDATE 9/24/20**
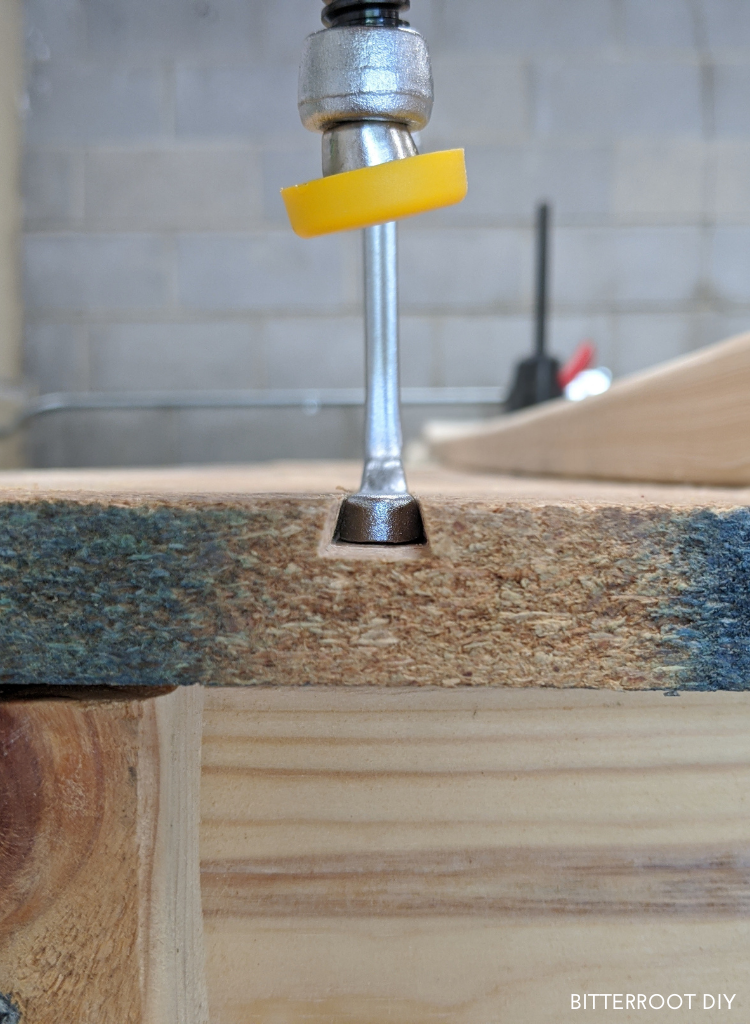
To add the MicroJig dovetail clamps, simply route a dovetail along the workbench wherever you want to place the clamps. No need to add any metal track or anything like that!
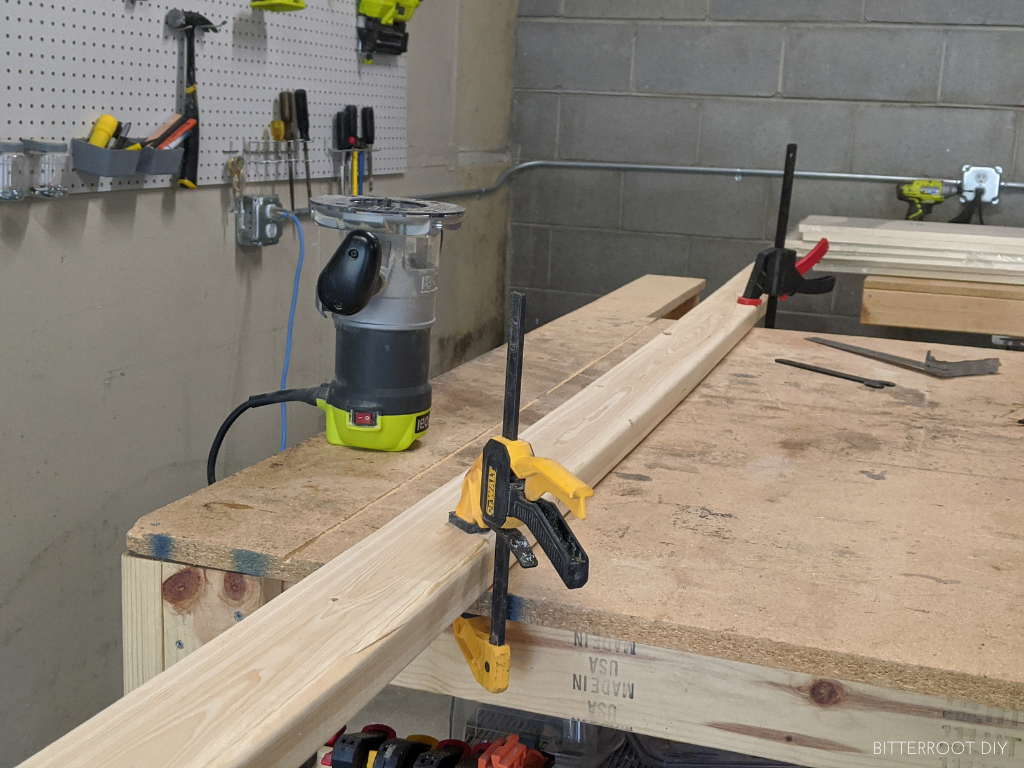
If you have 1 ½ HP router (which is what my Ryobi is), start by routing a ¼" relief groove. I clamped a 2x4 to the workbench as a guide for the router to make these cuts:
Next, use the MicroJig dovetail router bit to cut the dovetail:
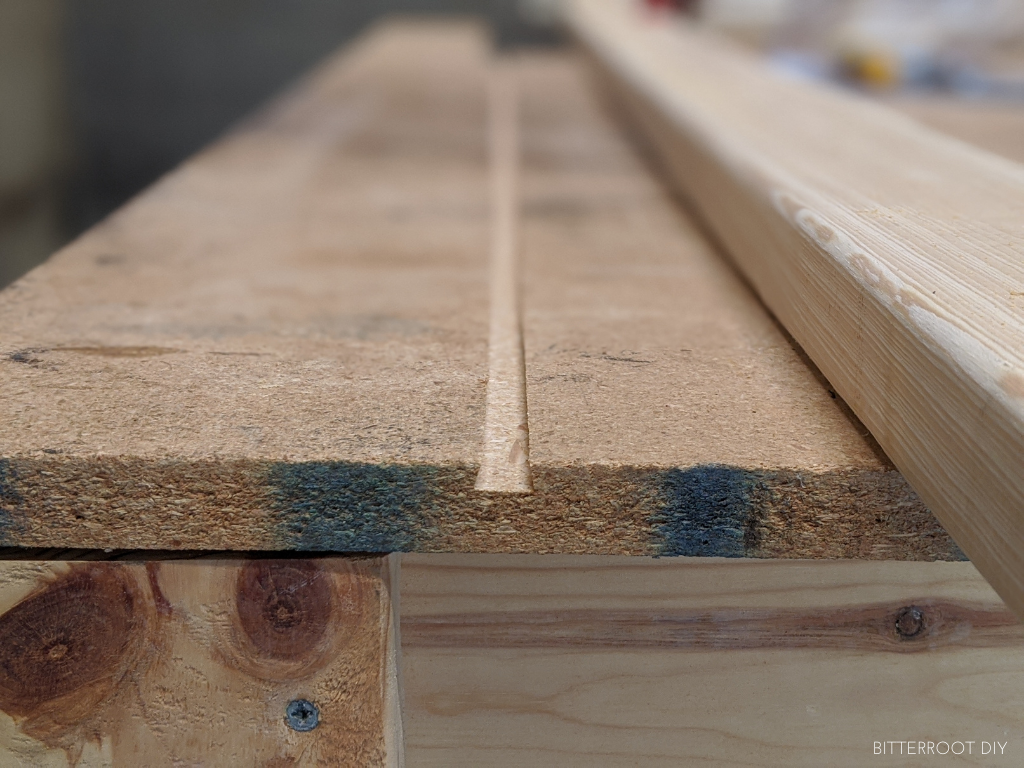
Make sure to cut the dovetail in the center of the ¼" relief groove if you had to cut that first. I just left the 2x4 guide in place when I switched from the straight bit to the dovetail bit to make sure I cut along the exact same line.
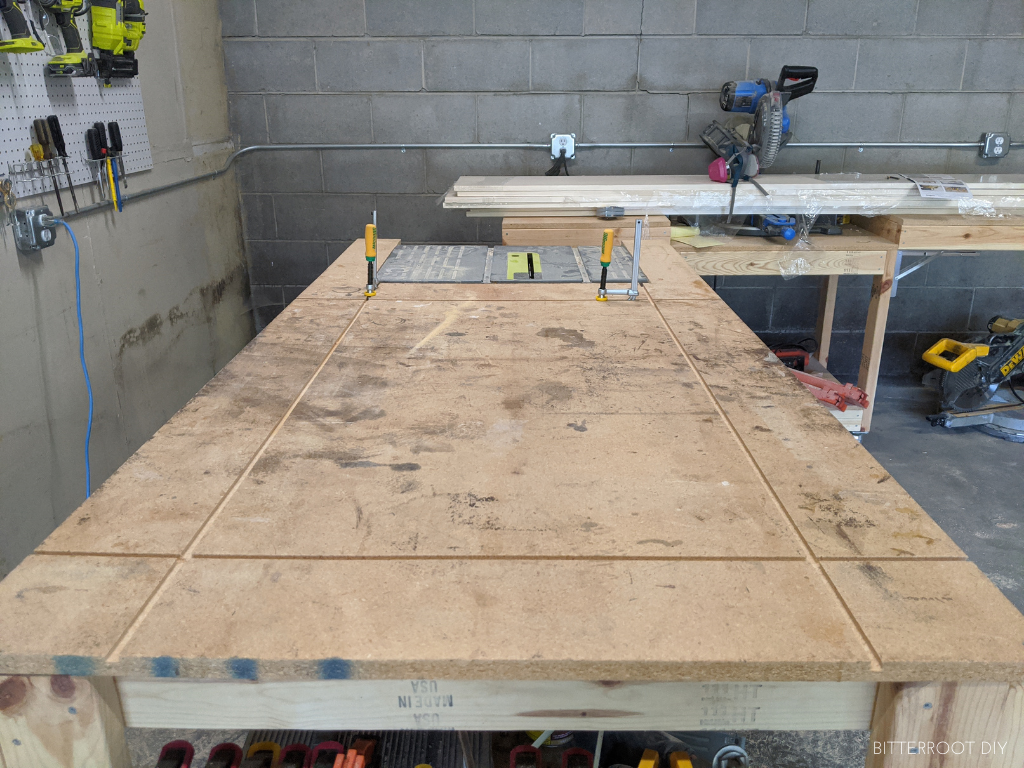
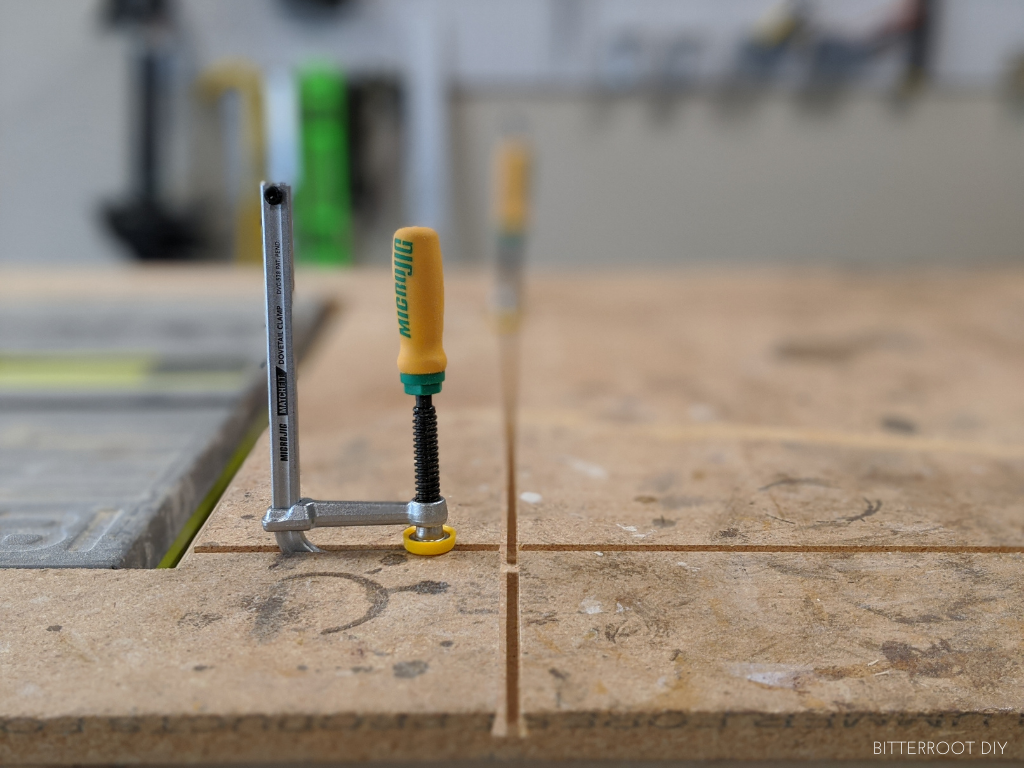
I added tracks along all four sides of the tabletop:
Once you've cut the tracks, the clamps just slide right into place:
I'm not sure how the particleboard is going to hold up to the clamping pressure long-term, but it's been fine so far. If I run into issues, I'll replace the top with nicer plywood or something more durable.
If you're planning to add these clamps, I'd recommend going with a plywood top, rather than the particleboard like I did. It'll be more durable in the long run.
And there you have it!
Just a heads up - I built this bench to fit my Ryobi table saw. Make sure to measure your table saw and adjust accordingly.
Please let me know if you have any questions and I’ll get back to you as soon as possible!
Thanks for stopping by!
For more project ideas, you can find me on Pinterest. And to stay up to date with the latest shenanigans, follow me on Instagram.
| Tylynn |
Don't forget to pin for later!

Tylynn:
I just saw your comment about not being able to afford software yet. Take a look at the FREE version of Google Make (used to be called Google Sketchup). I have been using it for over 5 years. It is very easy to learn and does everything I need for designing wood projects.
Thanks for the recommendation! I've been using the free online Sketchup and can create drawings and plans, but it doesn't let me export them to a pdf. Does Google Make have an option to export plans to pdf? I know the paid version of Sketchup includes "layout" which would allow me to export to pdf, but a free option would be great at this point.
If the top frame with legs had a size 38" maximum width how is a 36" x 73" table top going to sit over it or am I missing something
(30" short frame width) + (2"longest frame left side) + (2" longest frame right ) + (2" left leg) (2" right leg) = 38" width at widest point
Also 2' 9" is 34.5" and there is no peice you specify to cut this length, long frame piece is 33" which leaves you short slightly on the table saw shelf
Hi Will,
Thank you for the questions. The nominal dimensions of a 2x4 are 2" x 4" (thus the name 2x4) but the actual dimensions (if you measure it with a tape measure) are 1.5" x 3.5". So the total width of the frame is 30" + 1.5" + 1.5" + 1.5" + 1.5" = 36". I cut the table top to sit flush with the outside of the legs in order to maximize both the top and bottom shelf area. I have limited space in the garage/shop since we park a car there in the winter, which is why I cut it to the same width as the legs. If you want more of an overhang, you can definitely cut it a little wider.
In regards to the second question, I'm not really sure what you mean. Two feet and nine inches is 2'9" = 12" + 12" + 9" = 33". Another way to think about it is that the short frame boards are 30" and you attach a 2x4 on either end for the long frame boards, so that gives you a total of 30" + 1.5" + 1.5" = 33". The frame for the shelf attaches on either leg, so that's 33".
Let me know if you have other questions!
Thanks for you reply, I guess it doesn't help that in the UK using metric system its hard to follow when changing between 33" to then go to 2ft 9"
When I used google to translate to "2.9 feet to inches" it came out at 34.5" in total (should of put in 2.75 I guess)
Also the 2x4 lumber I purchased here (c24 studwork timber) is a lot closer to actually being 2"x4", its almost 2x4 exactly (48mm x 100mm)
I actually built this yesterday but found it to be a whole inch wider despite following your instructions and cut list 100%,
I realised mine was about an inch wider than what was in the plan just before fitting the table saw frame, but was most obvious when dry fitting the table top and the legs stuck out beyond the table top
I then had to disassemble completely, remove an inch from each horizontal framing piece, an inch from the width of the bottom plywood
This is probably because of the more literal 2x4's i used, and this is why i was confused when i thought it suddenly expected a 33" cut to be 34.5" ( this was my stupidity and trusting google) but its what lead to my confusion how i thought the design suddenly expected to have a 34.5" wide table saw shelf
Anyway its built now so thanks for your design and please let this be a warning to fellow Brits/Metric users trying to follow this design to check your lumber and maybe trim down your "2x4" to 1.5″ x 3.5″ first
Or follow these designs to make it as is but have the table top cut to be 2" wider at 38" x 76"
Will,
The stated dimensions had me confused too, I couldn't work out why 2' 9" outer dimension required 2' 6" inner on 2" lumber. The explanation about how US lumber is not actually 2"x 4" and rather 1. 1/2"x 3.1/2" now makes sense. Fortunately I hadn't started cutting!
Do you have this sketchup file anywhere available for download? I love this design because it's smaller than most plans and I'm limited on space, but I want to incorporate a shelf for my mitre saw on the other end. Instead of building it from scratch in sketchup, I thought I'd see if you already had it available.
Thanks! Great looking bench.
Hi Adam, that's a great idea! Unfortunately, I don't have a downloadable version of this plan. I'll have to look into possibilities to do that though. I've never tried it before and neo I'm curious!
guess who forgot to put in the bottom shelf till after the table saw shelf was mounted....
Do you have any pictures with additional shelving?
Happens to the best of us ha! I don't have any other pictures with additional shelving (not sure exactly what you mean?)
Just a note that you don't have the JigSaw listed in the Tools/Supplies section but it's needed to cut the notch for the Table Saw.
Thanks! I'll add it up there.
Easy instructions. Two hour build. Instructions spot on. Thanks !!!
Glad it worked out well for you! Thanks for using my plans!
I made your table for my Dewalt tablesaw . It is great .
Only little tweak I had to do was notch out a path for the telescoping rail for the fence. Thanks for the clear plans and direction .
So glad it worked out for you!
Hi I’m getting ready to make this bench for my dewalt table saw. Do you know what measurement you used for the top cutout for the saw? Thanks!
Hi Cherie,
All the dimensions are listed in the plan diagrams. I just measured the width of the tablesaw tabletop and cut it to fit.
Also do you think I would be able to install some dog holes on the bench? Or should I make the table top 1 1/2” thick?
I think dog holes would work fine in the 3/4" tabletop, but it's up to you. I don't have a lot of experience with them.
I’m a 63 year young new beginner woodworker and want to build this for my 8 1/4 ryobi table saw. Wish me luck. Thanks for the plans and patient replies to the questions that have been asked.
Of course! Good luck!
I agree with Toni... very much appreciate your detailed responses to comments. It has been very helpful! Also, thank you for taking the time to put this post/video (I found you on Pinterest) together and provide free of charge. This is a simple build for new DIYers that need a workbench. THANK YOU!!
Hi Melissa,
Thank you for the kind comment! I do my best to help out with questions.
I love this work station. Will be building it soon. Any ideas on how to incorporate a flip top on the other end for a miter saw?
Thanks! It would depend on what type of saw you have and how big it is, but I'm sure you can modify it to work out for you.
I like this design and am going to use it but I’m curious about putting a thicker top on it. Would you suggest using 2x4’s under the top? Or any other suggestions would be great!
I haven't had any issues with the 3/4" particleboard top. It's super strong and doesn't sag at all. If you're worried about it, you could run a few extra 2x4s through the middle.
Hello. Great workbench and table saw incorporation! I’ll be building this myself soon.
The only question I had was regarding on how you affixed the legs to the the frame in step 2. Did you join the legs together first before attaching them to the frame? Or did you just attach one 2x4 at a time to the frame to give you the leg design?
If you joined the legs together prior to attaching them to the frame, what size screws did you use?
Did you do any glue up at all in this project?
Thanks!
I just attached the legs straight to the frame and then drove a few screws through the front and back legs into the narrow side of the 2x4 legs on the sides to hold them together. You could attach the legs together before attaching them to the frame, but I just found it easier to attach them straight to the frame first. I used the same 2 1/2" screws as for everything else.
No glue in this project, but you could use glue between everything if you want to.
Good luck and I hope you like it!
Just built this today, although a slightly bigger version. I’m extremely happy with it. Thanks for the inspiration and guidance. I really appreciate it.
That's great to hear! Thanks for using my plans!
I can’t wait to get started on this, been needing a good table that can hold my saw too. What is the final height from floor to table top? I may need to adjust the height some.
It's 36" when the wings are extended.
I do not have a garage only a shed. Instead of the long permanent table off the back, do you think I could put one of the folding wings, like from your miter saw table or would that make it too heavy on the backside when opened?
I'm not totally sure on that one. Another option is that you could build a separate mobile table and pull it around to the back when you need to use it.