
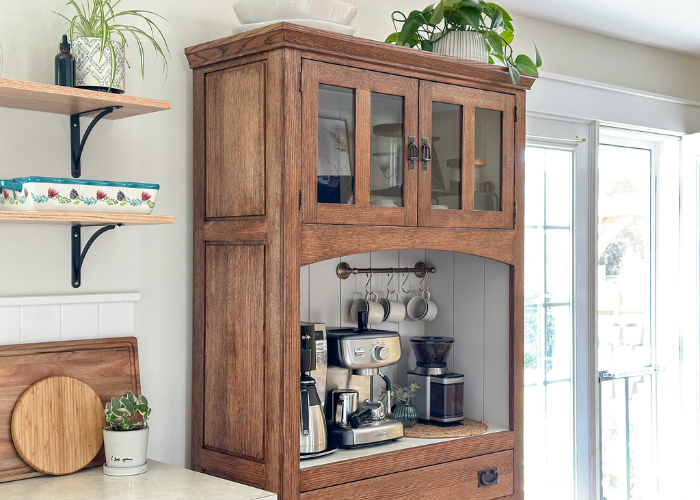
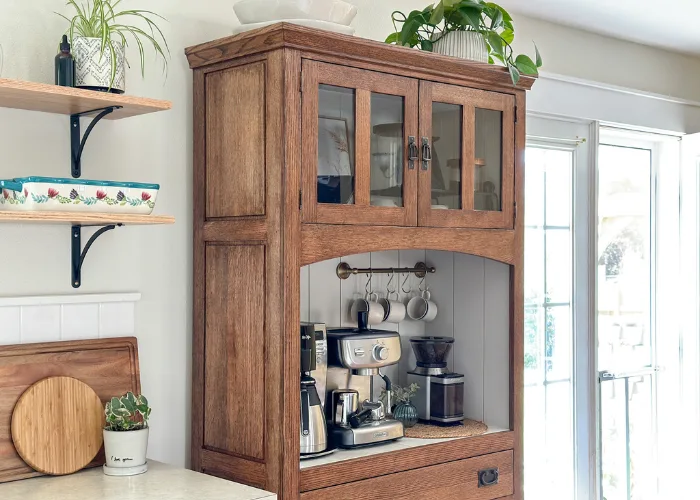
Turn an old hutch into your very own DIY coffee bar cabinet. Say goodbye to cluttered countertops and hello to a custom coffee bar station.
A few months ago, we gave our kitchen a quick refresh. We removed a few sets of cabinets, added open shelving, and gave it a fresh coat of paint. It’s still very much a work in progress, and someday I’d love to tear the whole thing out and completely redo it. But, for now, we’re adding a few small changes here and there to make it a little nicer and work for our family better. You don’t have to do a full remodel to make your home wonderful! Small changes here and there have a huge impact.
One thing we’ve wanted to add is a coffee bar station. We never used that desk on the right side of the kitchen. It was mostly just a catch-all-crap zone. You know how it goes. Open countertop equals a place to stack any and all random things that make their way to the kitchen. After a long Facebook Marketplace search, I finally found the perfect hutch to turn into a coffee bar. We removed the old desk, brought the hutch in, and there it sat for 6 months … mostly unused and unloved. You know – life and three little kids and all 😉 But I’m happy to report that it is (finally) officially the coffee bar I had imagined when we picked it up 6 months ago!
- Mug Rail – made from this towel bar and S hooks
- Orbital Sander
- Brad Nailer
- 80 Grit and 120 Grit Sandpaper
- 1 1/4″ Brad Nails
- Construction Adhesive
- Minwax Gel Stain in Chestnut
- Polycrylic in Satin
- Musselbound Tile Adhesive Mat
- Marble Tiles
- Grout
- Sealant
- Shiplap Planks
- Paintable Caulk
- Fine Finish Trim Rollers
- Coffee Pot (family favorite and I highly recommend)
- Espresso Machine (also a family favorite and I highly recommend)
- Coffee Grinder
- Mug Rail Towel Bar and S Hooks
- Similar Coffee Cups
- Large Glass Storage Container
- Small Glass Storage Container
I saved the whole process to my Instagram highlights if you want more info or prefer to watch a video.
Step 1 – Sanding
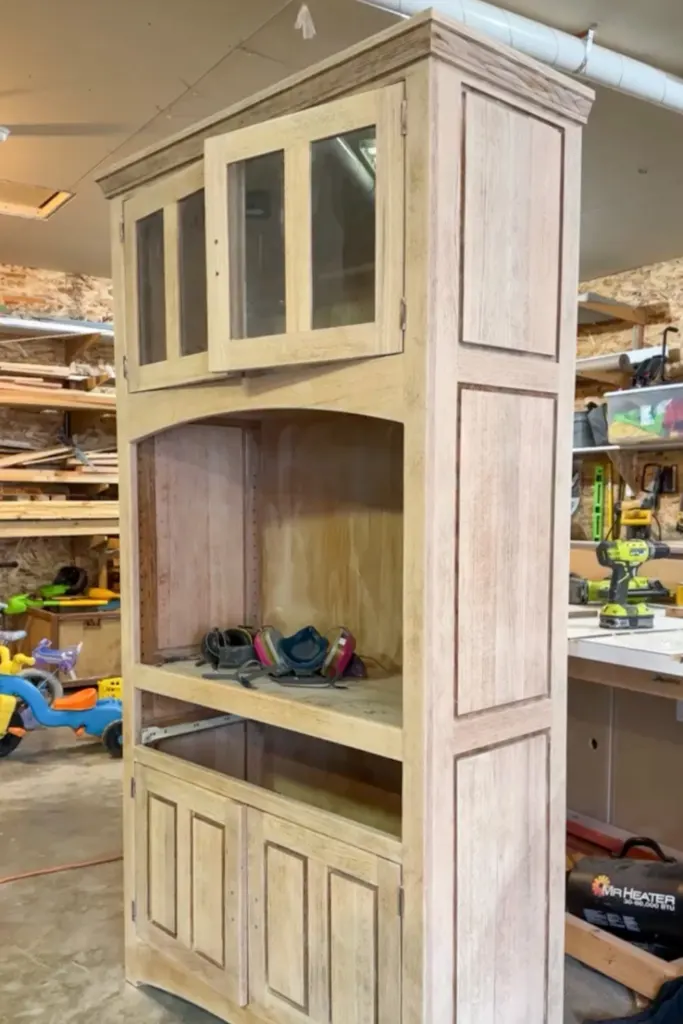
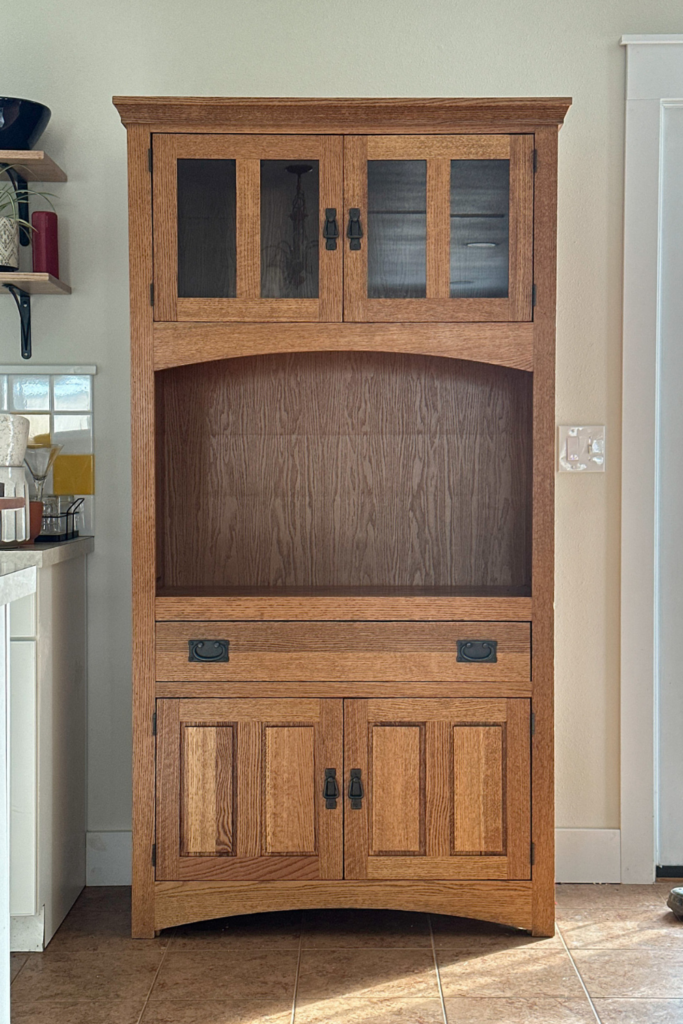
It’s solid oak, but the original stain color was a little too orange for our taste. So I started by sanding the whole thing down to fresh wood.
I removed all the hardware and placed it in labeled Ziploc bags to make it easy to put back together.


There have been enough projects where I just put all the hardware together in a bag and then had a big mess on my hands when trying to put it back on the cabinet at the end. I’ve finally learned my lesson and stayed organized this time!
Once the hardware was off, I started sanding.
I used 120 grit sandpaper on the entire outside of the hutch. The inside of the top and bottom cabinets had a bit more clear coat on them, so I used 80 grit sandpaper to get the initial finish off, then progressed to 120 grit to smooth it out. Lower grit sandpaper (80) is rougher, and higher grit (120) is smoother. The higher you go with the grit, the smoother the wood will be. I find 120 to be good enough for refinishing projects like this.

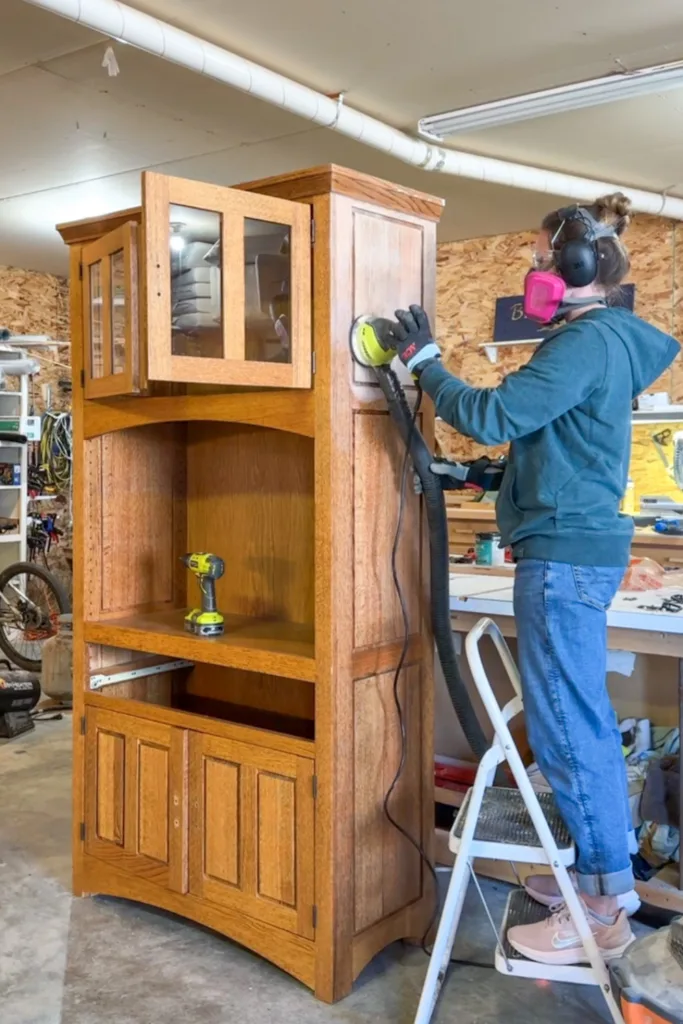

I ended up having to do all those beautiful groves by hand, but it honestly went faster than I thought!
The outside of this cabinet is solid oak – no veneer or plywood. If you’re working with a plywood or veneer, you want to be more careful with sanding so as not to sand all the way through the top “pretty” layer (the veneer or top plywood surface). With solid wood, you can sand it all the way down if you wanted – it’ll look the same all the way through. The backing on this cabinet is plywood, so I knew I wouldn’t have much luck sanding it down without wrecking the surface (the stain usually soaks in too far). Instead, I covered it with vertical shiplap (see step 4).
Just make sure to figure out what material you’re working with so you can plan accordingly. It’s no fun to be surprised by that in the middle of a project! Refinishing a veneer surface is totally different – more paint friendly.
Step 2 – Stain & Seal
Next, I stained the cabinet with Minwax gel stain in the color Chestnut.
Since this cabinet is oak, I didn’t use a pre-stain. But if you refinish a softer wood, such as pine, pre-stain is much more important to ensure the stain applies evenly. Oak is dense enough that it doesn’t make as big of a difference. Though you can definitely still choose to use it to be on the safe side! This is just my personal experience.
Gel stain is a non-drip stain that is much thicker consistency than liquid stain. I really like how gel stain applies and use it on a lot of my projects. I just use a stain pad or piece of an old cotton t shirt (turned shop rag) to apply. Rub it onto the wood, let it sit for a minute, and wipe away the excess. Make sure to wipe the excess off pretty quickly – don’t leave any sitting on the surface. Gel stain starts to set within a couple minutes and will leave really bad streak marks if you don’t wipe it smooth.
The chestnut color is one of my favorites – just dark enough, but not too much, and very rich!


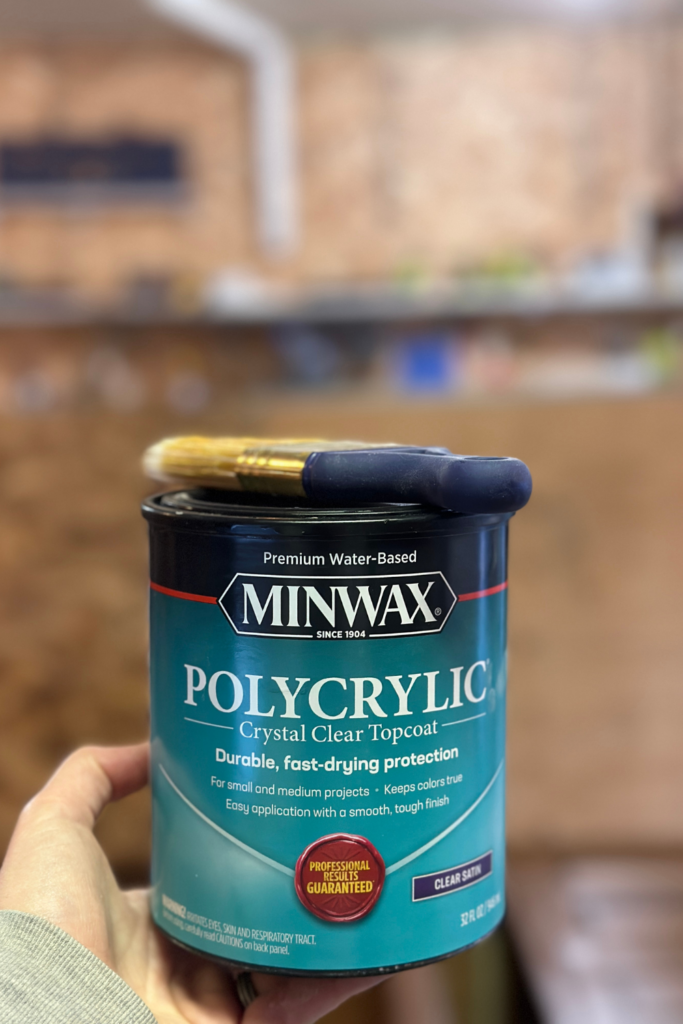

Once the stain dried, I sealed it with a coat of polycrylic in satin. I prefer polycrylic to polyurethane in a lot of situations because it goes on more smoothly. It doesn’t provide quite as much protection as the oil based polyurethane, but for something like this cabinet, it’s perfect. I use it for everything besides maybe a dining room table that sees a ton of liquids and different temperatures from serving pots and pans. But I prefer Rubio Monocoat for that anyways. So I really don’t use polyurethane – it’s always a struggle to get all the bubbles out and it will amber over time, darkening your finish.
But anywayyyyys – I didn’t get a great photo of this, but I added new bun feet [HERE] to bring the cabinet countertop up to the same height as our kitchen countertops. The cabinet was already prepped for feet, so I just stained the feet to match, added the new inserts to that 2×2 blocking you can see in the photo above, and screwed the new bun feet in. You can see them in the finished photos below.
Step 3 – Countertop
Next up – a new countertop.
We moved the cabinet back into the kitchen for the rest of the makeover. It was already a heavy cabinet, and I was a little worried we wouldn’t be able to move it once I added the tile countertop and backsplash.
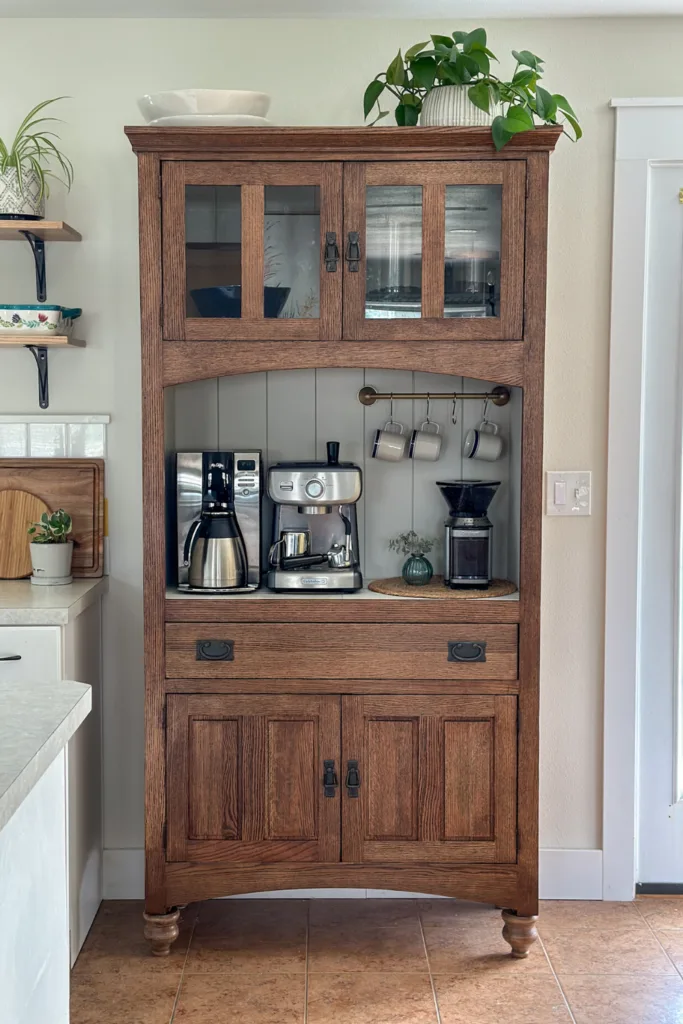
I tiled the countertop with these BEAUTIFUL polished natural stone marble tiles [HERE]. I love bright quartz, marble, and/or granite countertops and this tile was a great budget friendly way to create that look!


This Musselbound mat made tiling SO EASY! All you have to do is apply the Musselbound mat (it’s adhesive), tile, and grout. No dealing with mortar or waiting for it to dry [HERE].
Each tile is unique, so I bought a whole box so I could pick through it to find which ones I wanted. I started in the center of the countertop, centering the first piece of tile, and then worked outward. I used 1/8″ spacers for the gaps and laid them like a brick pattern. Once all the tiles were set, I grouted with an all-in-one grout in the color Avalanche [HERE].
After the grout dried, I sealed it all with a penetrating sealant [HERE] to protect it from stains (especially around coffee).
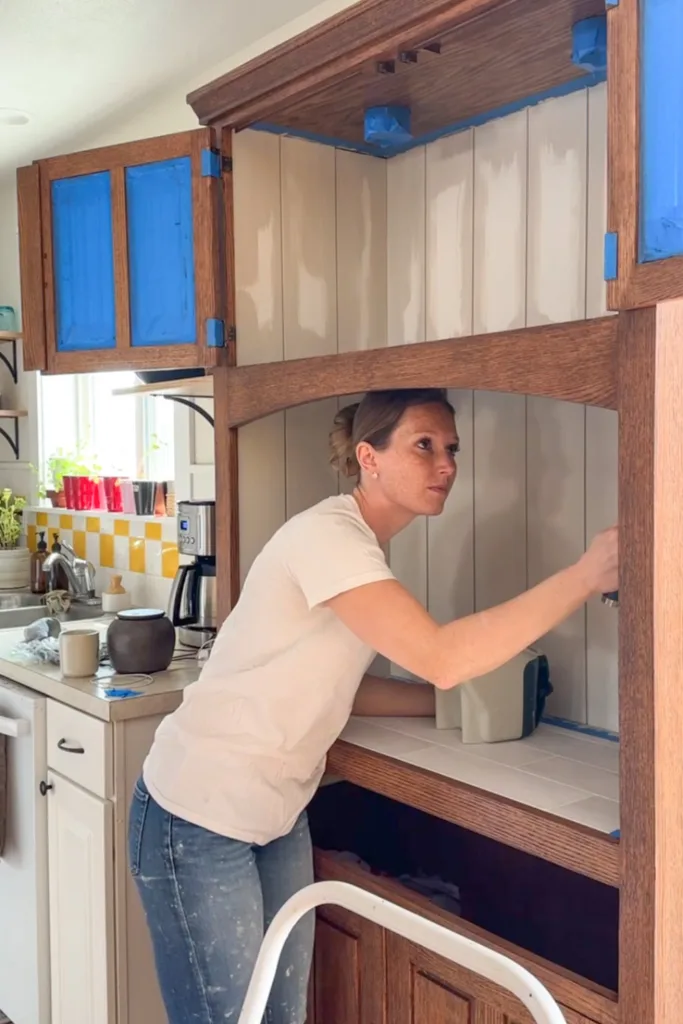
Step 4 – Backsplash
I used pre-primed shiplap wall planks [HERE] for the backsplash in the top cabinet and middle section. I started on the back of the cabinet and then filled in the sides. The boards at the front on the sides had to be ripped down to width to fit. The face frame covers the front, so there’s no exposed edge and you don’t notice that those front boards are narrower than the rest.


Since the back panel on the cabinet is only 1/4″ plywood, I used construction adhesive to attach the shiplap boards to it. I threw a couple really small brad nails (3/4″) into a few of the boards hold them in place as the adhesive dried. But I tried to use mostly just construction adhesive to avoid nails shooting through the back (a few did even though they were really short).
I would NOT recommend using construction adhesive if you ever want to be able to remove the shiplap. Construction adhesive will damage the underlying surface. I do not plan to ever remove these planks.
To finish the backsplash, I sealed all the edges (along the top and bottom) with white paintable caulk [HERE].
Step 5 – Paint
I love warm wood tones paired with mushroom paint colors. In the interest of using paint I already had, as well as saving some $$, I wanted to use paint that I had on hand. So the backsplash ended up being a mix of colors. It’s majority Pale Oak by Benjamin Moore with a dash of Sculptor’s Clay by Behr mixed in.
I used a foam fine finish roller to apply it. These fine finish rollers [HERE] are the BEST way to paint trim or anything you want a really smooth finish on if you don’t have a sprayer! (r just don’t want to deal with it for something small like this 😉 )

If I did it again, I think I’d try to go a tad darker and more mushroom. But, overall, I’m happy with the color and used up some good paint samples!
Step 6 – Mug Rail
The mug rail might be my favorite part of this whole makeover. I couldn’t find an actual mug rail that was small enough for this space. So I grabbed a small towel bar from Amazon [HERE] and a few S hooks [HERE] and, boom, custom mug rail!
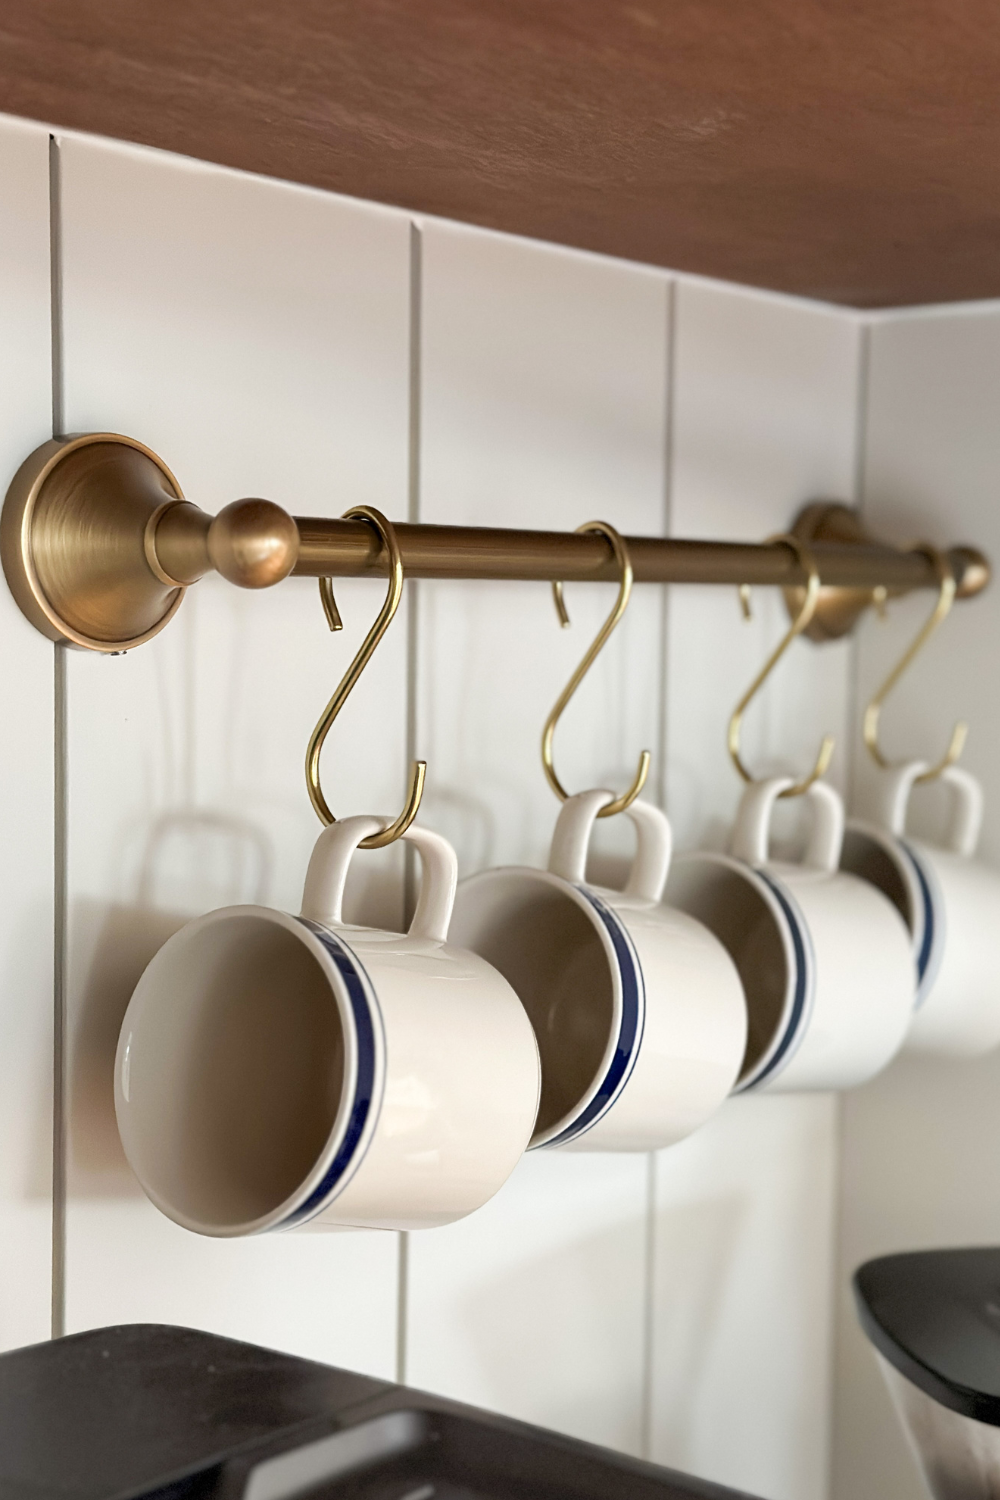

The finish is beautiful in person and just what I was picturing. It’s adjustable, so you could use it in lots of different scenarios as a mug rail!
Step 7 – Hardware & Coffee Supplies
I cut a small hole in the back of the cabinet with a 3/4″ hole saw to run cords through. It’s positioned behind the espresso machine so you can’t see it. I plugged in a small extension cord behind the cabinet to plug the machines into and then used a small command hook to hang any excess cords on so they don’t hang out below the cabinet.
Lastly, I put the hardware back on the doors and drawers. I went with the original hardware and really like the mix with the brass mug rail. Here’s how it turned out!

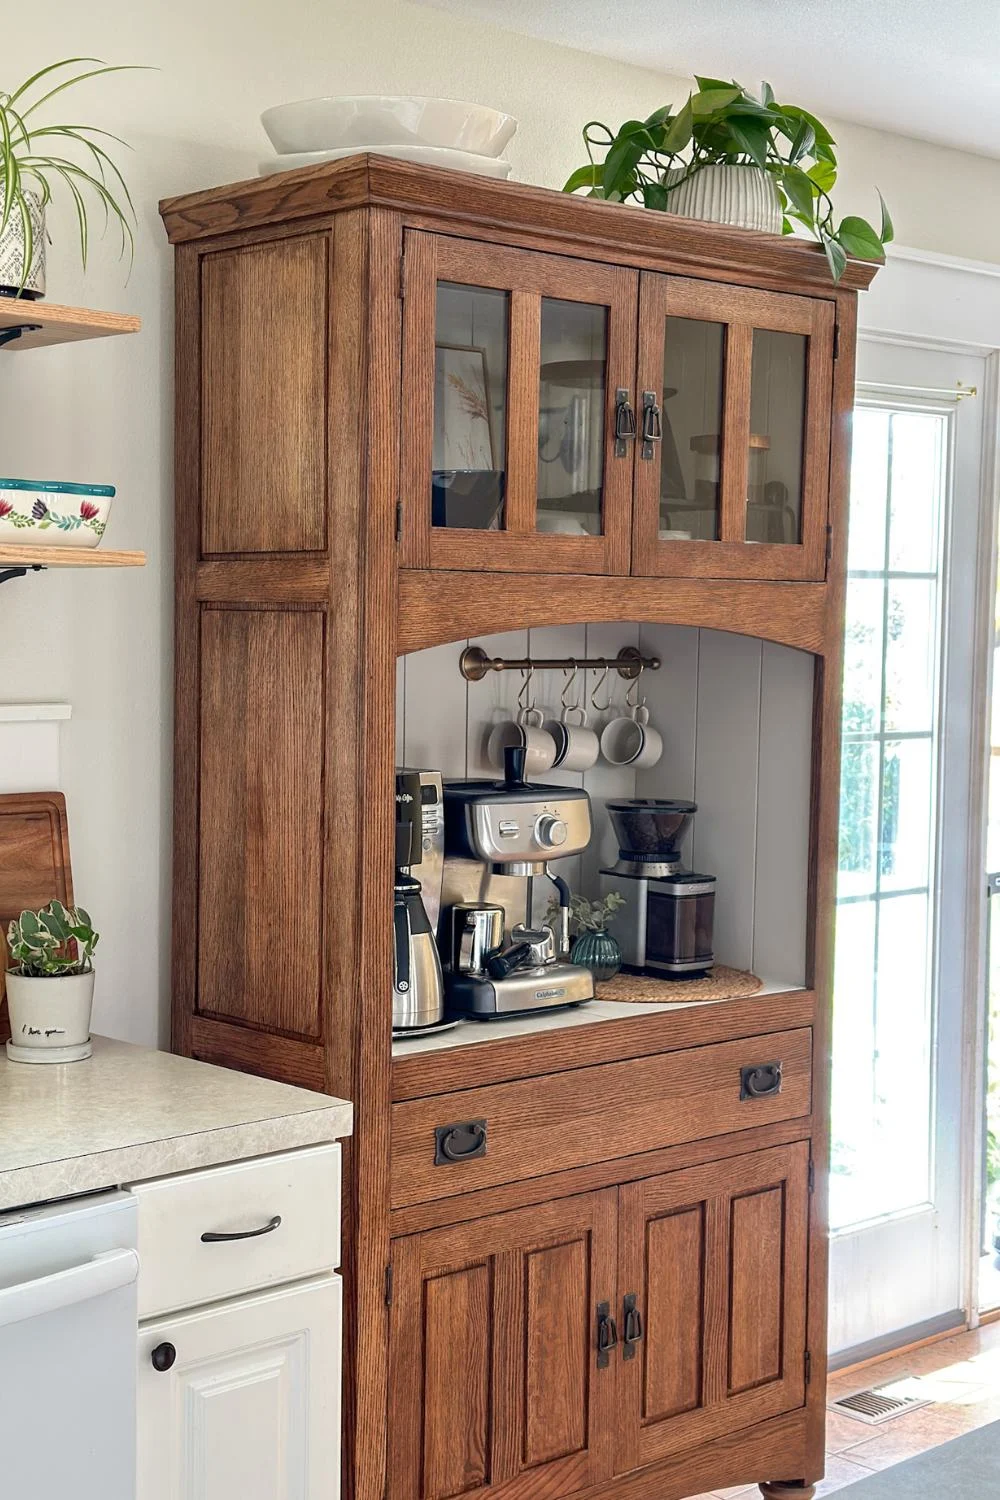
It actually added so much space to the whole kitchen! I put a little shelf in the top cabinet for coffee mugs, coffee beans, scoops, etc. It’s also big enough to store our larger serving bowls, which have been hiding in the far back corner of the pantry until now!

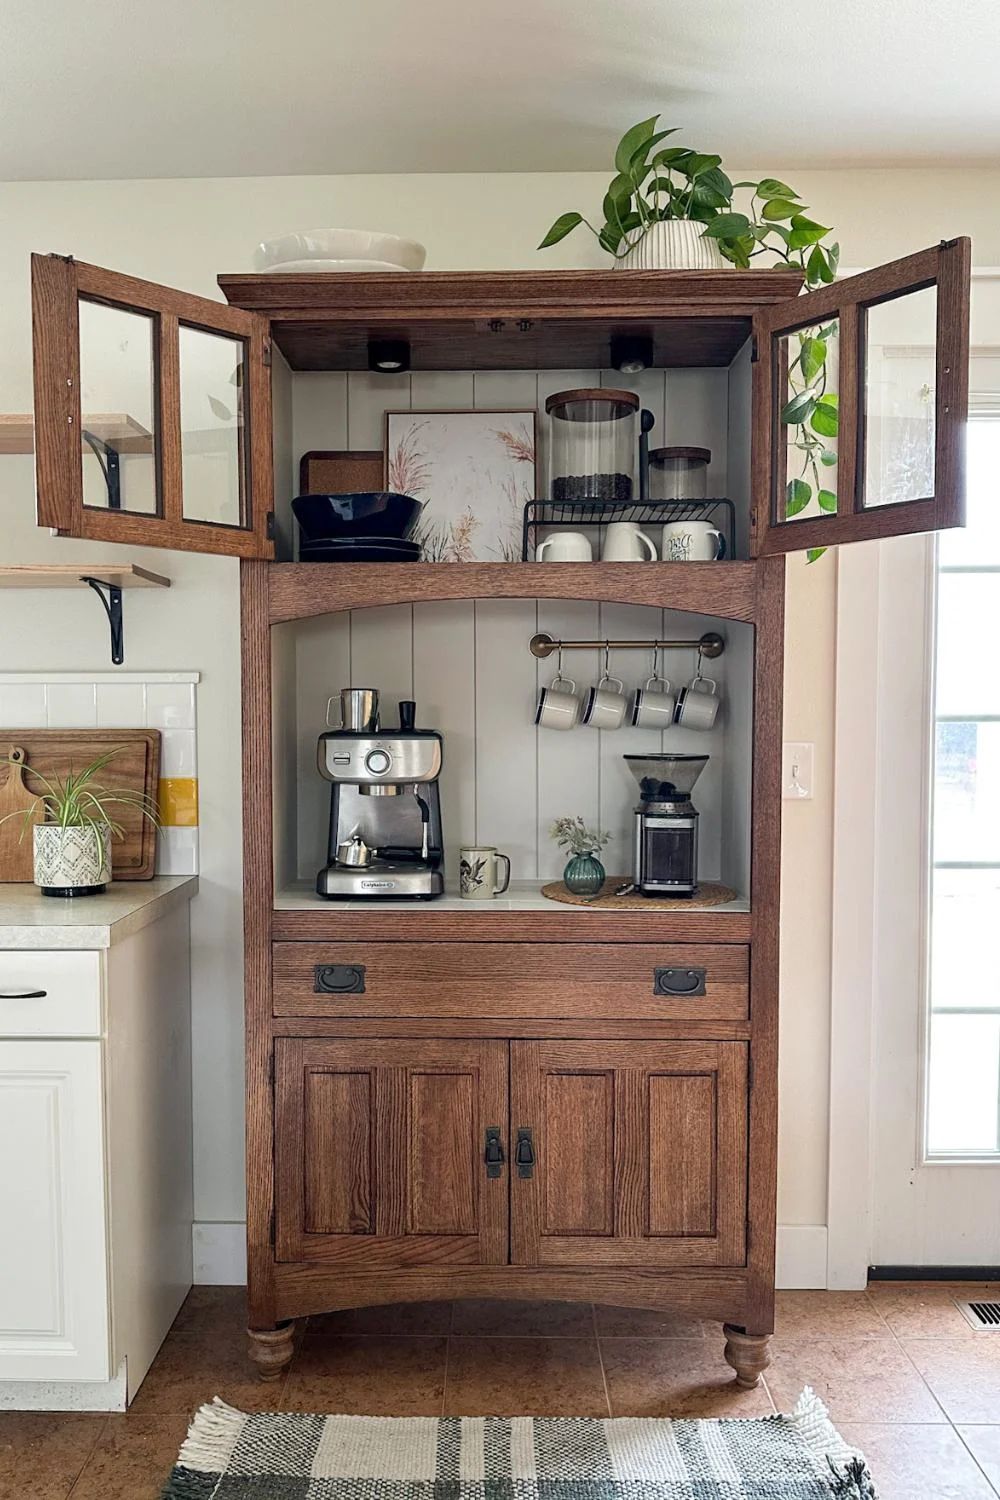
I put all our tea and coffee filters in the drawer, and the bottom cabinet is full of kids art supplies and coloring books. I should get a photo of that, but it currently just looks like a bunch of chaos 😅.
Here’s a side by side of the before and after:


Let me know if you have any questions, or if I missed anything. I’ll get back to you as soon as possible.
Sources
- Coffee Pot (family favorite and I highly recommend)
- Espresso Machine (also a family favorite and I highly recommend)
- Coffee Grinder
- Mug Rail Towel Bar and S Hooks
- Similar Coffee Cups
- Large Glass Storage Container
- Small Glass Storage Container

| Tylynn |
This post contains affiliate links. If you make a purchase from one of the links, I may make a small commission at NO EXTRA COST to you. Thank you for your support! See my full disclosure here.