
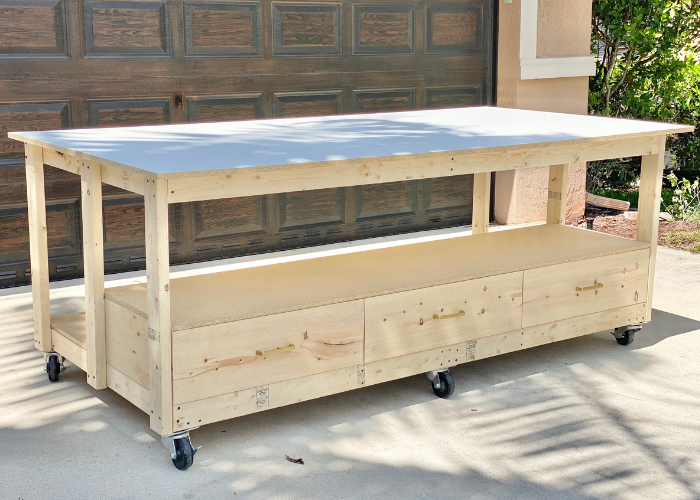
Plans and tutorial to build a DIY mobile miter saw stand for your workshop.
Head to my new YouTube channel for the full video on how I put this DIY Mobile Miter Saw Stand together.
This post contains affiliate links. If you make a purchase from one of the links, I may make a small commission at NO EXTRA COST to you. This helps keep the tutorials and plans free here at Terrace Place. Thank you for your support! See my full disclosure here.
So the craziest thing happened a few weeks ago. One of my friends over on Instagram broke 100k followers and did the COOLEST giveaway ever. I still can't believe it, but he teamed up with Delta to give away one of their Delta Cruzer 10" sliding miter saws and I won ... like, WHATTT?! I don't even know.
It was a completely random drawing and I guess I remembered to do all the correct things to enter and BAM. Here we are.
So this new DIY miter saw stand goes out to the new saw - you the real MVP of the shop!
Last summer I built a stationary DIY miter saw bench for my very first saw - a well used DeWalt from the ol' Craigslist. And when I say well used, I mean I bought this thing off a contractor after like 10 years in the field. I was hoping to upgrade this summer, so this giveaway was really unbelievable. The big miter saw station is great, but my FAVORITE FAVORITE workbench is the mobile workbench I built for the table saw. I work out of the garage, so my goal is to be able to pull everything to the center to work and then push it back to the sides so we can pull the car in. The big workbench works great along the back wall, but I wanted to try out a mobile stand for the miter saw as well, just to see how it helps with work flow.
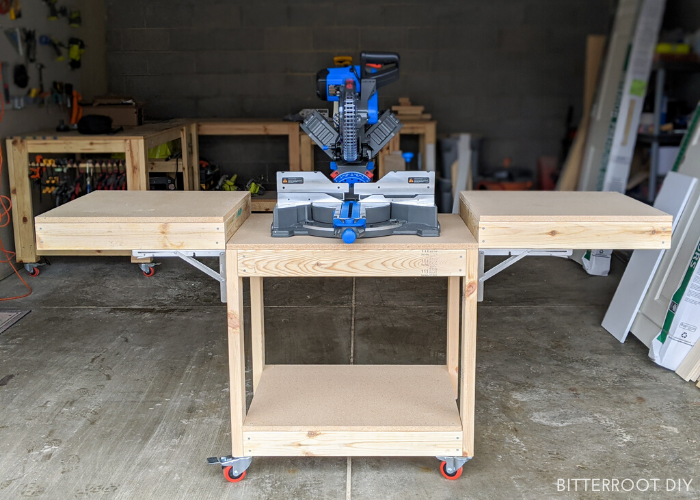
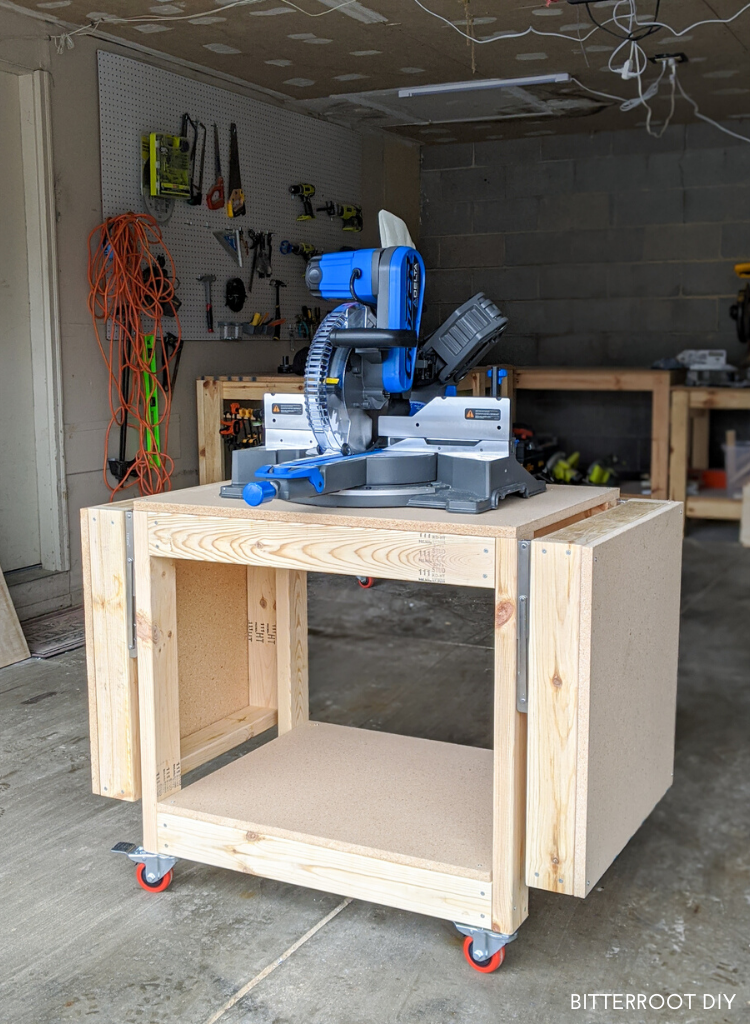
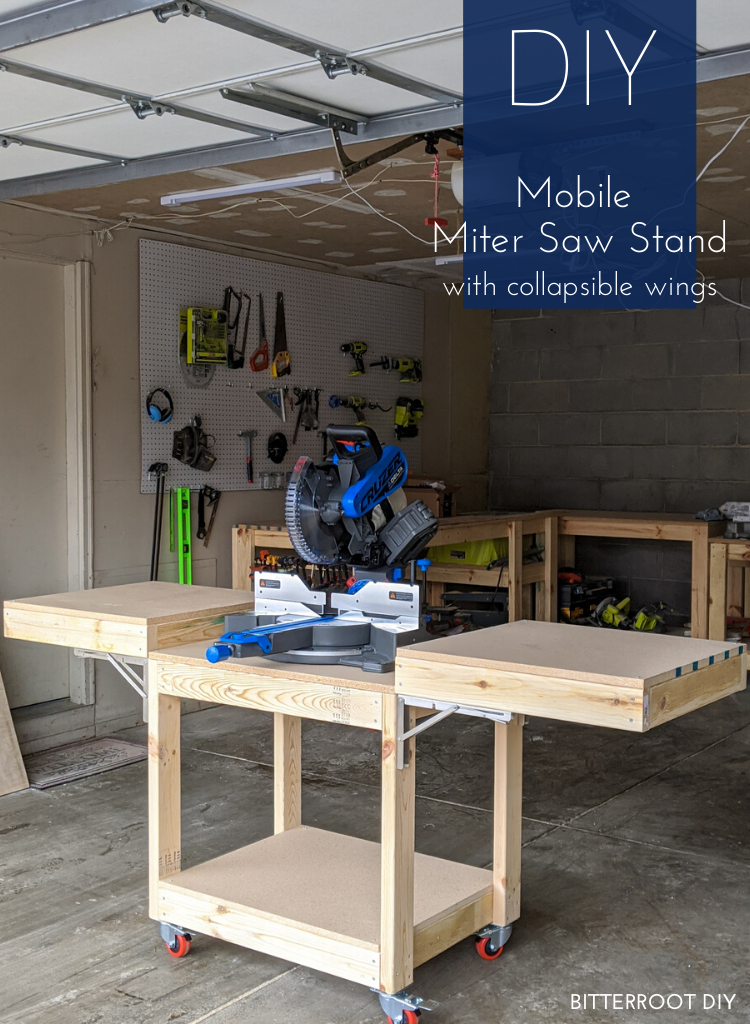
Alright, here you go - DIY mobile miter saw stand with collapsible wings.
Tools & Supplies
- 14" Folding Brackets (or bigger if you prefer)
- 3" Locking Casters
- Miter Saw
- Circular Saw
- Drill
- 6" Drill Bit
- Impact Driver (optional - just drives the screws a little easier)
- 2 ½” Screws
- 1 ¼” Screws
- Tape Measure
- Clamps
- Level
- Speed Square
- Pencil
- Safety Glasses
- Ear Protection
Lumber Lists
- 6 | 2x4 @ 8' (legs and frame)
- 1 | ¾" Particleboard @ 4'x8' (tabletops and shelves)
Cut Lists
- 4 | 2x4 @ 29" (center frames)
- 8 | 2x4 @ 21" (center & wing frames)
- 4 | 2x4 @ 24" (wing frames)
- 4 | 2x4 @ 28" (legs)
- 1 | ¾" Particleboard @ 24" x 32" (center tabletop)
- 1 | ¾" Particleboard @ 24" x 29" (center bottom shelf)
- 2 | ¾" Particleboard @ 24" x 24" (wing tabletops)
** NOTE: I built this workbench so the wings are at standard kitchen counter-top height (36"). If you're tall, you may want to adjust the legs to make it a little taller.
Step 1.
Build the frames for the center of the mobile miter saw stand. Make sure the frame is square and use two 2 ½" self tapping screws on each end of the 2x4s to attach them together.
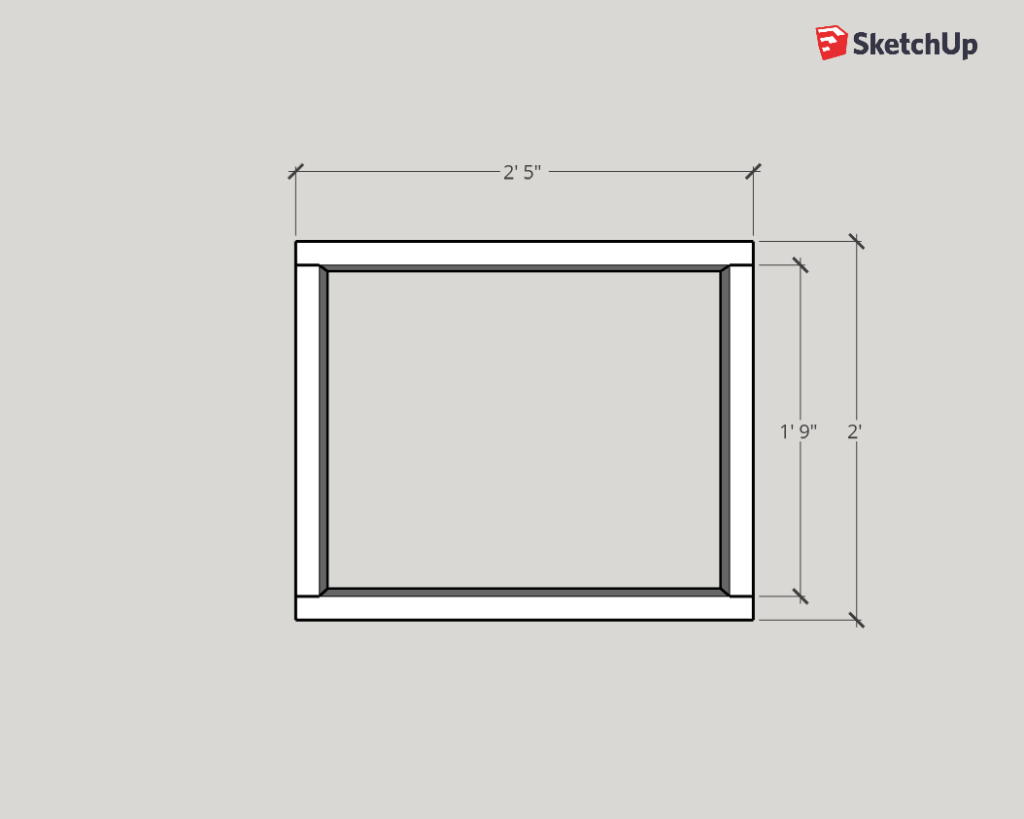
Assemble two frames - one for the miter saw shelf and one for the bottom shelf.
Step 2.
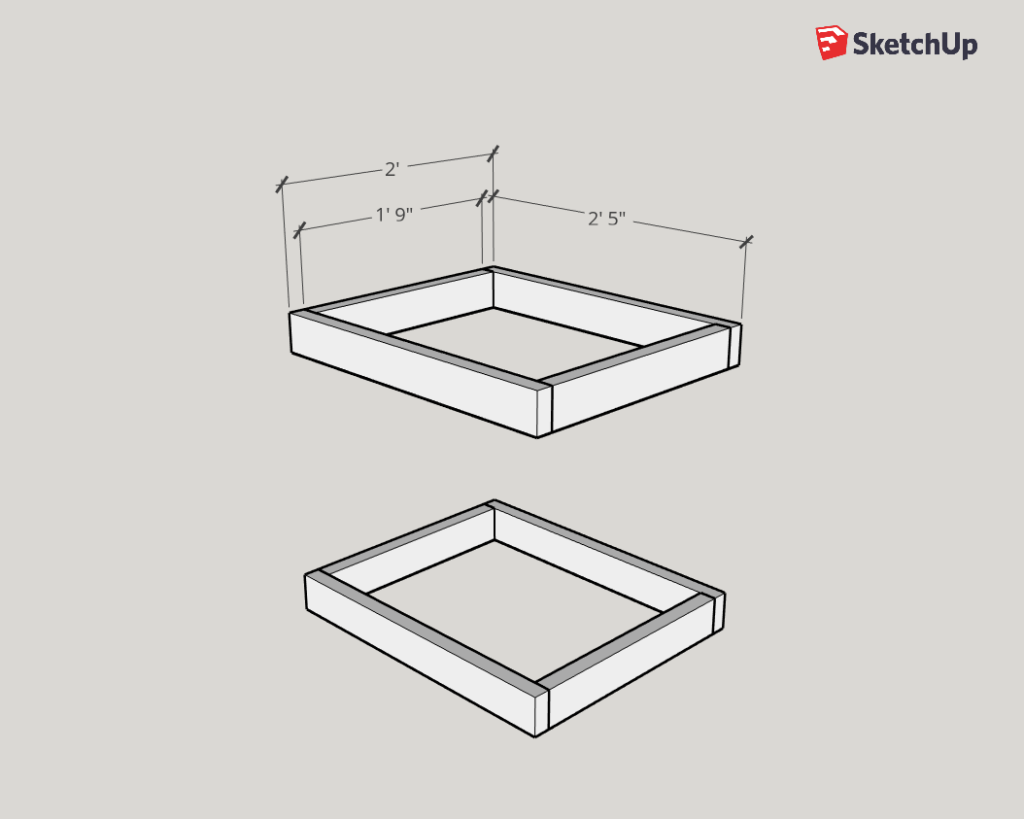
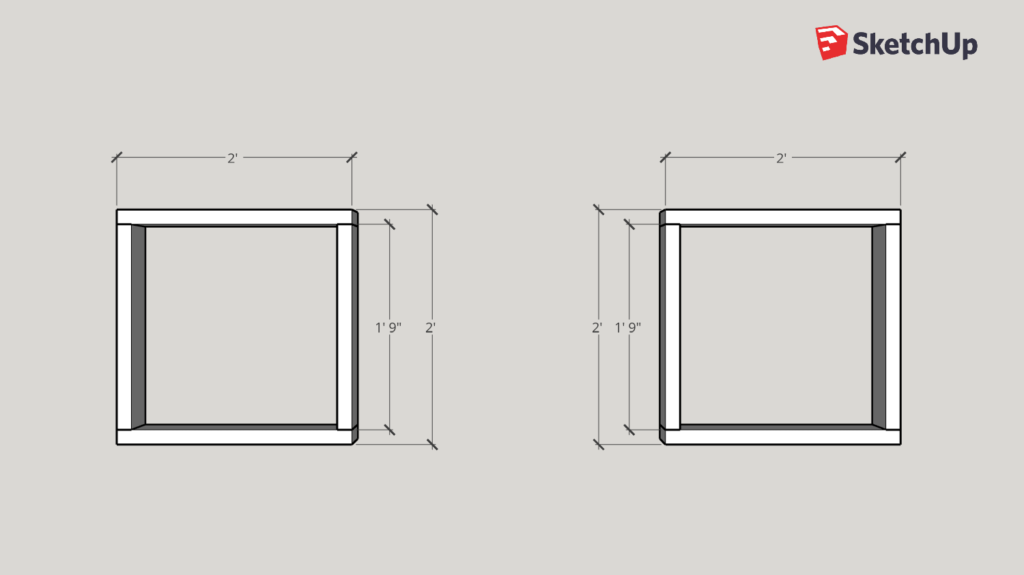
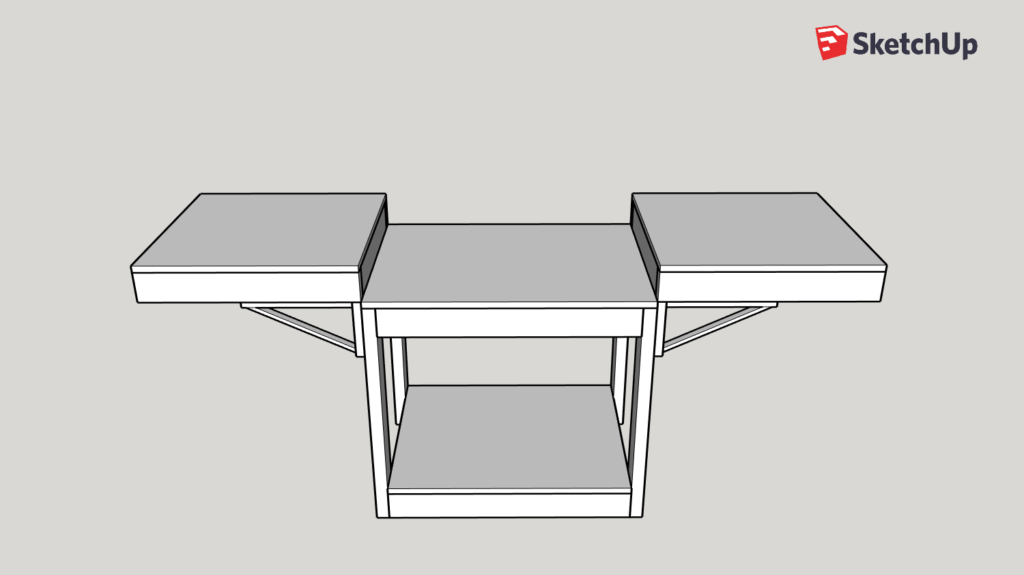
Repeat the same process to build two frames for the wings as shown below. Again use two 2 ½" self taping screws on each end of the 2x4s.
Step 3.
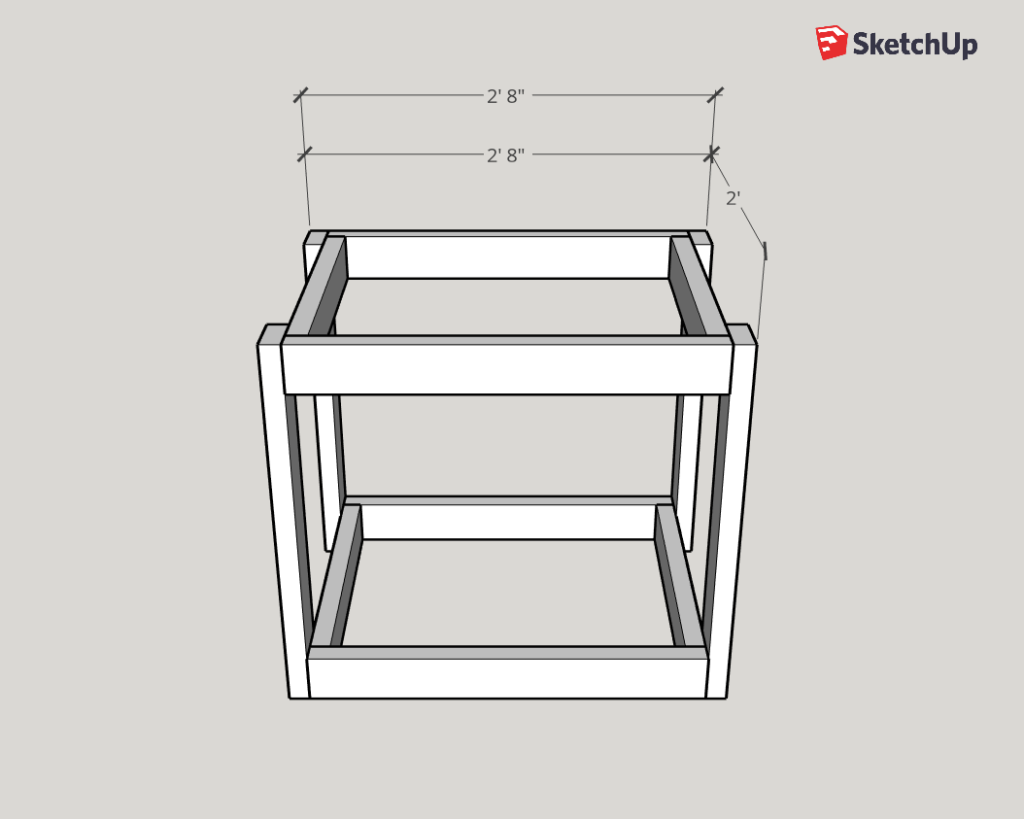
Next, attach the legs to the center frame. Line the legs up so they're flush with the edges and bottom of the first frame. Use 2 ½" self tapping screws to secure them.

I used three screws per leg - two through the side 2x4s and one through the center of the ends of the front and back 2x4s.
Repeat for the second center frame.
Step 4.
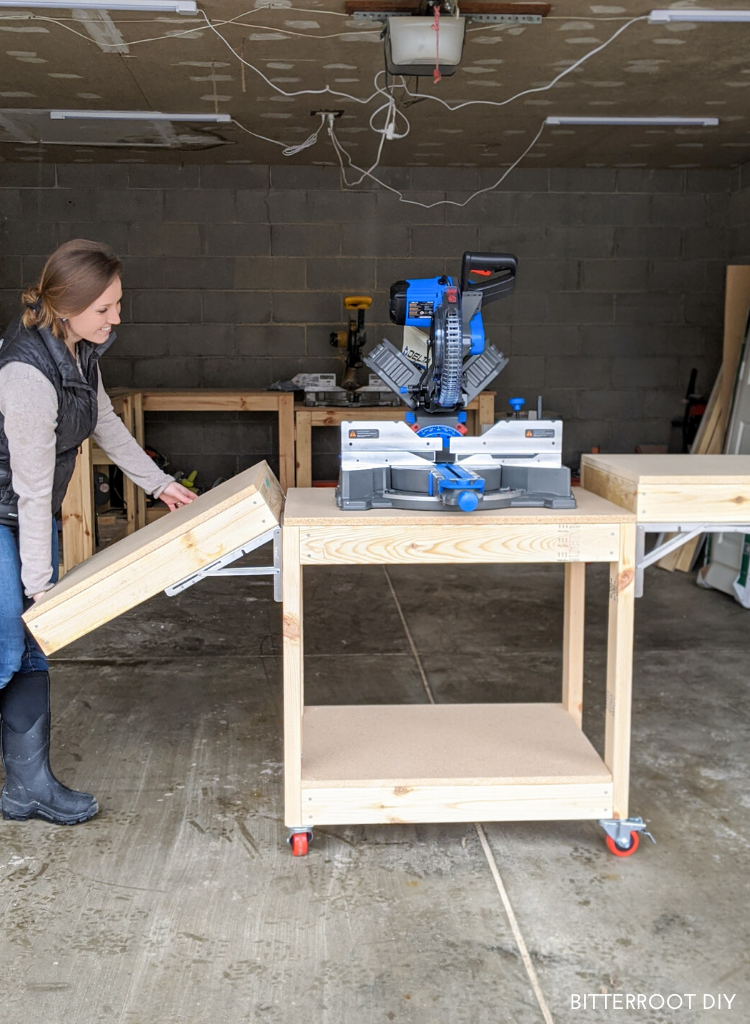
Now it's time to attach the folding brackets.
The brackets came with exactly ZERO instructions, but they're pretty straightforward. I didn't use the included screws since they were huge and looked like they'd split and destroy the 2x4s. Instead, I opted to use 1 ¼ self tapping screws and washers.
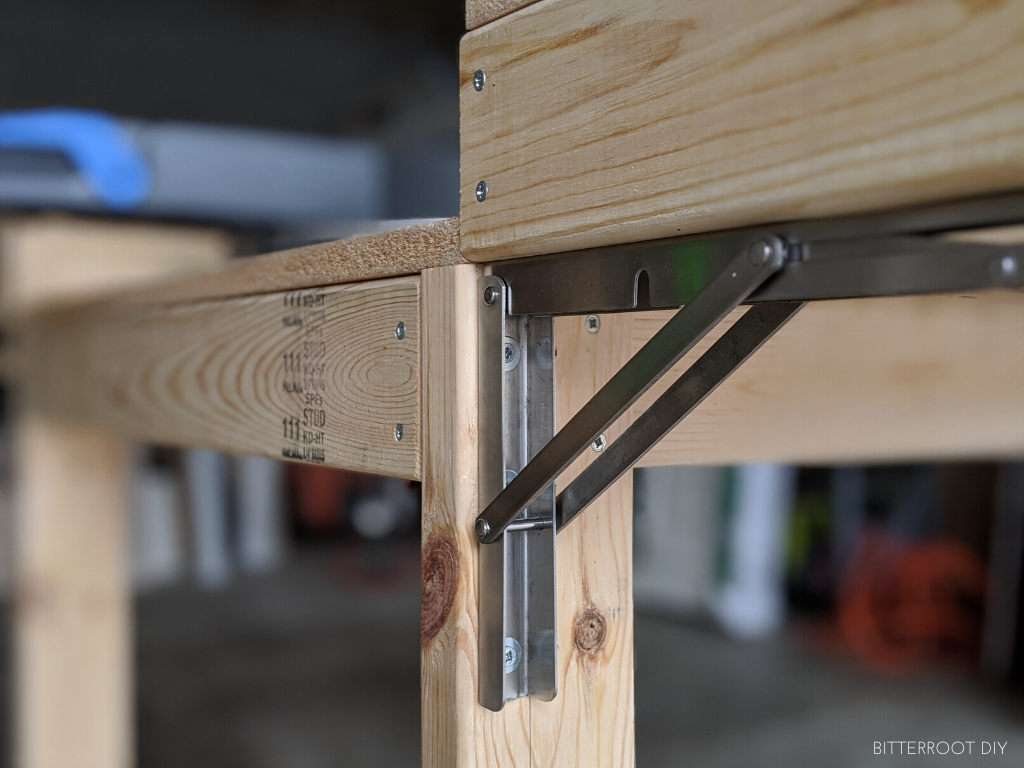
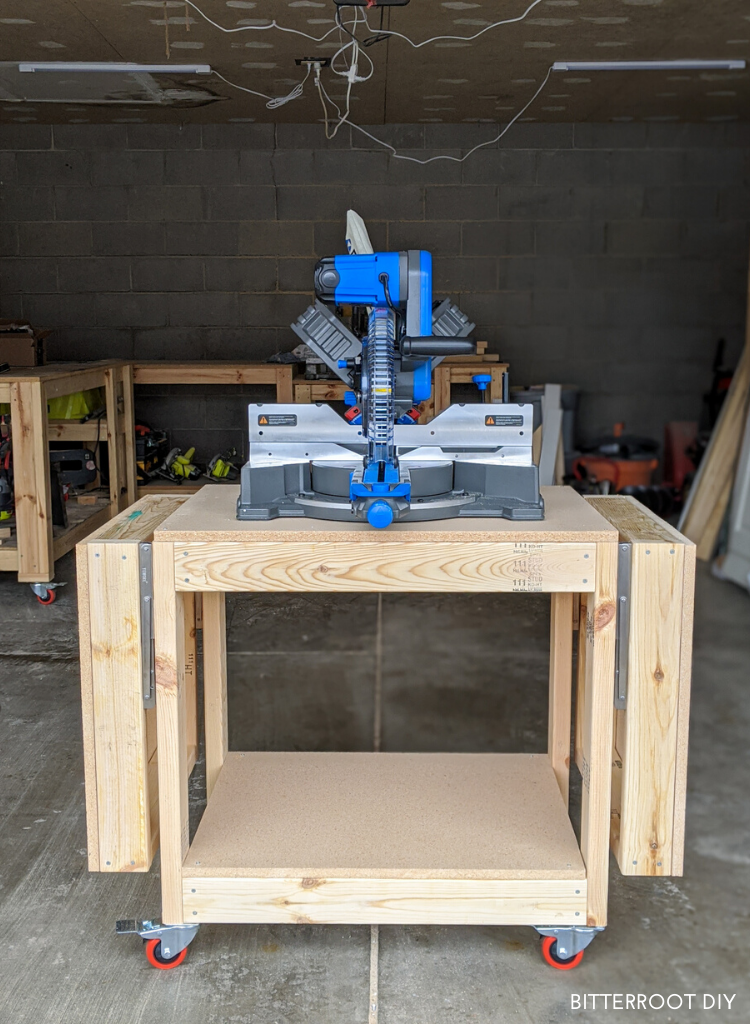
Line the bracket up with the outside of the leg, level it, and align it at the top to hold the wing level with the top of your miter saw table and fence. The tabletop of my miter saw sits at 3 ⅝", so I set the brackets so the wings fold up exactly level with that.
Use a long 6" bit to reach in the bracket and attach it to the legs.
I ended up removing the single 2 ½" screws I drove through the end of each of those center frame 2x4s so I could get the brackets in the correct place. I took the screw out, lined the bracket up where it needed to be, and then used a washer and that same 2 ½" screw to secure the very top of each bracket. So the screw and joint is still the same - it's just holding the bracket as well.
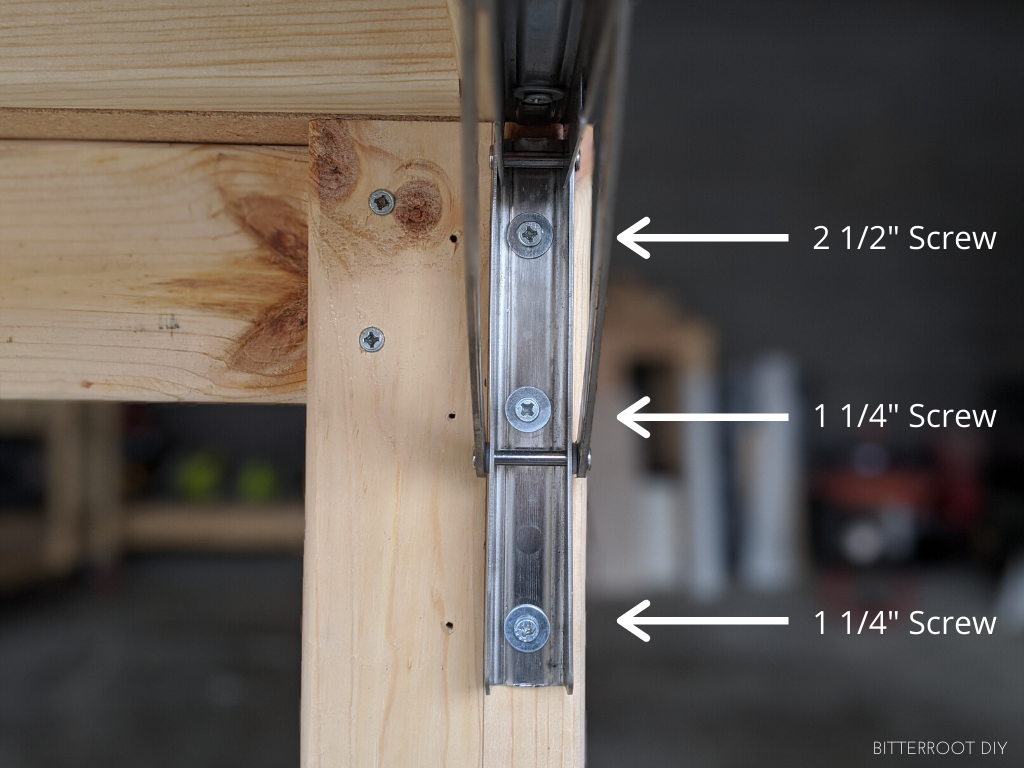
You can opt to leave those screws out until now when you attach the brackets, or just remove them one by one as you attach the brackets like I did.
I used 1 ¼" screws and washers to secure the rest of the bracket.
Step 5.
Once the brackets are secured to the legs, position the wings and attach the brackets to them.
The brackets should be centered in the bottom of the wing 2x4s.
Make sure everything is square - it may take a little shimming and finagling - so the brackets slide smoothly.
Step 6.
Flip the whole thing over and attach the locking casters to the bottom. I suppose you could do this before attaching the wings, but I did it after - totally up to you!
I used 1 ¼" screws and washers to secure the casters. The holes for attaching the casters are larger than the screw heads, thus the washers.
Step 7.
Lastly, add the tabletops.
I secured the tabletops to the frames with 1 ¼" self tapping screws in each corner.
Countersink the screws for a perfectly flat tabletop and shelves.
And there you have it - easiest DIY mobile miter saw stand EVER!
Let's just ignore all the random cords hanging from the ceiling and molding back corner of drywall ... focus on the beautiful workbench haha!
Please let me know if you have any questions and I'll get back to you as soon as possible.

Thanks for stopping by!
For more project ideas, you can find me on Pinterest. And to stay up to date with the latest shenanigans, follow me on Instagram.

Awesome build. I was looking for a compact design for my miter saw and this is perfect. Do the top of the wings sit level with the top of the Miter saw table? I'm wondering if lumber that stretches across the wings are level with the Miter saw table surface.
Yes, I mounted the brackets so the wings are level with the saw table. You may have to adjust depending on the height of your miter saw.
I’m building this today. Looking forward to it. Great and simple plan. Did you measure the height of your miter saw so the foldable shelves would be flush with your saw? Just want to make sure I don’t build a stand for your saw and not mine. 🙂
Yes I did. Make sure to adjust it for your saw!
Hi, I was looking for a plan for my mitre saw. Loved your one and am going to build it. Thanks for the inspiration. Keep up the fantastic work.
That's great to hear! Thanks!
The link for the folding brackets just list some "L" shaped brackets, did the link change? Thank you for posting this!! I'm gonna try to build this one!!
Sorry about that. I just checked and the link is correct, but maybe it changed for a bit? Sometimes the Amazon links do that without any notification or anything. Sorry for the inconvenience.
Hello,
Great build. I'm following along for my own station, I just bought my first miter saw! However, I do have one question: The top of my miter saw measures 4 and 1/4 from the bottom- what adjustment to the wings would I make to make sure they are flat with the top of the miter saw surface?
You could mount the brackets a little higher or use wider boards to build the wings so they sit higher. Or you could add extra shims on top of the 2x4 wing frames, under the particleboard. Hope that helps!
Does the length of the legs and the height of the casters make the height 36"?
Also what is a flip top?
Love the looks of your table. It is just what I have been looking for.
Thanks for sharing.
Yes, it's about 36" tall when the wings are up - countertop height. I'm not sure I understand the question about what a flip top is?
Great build! Thank you for the plans! I'm in the process of finishing up this station myself. A couple of notes on my experience... For the link on the folding brackets, you mentioned it was a "pack of 4", but it now links to standard L brackets, with an option to click for 12" folding brackets "pack of 2". In my rush I figured pack of 2 meant 2 sets... nope! So my bad... had to order a second set which will be here tomorrow. 🙁 A second duh moment for me was that the linked 3" casters weren't available when I wanted to order them, so I searched for comparable ones on Amazon and found a different set. I didn't check the base size on the ones I chose and size of base was a little different. Your linked ones are 3.7" x 2.55", while the ones I chose were 3.74" x 2.55"... and yes, that .04" made a difference when lining up the screwholes to mount. 1 of the holes doesn't quite hit on wood, so buyers, be careful on those base sizes! One last note is triple check your height on your wings so you mount the brackets exactly to the height you need in order for the wings to be level to your saw's top face. I'm off by about 3/16" and will need to shim up my saw... no biggie... I'm putting in a 3/16" sheet under my MDF top to bring it up to level, (unless someone has a better idea). I'm planning on adding an extended fence on the wings as well, (probably removable to have the option of more work surface if needed) Overall a fantastic table that I plan on finishing up tomorrow and excited to put to use. Thank you so much for making the plans available!!!
Just bought a great miter saw and your plans are perfect! Will start building tomorrow and just ordered the brackets from your link. Thanks so much for the video and plans.
Of course!
Like so many other's have said, this is the simplest table I've found with the most detailed and helpful instructions. This is also the one I'll be building. The parts list that takes you to Amazon was an amazing addition to this list. Thanks.
Thanks - glad you like the plans!
Hy Tylynn,
I found your video on your new Youtube channel about this mobile miter saw.
I write to you from Italy (i hope you understand my English 😛 also if it isn't perfect ... Soon, when i'll move to the new house (and i'll have a double garage to use also for small diy works) I surely build this one!
Very interesting are the sliding side. I will study on my project a wood "moving frame" from behind the bench with also 2 other "moving frames" (with "hinges"? is the correct name? I hope :P) that closes the sides (like a |_| ) around the miter saw so i'll not have a lot of wood dust in the garage or on the floor anyway.
I'll go now on FB to see all your others videos! Have a nice weekend.
Andrea
That sounds like a great idea! Hope you have a great weekend too!
Hi Tylynn,
First of all mahalo for your time and thoughtfulness in creating such a functional Mitre stand.
I was wondering, what are your ideas for adding a “fence” and “stop blocks?”
Aloha,
Brudda Damon
Thank you! I haven't added a fence or stop blocks to this miter saw stand yet. But if I do, I'll just attach them to the tabletops on the wings so they fold up and down with them. I'm not sure if that answers the question?
I just made mine today according to your instructions. It was my first wood working project. Thanks a lot for posting this
That's great to hear!
Hi Tylynn,
They say timing is everything. I have a new miter saw. You just published awesome plans for a mobile stand. Coincidence? I think not
Great plans and easy to follow directions for a beginner like me with a new miter saw that cries out for a rolling stand!
Couple of questions:
-should I size my top before cutting to make sure I can turn my saw all the way to 50 degrees either way? Yours looks plenty big enough but I have a different saw.
-do you think the wings can be made out of 2x2’s instead of 2x4’s to save a little coverall width and weight? Obviously screw size would have to change. Have pretty limited space. Sorry, I’m a beginner.
Just waiting on the brackets and wheels to be delivered then off to get some (more) wood.
Perfect timing!
I measured the saw when it was turned all the way to full miters to make sure it would fit, so I think these measurements should work for you as well. However, I recommend double checking since you have a different saw.
I think you could make the wings with 2x2s and be just fine. The brackets are what really ever holds any weight anyways.
Thanks so much for using my plans and good luck!
Tylynn,
Do you know if the 12" saw will fit on the stand? Or does anyone have the 12" version of this saw on the stand? Thanks!
I think so. I put my 12" sliding compound DeWalt on it the other day and it fit just fine. Just double check the measurements when the saw is at its far miters to either side to make sure it won't hit the sides.
IT LOOKS AWESOME
ARE ALL 4 BOXES 29 X 21
Thank you! No, the center boxes and wing boxes are different sizes. Please refer to the plans for exact dimensions.