
Build your own fire pit for $50 using landscaping bricks and adhesive.

This post may contain affiliate links. If you make a purchase from one of the links, I may make a small commission at NO EXTRA COST to you. This helps keep the tutorials and plans free here at Bitterroot DIY. Thank you for your support! See my full disclosure here.
It’s been an outdoor-projects extravaganza around here lately! It started with the workshop benches (here and here … sorta outside since it’s the garage), then the gas fire pit table, outdoor bench, this new backyard DIY fire pit, there’s a couple types of planters coming soon, aaaaand – if you follow along on Instagram, you’ve already heard – I’m tackling the most dreaded project EVER next week … stripping and refinishing the decks. But, for now, let’s just focus on the project at hand – this $50 DIY fire pit!
Yep.
50 big ones.
That’s it!
I think the adhesive cost about $4 though … so 54 big ones … Not bad for a new fire pit!
You can buy full fire pit kits, but they generally cost quite a bit more since they include all the bricks and a heat insert. I did not put a heat insert in this DIY fire pit, but I’ve built a few fire pits just like this and never had an issue! The bricks get dark on the inside edge, next to the flame, but that’s not a problem.
I bought my supplies at Menards, but it’s just a bunch of paving bricks which you should be able to find at just about any home improvement store.
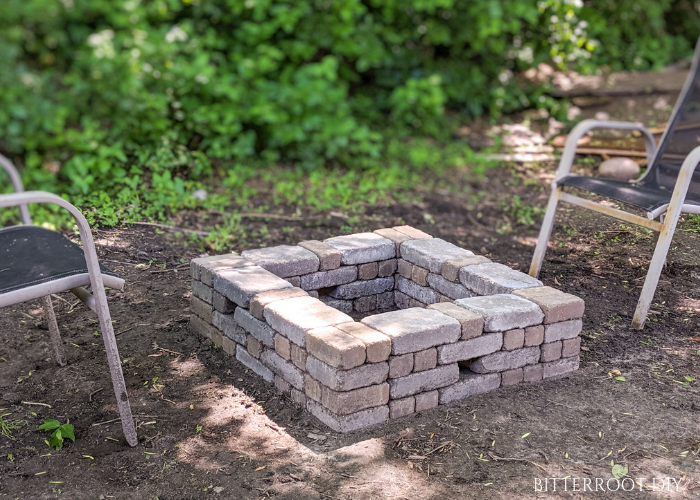
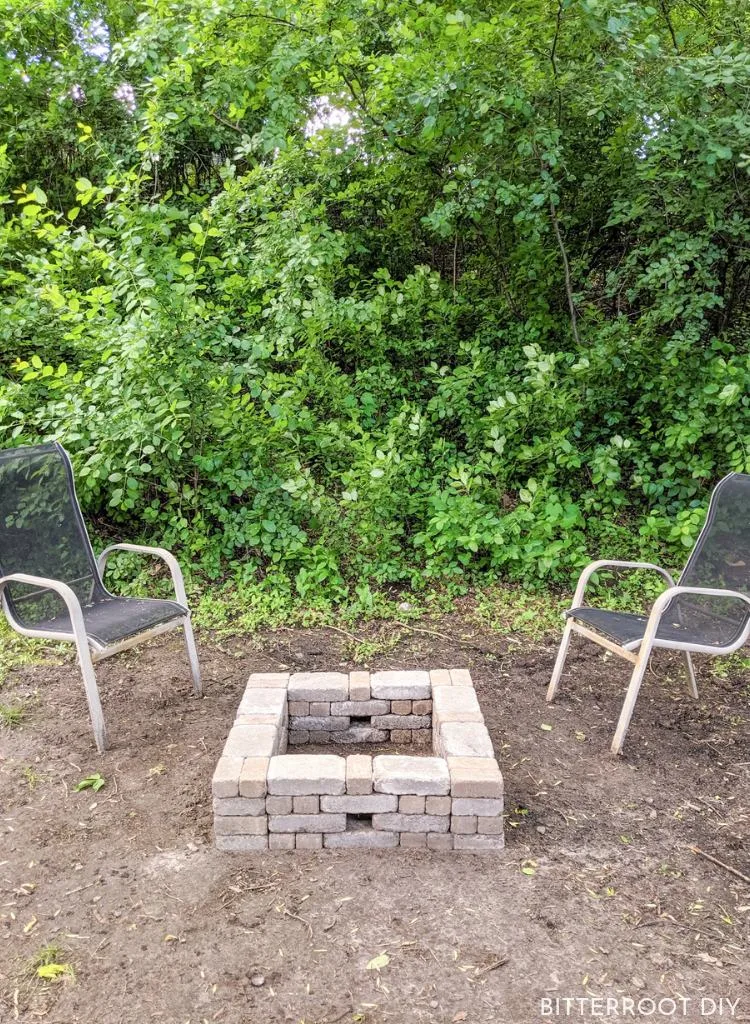
I didn’t have an exact pattern planned out when I went to get supplies, so I spent some time stacking bricks (*read: I built about 6 different fire pits in the garden center and everyone thought I was crazy) until I figured out a pattern I liked. The fire pit is about 33″ x 33″ and 8″ tall. Adjust the number of bricks if you want bigger or smaller (I wouldn’t recommend going any smaller though), or even round!
If you want to see how I put it together, check out the step by step in this quick video!
Tools & Supplies:
- Square Paver Bricks
- Small Rectangle Paver Bricks
- Large Rectangle Paver Bricks
- 4 Tubes of Landscape Adhesive
- Caulk Gun
- Tape Measure
- Level
- Gloves
- Shovel
** Adjust the supplies as necessary to build a fire pit that fits your space.
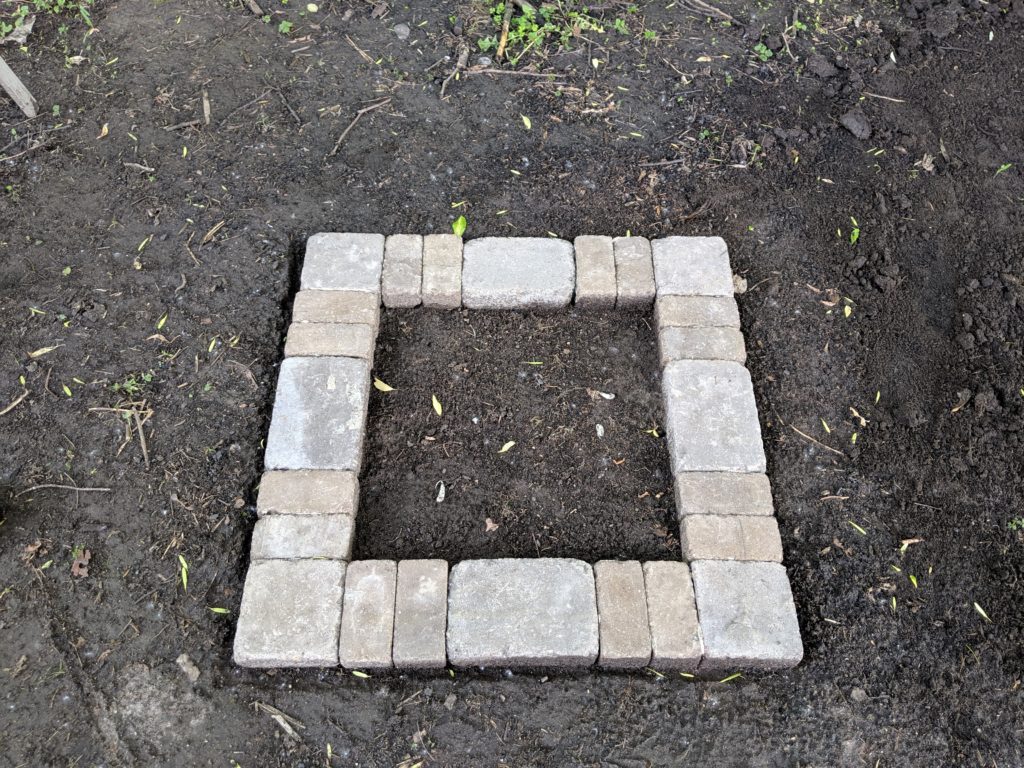
Step 1.
Measure out the fire pit area and remove any grass or vegetation. Use a tape measure to mark the area and dig down about 1″-2″ all the way around the border. Place the first level of pavers around the border to make sure they all fit. Expand and adjust the border as necessary. Once the pavers fit nicely in the border, remove the pavers and dig the rest of the fire pit area out until it’s level.
A lot of people dig out about 6″ for the fire pit area and fill it with gravel. Gravel helps with drainage and maintaining a level surface. I skipped the gravel with our fire pit and built it directly on the dirt. It burns just fine, but feel free to add gravel if you want.
If you build directly on the dirt, make sure to pack the dirt down really well so it doesn’t move around and settle after you build the fire pit. I dug the fire pit area out and then dropped the biggest paver blocks all around it a few times to compact everything … very scientific, I know. The thing hasn’t moved at all, so it seems to have worked!
Step 2.
Once you have a solid, level surface for your fire pit, lay out the first level of pavers.

Remove the pavers one by one to add landscape ahesive between them. Work your way around the first level until all the pavers are stuck together.

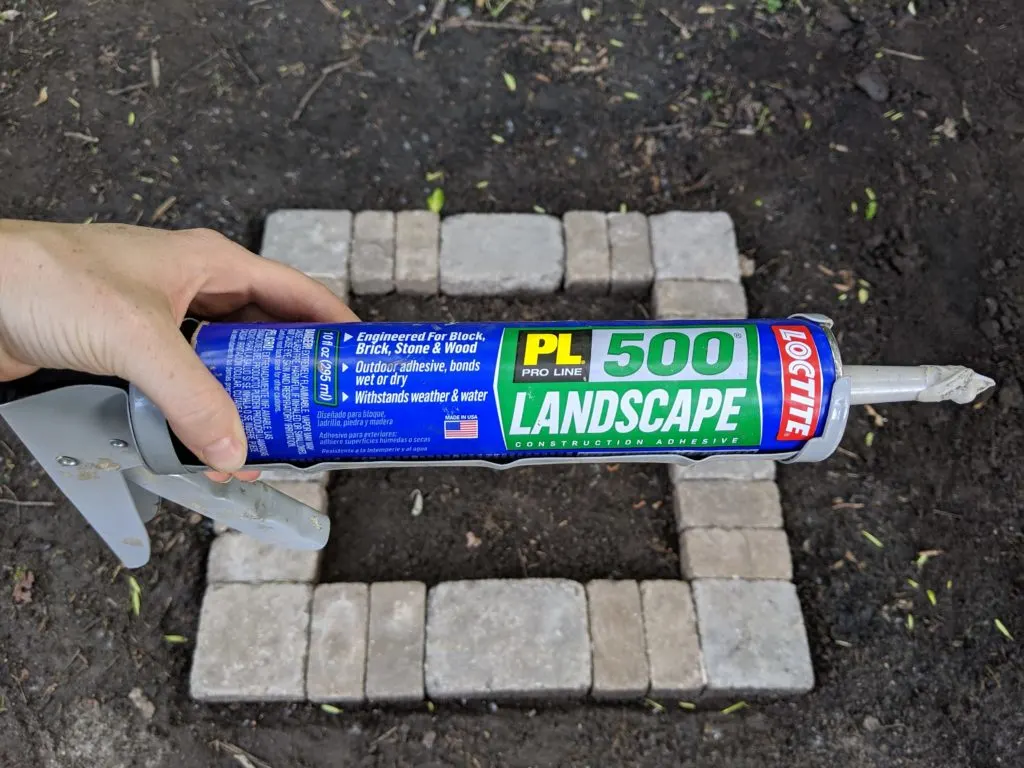
This landscape adhesive works wonderfully. I used the same stuff on the top of the gas fire pit table. It’s super strong, sets quickly, and holds up to the heat.
Step 3.
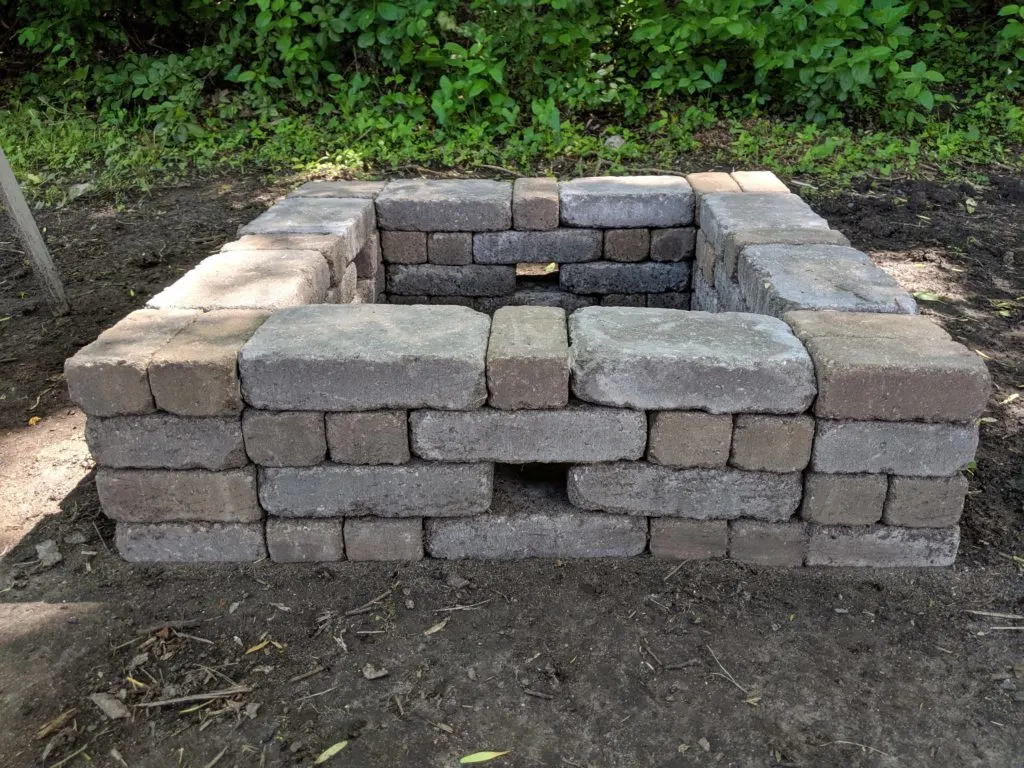
Repeat for the second level of pavers.


Leave two small pavers out of the second level to allow air flow to the fire (you can see the missing blocks in the above photo).
Use the adhesive between all the pavers on the second level, as well as on the top and bottom of first and second levels so the levels stick together.
Step 4.
Repeat for the third level of pavers.


Leave out two small bricks on the opposite sides as you did in Step 3 to allow airflow.
Step 5.
Repeat for the top (fourth) level of bricks.


Do not leave out any bricks on the top level so there’s a nice, complete top surface.

And there you have it – brand new fire pit for $50!
Though it’s not as “refined” as an official fire pit kit, I’m really happy with how ours turned out. It looks so much better than what we had before (a small metal one) and burns great. We haven’t had any issues with bricks moving or settling weirdly.

Please let me know if you have any questions and I’ll get back to you as soon as possible!


Thanks for stopping by!
For more project ideas, you can find me on Pinterest. And to stay up to date with the latest shenanigans, follow me on Instagram.


Sara Farnsworth
Sunday 25th of April 2021
Trying to do this for my hubby for Father's Day, the kids want to surprise him with it! Can you break it down for me, as to how many of each size block we should be purchasing? We are going to mimic exactly what you have done. Thank you!!
tylynn_sattler
Monday 26th of April 2021
Hi Sara,
That's a wonderful idea for Father's day! I *think* I used a combination of 3"x6" blocks, 6"x6" blocks, and 6"x9" blocks. I found it easiest to just go to the store and see what size blocks they had so I could brainstorm a pattern. I know that's probably not super helpful, but not all stores carry the same size blocks. Just make sure the combination of blocks you choose can all add to the same dimension. On my fire pit the dimensions are all multiples of the 3" side, so I could just stack and turn things as necessary to make up a square.
If you use all the same size blocks, the general idea is to alternate which direction the corner blocks face so you get that checkerboard-ish pattern. I'll try to explain that: on the first level, face the corner blocks horizontal to the east & west. On the second level, face the corner blocks horizontal to the north & south. Complete the square based on those corners.
Hope that helps!
Bjorn
Monday 23rd of November 2020
I like your fire pit and would like o build one exactly like that. But I have a hard time finding the 3 sizes and types of bricks you were using. Looking at Menards, they have a ton of different bricks but it is hard to find the exact ones you used. Could you elaborate?
tylynn_sattler
Monday 7th of December 2020
I've tried to find links to the exact bricks, but haven't been able to. I think it depends on what your local store has in stock. I just found some so the dimensions worked out - they're 6" square. Sorry I don't have more information.
Karen Jefferson
Saturday 1st of August 2020
We just scored 215-ish landscape bricks for $15!!! This looks like a design that will work for us! Thanks for putting it out there.
tylynn_sattler
Saturday 1st of August 2020
Perfect! That's a pretty good score!