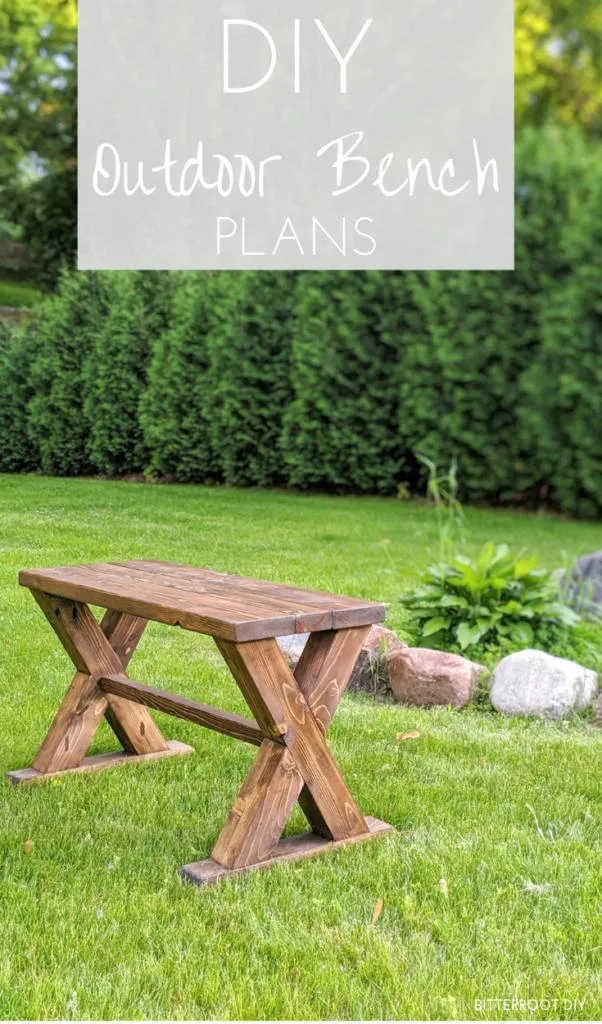
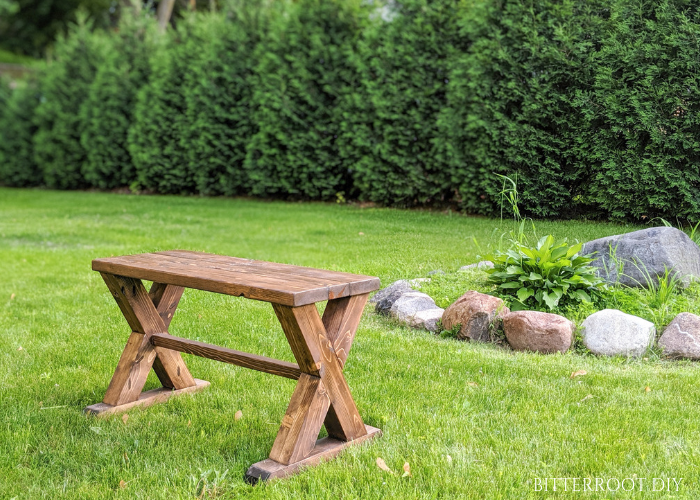
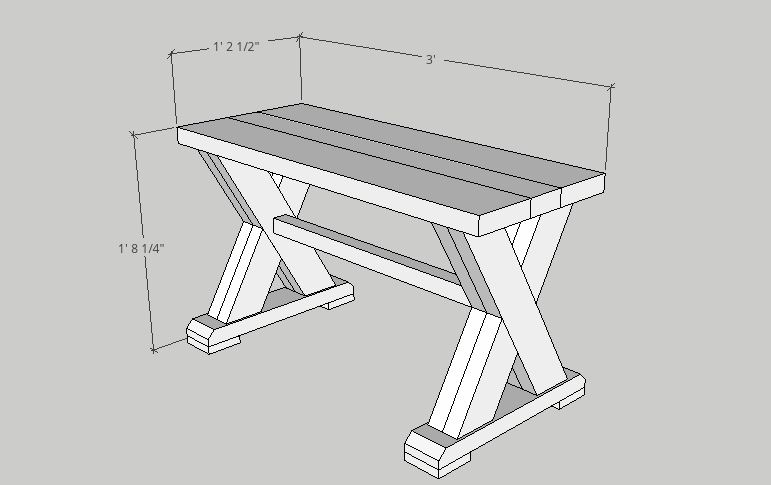
Build a farmhouse outdoor bench for your porch, patio, or backyard.

This post may contain affiliate links. If you make a purchase from one of the links, I may make a small commission at NO EXTRA COST to you. This helps keep the tutorials and plans free here at Bitterroot DIY. Thank you for your support! See my full disclosure here.
This bench is more the product of hoarding than anything else … I’ve been saving this set of X legs for over a year now and finally put them to use! Why did I have an extra set of X legs? Well, they were actually a mistake from my first attempt on this coffee table. By the time I realized I had messed up the dimensions, I’d already put quite a bit of time in and couldn’t just throw them away. So they sat in the corner of the garage for WAY too long.
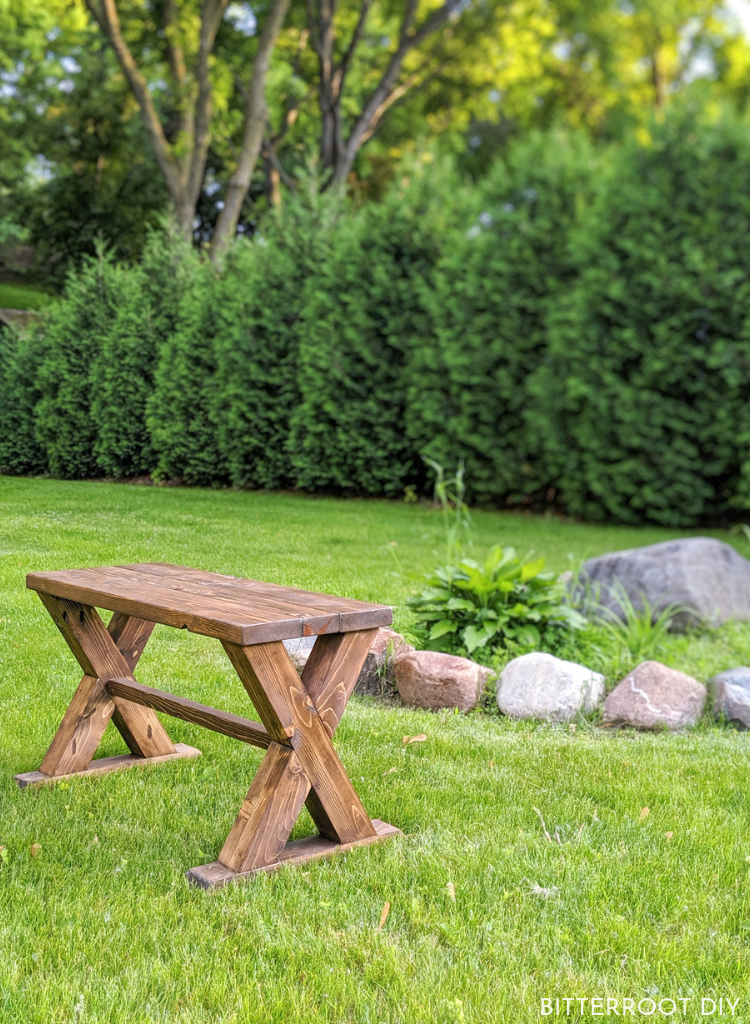
But no more! I put a bench top on them last week.
About. Time.
You can modify the materials to make this an indoor or outdoor bench. I used all exterior-grade screws, glue, and sealant for an outdoor bench. However, you can most definitely use interior screws, glue, and sealant and put it inside. Whatever floats your boat!
Enjoy the plans!
TOOLS & SUPPLIES:
- Miter Saw
- Table Saw (optional)
- Drill
- Orbital Sander
- Kreg Pocket Hole Jig
- Paint Sprayer
- Tape Measure
- Clamps
- Exterior Wood Glue
- Exterior Spar Urethane (I think it’s cheaper at Home Depot than Amazon, but that’s what it looks like)
- 2 1/2” Screws – Exterior Grade
- Pencil
- Safety Glasses
- Ear Protection
LUMBER:
- 3 | 2 x 4 @ 8′
- 1 | 2 x 2 @ 6′ (only need 3′ but 6′ is usually the smallest they sell)
- 1 | 2 x 6 @ 8′
- 1 | 1 x 4 @ 6′ ( you only really need ~15″ for the feet)
- 1 | 1 x 2 @ 6′ (only need ~19″ but 6′ is usually the smallest they sell)
CUTS:
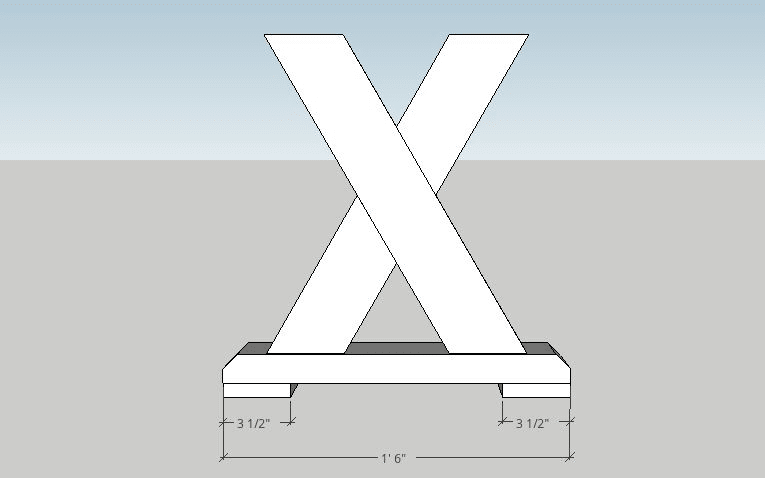
- 1 | 2 x 2 @ 26″ (stabilizer brace)
- 1 | 2 x 4 @ 36″ (bench top)
- 2 | 2 x 6 @ 36″ (bench top)
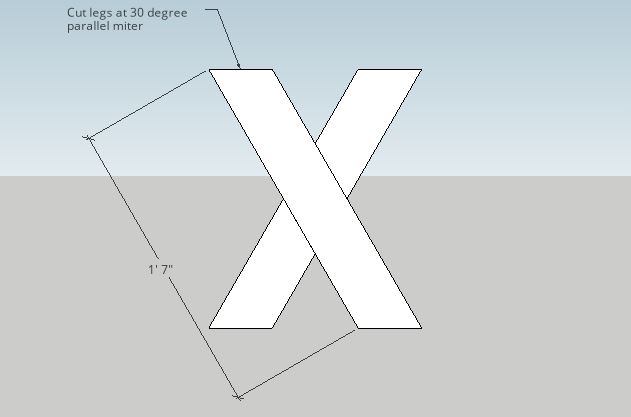
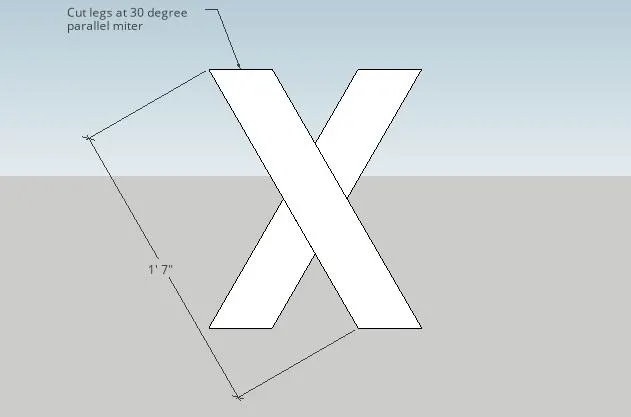
- 4 | 2 x 4 @ 19″ with 30 degree parallel miter (legs)
- 8 | 2 x 4 @ 9 1/2″ with 30 degree perpendicular miter (long side)
- 2 | 2 x 4 @ 18″ (feet)
- 4 | 1 x 4 @ 3 1/2″ (feet)
- 2 | 1 x 2 @ 9 1/2″ (bench top supports)
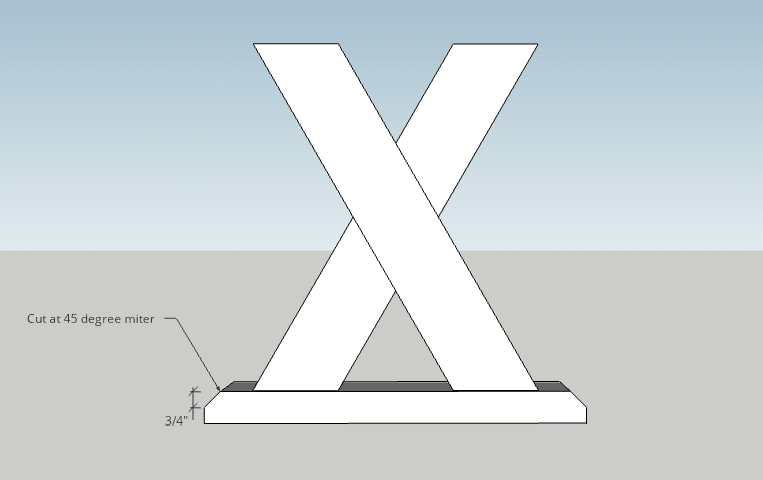
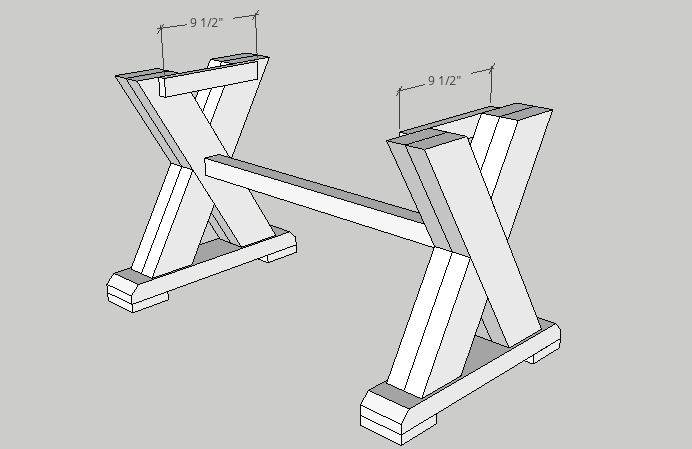
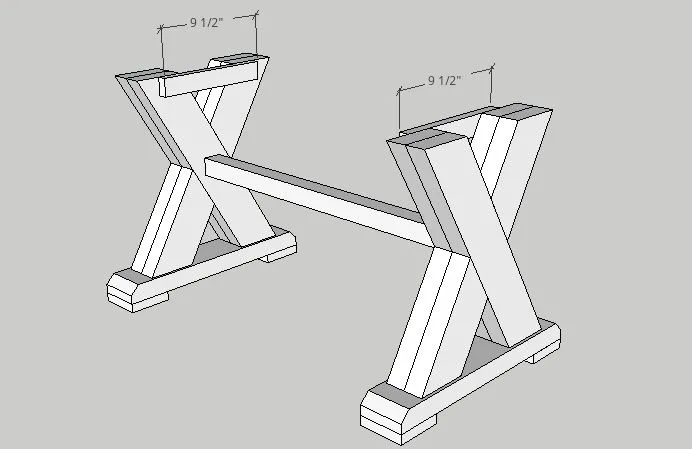
Step 1.
Build the legs according to following diagrams.
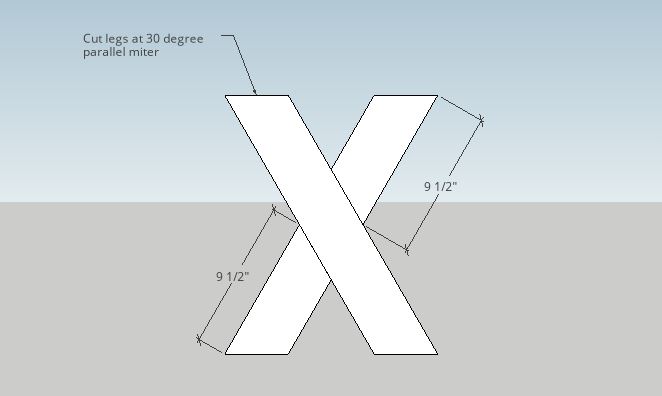
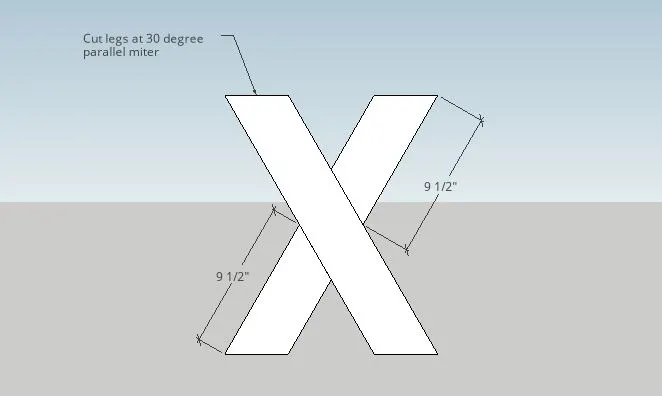
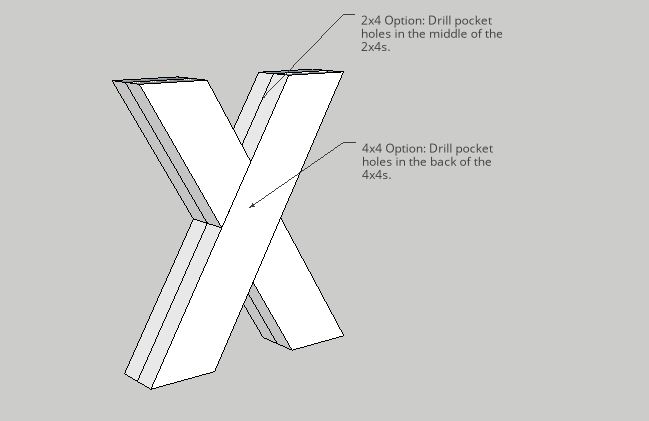
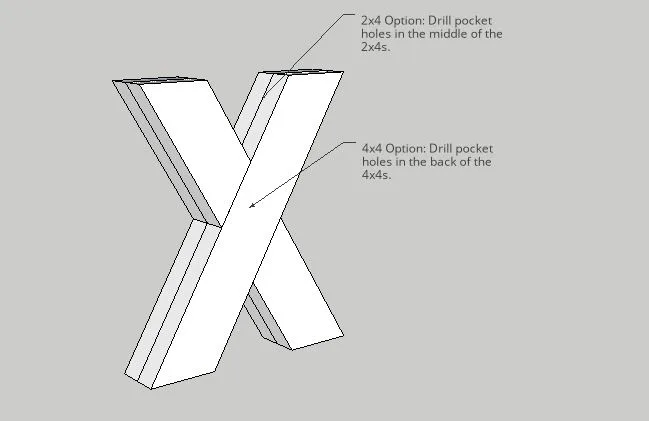
I glued 2x4s together to make 4x4s for the legs. You can just buy 4x4s rather than 2x4s, but it’s a little more expensive. I drew the diagrams to show two separate 2x4s, but the dimensions are the same as if you use 4x4s.
There area few options to build these legs. I’ll do my best to explain them.
2 x 4 Option:
To use 2x4s, build each X separately and then glue them together. Use wood glue and 2 1/2″ pocket hole screws to build the X. Face the sides with pocket holes towards each other when you glue the Xs together to hide the pocket holes. Sand down the joints between Xs until they look like a solid 4×4.
If you have a table saw, you can cut the rounded edges (about 1/4″) off the 2x4s prior to building the Xs. Cutting the rounded edges off makes them look like true 4x4s once they’re glued together. **(this is what I did)
If you do not own a table saw, don’t worry about cutting the rounded edges. The bench will look just fine even if you can see the seam between 2x4s!
4 x 4 Option:
If you use 4x4s for the legs, drill pocket holes in the back of the Xs and then plug them with wood filler or glue & wood plugs.
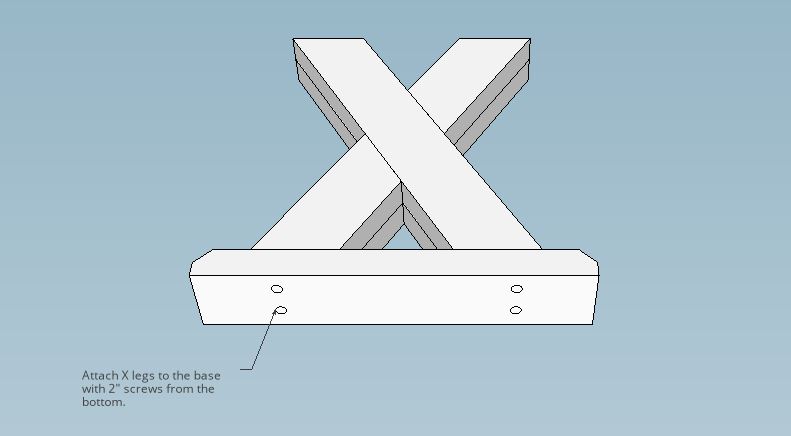
Step 2.
Cut a 45 degree slant off each 2×4 foot (the 18″ long pieces). To cut the slant, place the 2×4 on your miter saw with the narrow side up (flipped from how you normally cut a 2×4), set the saw to a 45 degree miter, and cut half the width off the end of the 2×4.

Attach the 2×4 feet to the legs with 2″ screws from the bottom.
Step 3.
Attach the 1×4 feet to the legs with wood glue. Clamp and let the glue dry completely.
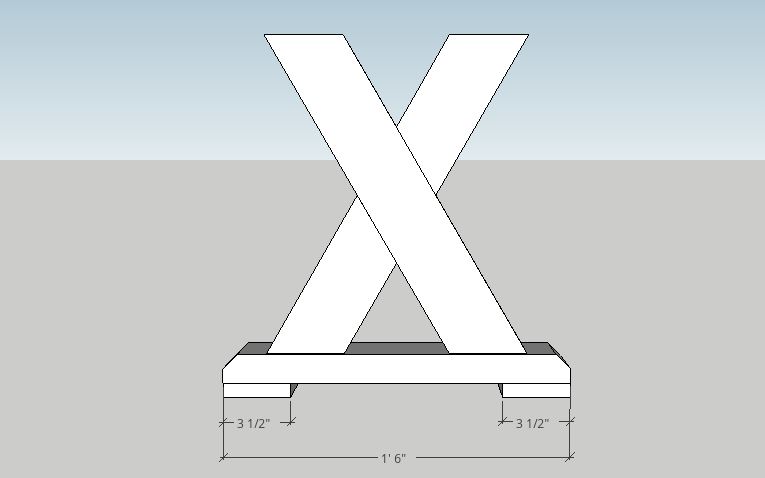
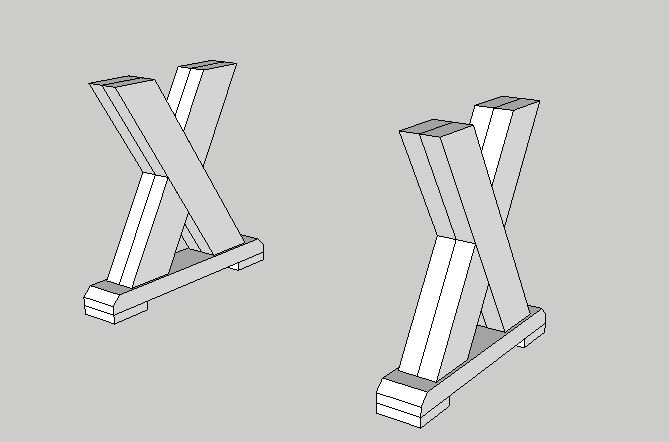
When it’s all said and done, you should have two legs:

Step 4.
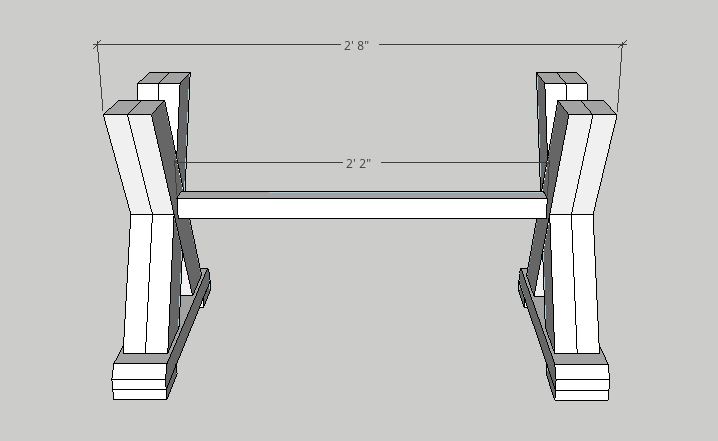
Attach the legs with a 1×2 to stabilize the bench. Center the 1×2 on the legs and use 2 1/2″ pocket hole screws and wood glue. Drill the pocket holes in the bottom of the 1×2 to best hide them.
Step 5.
To support the middle 2×4 on the bench seat, attach 1x2s to the top of each leg with screws and wood glue.
I’ll be honest with you … I did not put these extra 1x2s on the legs. I was planning to since the middle 2×4 in the seat is just kinda chillin’ out in the middle. But once it was all assembled, it was PLENTY strong. It’s totally up to you, but the 1x2s will give the seat good support if you want to be safe.
Step 6.
Build the bench seat as you would a tabletop. Stagger pocket holes along the back of the boards and use wood glue and 2 1/2″ screws to attach them. I wrote a separate post on how to build a tabletop if you need more information.
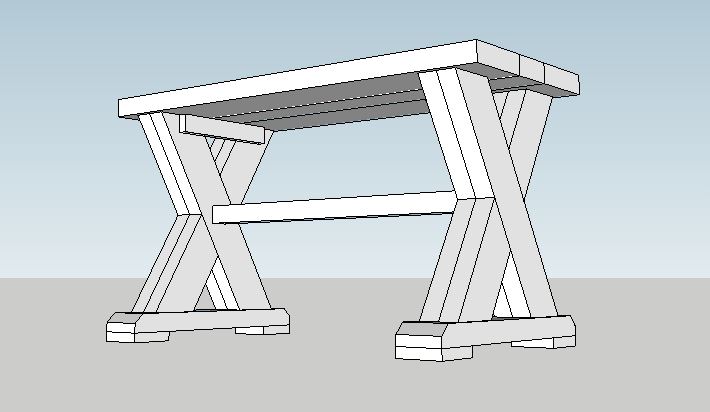
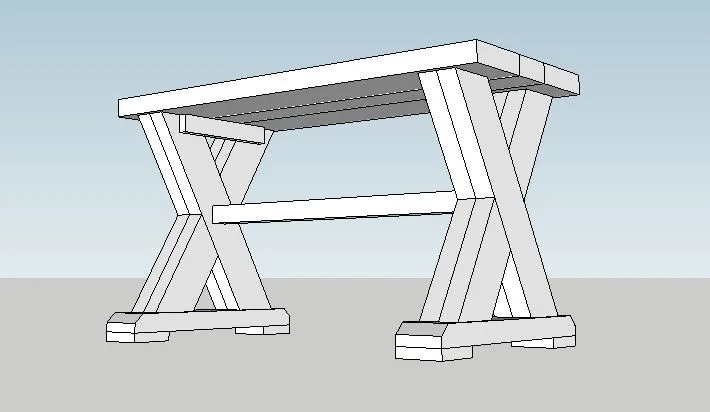
Once the seat is assembled, attach it to the legs. I used 2 1/2″ pocket hole screws. You could also screw the bench down to the legs from the top, or use corner brackets along the bottom.

Last, but not least, sand and finish as desired. I stained the bench with Minwax ‘Espresso’ and sealed it with Varathane Exterior Spar Urethane.
Side note – I’ve been eyeing a paint sprayer for a looooong time now and finally grabbed one a few weeks ago. I used it for the very first time to spray the polyurethane on this bench and oh. my. goodness. It saved so much time! There are a lot of corners on this bench, which are really difficult to get with a brush. So if you’re looking for an easier/quicker way to finish it, grab a paint sprayer and go to town!
No pressure though – a brush and some persistence works just fine as well! I’ve finished every. single. other project with a brush up until now and am still alive to tell the tale.
Just a friendly recommendation!

Please let me know if you have any questions and I’ll get back to you as soon as possible.


Thanks for stopping by!
For more project ideas, you can find me on Pinterest. And to stay up to date with the latest shenanigans, follow me on Instagram.