
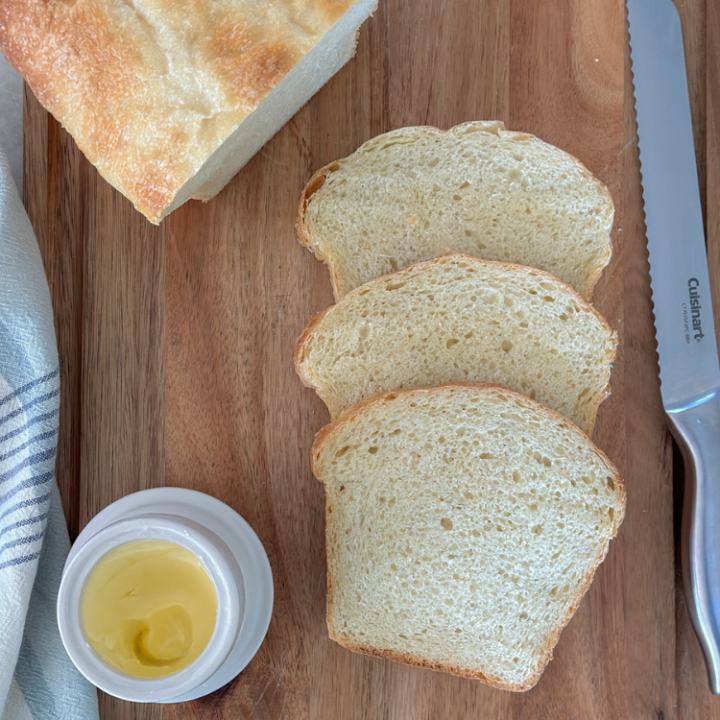
Is there anything more satisfying than slicing into a loaf of freshly baked bread? This sourdough sandwich bread recipe yields a delicious, soft loaf, perfect for sandwiches, toast, or just a side slice of bread!

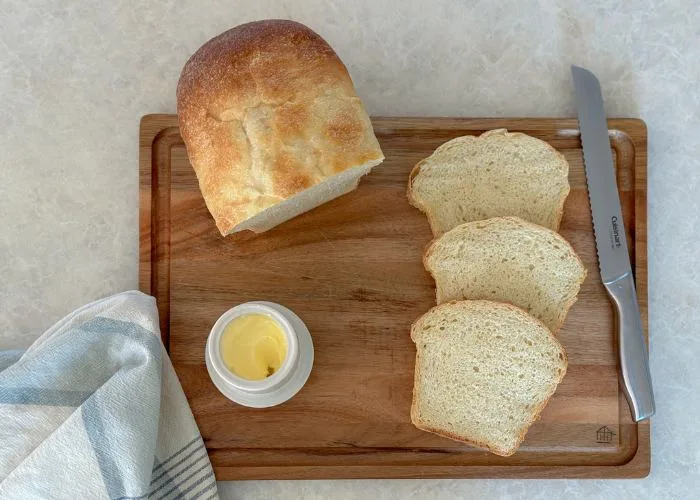
After many many tweaks and adjustments, today, I’m so excited to share my go-to sourdough sandwich bread recipe. This recipe has become a staple in our house. It’s seriously the easiest sourdough bread recipe ever! I make it at least once a week. It’s so crazy to think about, but we haven’t bought sandwich bread from the store in almost a year and a half.
I have a few starters going now. So, often, I’ll bake two of these loaves at a time. It freezes wonderfully if we don’t go through it as quickly one week versus another. We use it for everything from sandwiches to toast to dinner bread. It is hands-down the best bread we’ve ever had! You can also add mix-ins if you want a flavored bread. I’ve done garlic and rosemary, cranberry and nuts, jalapeno and cheddar. I’ll have to share the recipes for them as well, but you just add the mix-ins at the very beginning and then follow the recipe as per usual.


Keeping Sourdough Simple
As with all my sourdough recipes, my goal is to keep sourdough simple. I think there is a lot of confusion out there that makes it seem more complicated than it is. When in reality all you’re doing is replacing the yeast you buy at the store with yeast you grow in a jar – your sourdough starter. The only thing that really changes is longer rising times. Otherwise, you’re just making bread like usual!
As I was learning how to work with sourdough, I used to tease myself – “don’t be afraid of the dough”. But it’s so true! It’s just like any kind of bread baking. You really don’t have to get it perfect to be successful and make some delicious loaves of sourdough bread. If you prefer to bake artisan bread, that’s wonderful! There are tons of great artisan bread blogs and recipes out there.
In many sourdough bread recipes, all the ingredients are measured in grams, and the process is explained like you have to do it just exactly right or it’ll all be a loss. It seems way too complicated and intimidating! And I think that’s a misunderstanding that causes a lot of home bakers to not even try. But you don’t have to get it perfect! You can bake it like grandma, and it will turn out. Oof, what a relief!
Again, if you want to go the artisan route, more power to you! It’s just not my goal here. I’m a casual sourdough baker 😉


Now, of course, there may be a few attempts that don’t turn out quite like you imagined. I’ve had my fair share. The loaf might fall a little flat or be a little dense, but they’re still delicious! I once forgot a couple sandwich loaves on the counter for like 18 hours. Talk about over-proofed! But I went ahead and baked them. They were a bit dense for sandwich bread and they had more of the tangy flavor than usual, but they made great toasted dinner bread! And let’s be honest, the exact same thing would have happened if I had used store-bought yeast. It had nothing to do with being sourdough. I just left the dough out way too long.
My best advice is just to get your hands into the dough. You’ll learn what you like your dough to feel and look like. If the dough is a little dry, add some water. If the dough is a little wet, add some flour. This recipe is more like a set of guidelines to get you started in the right direction (as are all recipes 😉 in my opinion).


Also, sourdough sandwich bread is super simple compared to the traditional sourdough round loaf (boule). You don’t have to worry about any stretch-and-folds or tight shaping. Just mix the dough, let it rise, degas, move it to the loaf pan, and bake.
You got this!
** If you’re interested, you can find my Go-To Sourdough Bread Boule Recipe here.


A Few Tips and Tricks
- Feed Your Sourdough Starter: Before diving into the bread-making process, ensure your sourdough starter is active. A bubbly and lively starter is key to a good rise. I usually make this as an overnight loaf. I feed my starter around 12pm (noon). It takes my starter about 6-7 hours to get active, so it’s ready to mix into the dough in the evening after dinner.
- Shred the Butter: This is, hands-down, the best method I’ve found to get the butter to mix well into the dough. Just mark 2 Tsbp on a stick of butter and use a cheese grater to shred it to the mark. I do the same for pie crusts, scones, pastries. Works like a charm and mixes in way better than cubed pieces!
- Second Rise: This is key! You want to wait until the loaf rises about 1 1/2″ above the edges of the pan, even if it takes longer than 2 hours. If you bake it too soon, it will have way too much oven spring and split the top when it’s in the oven (much like the round loaves) … ask me how I know. This rise takes longer when the house is cooler. In the winter, I like to keep the dough on the counter near the oven (warmest spot in our kitchen). Or sometimes, I’ll turn the overhead light on above the stove and set the dough under that.
- Plastic Wrap: I’ve used both reusable bowl covers and plastic wrap successfully for the overnight rise. Since the dough is out for so long, a damp towel dries out way too fast and then the dough get’s dry. The reusable covers do alright, but the dough still gets a bit of a skin over it, though not too much to still bake well. Plastic wrap really works the best to keep it airtight for that long. But I’m on the search for a reusable cover that will work overnight since I bake these loaves so often. Will keep you posted!
- Shaping: It took me a while to get the hang of shaping these loaves. The method that works best for me is to degas the dough with a mixing spoon, lay it out on the counter, spread it into a rectangle, and roll it into a log. Then I flip it over, spread it into a rectangle again, and roll it into a log the opposite way from the first roll. Then gently tighten the shape, pinch the ends together, and transfer it to the loaf pan (I just pick it up with my hands, no scraper). The dough has a lot of movement in it when it first comes out of the bowl from the overnight rise, so rolling it twice works best for me. Experiment a little to see what works best for you!


Happy baking!
Please let me know if you have any questions and I’ll get back to you as soon as possible. I’m working on a post for troubleshooting sourdough as well that will be out soon to cover some FAQs!

Simple Sourdough Sandwich Bread
Bake the perfect soft sourdough sandwich bread with this easy recipe, using all-purpose flour and a touch of butter. Prepare the dough at night to bake fresh bread in the morning. It freezes beautifully if you prefer to make a few loaves at a time!
Ingredients
- 1 1/4 cup water
- 1 cup active sourdough starter
- 3 1/3 cups all-purpose flour
- 1 tsp salt
- 1 Tbsp honey (or sugar)
- 2 Tbsp butter, shredded
Instructions
- In a large mixing bowl, combine 1 1/4 cups water and 1 cup active sourdough starter. Stir until the starter is mostly dissolved into the water. It should look milky.
- Add 3 1/3 cups all-purpose flour, 1 tsp salt, 1 Tbsp honey, and 2 Tbsp shredded butter. The butter gives a tender crumb to the bread while the honey adds a subtle sweetness - perfect for sandwich bread. Mix the dough. It's a shaggy dough, so I often finish bringing the last of the flour into it by hand.
- Cover and let sit for 30 minutes. This is called the "fermentolyse" where you allow the ingredients to come together.
- Transfer your dough to the counter and knead for 2-3 minutes. You're aiming for a smooth and slightly tacky dough. You don't have to knead for long with this dough. In fact, sometimes I skip it altogether or just gently squelch the dough together in the bowl. The butter does make this dough a little bit sticky, so kneading helps bring all the ingredients together and make sure everything is evenly spread out (particularly the butter).
- Place your dough back in the bowl, cover it with an airtight cover (plastic wrap or reusable cover), and let it rise until doubled in size. This usually takes about 10 - 12 hours, depending on the temperature of your kitchen. I like to make this dough in the evening for an overnight rise, then bake it in the morning.
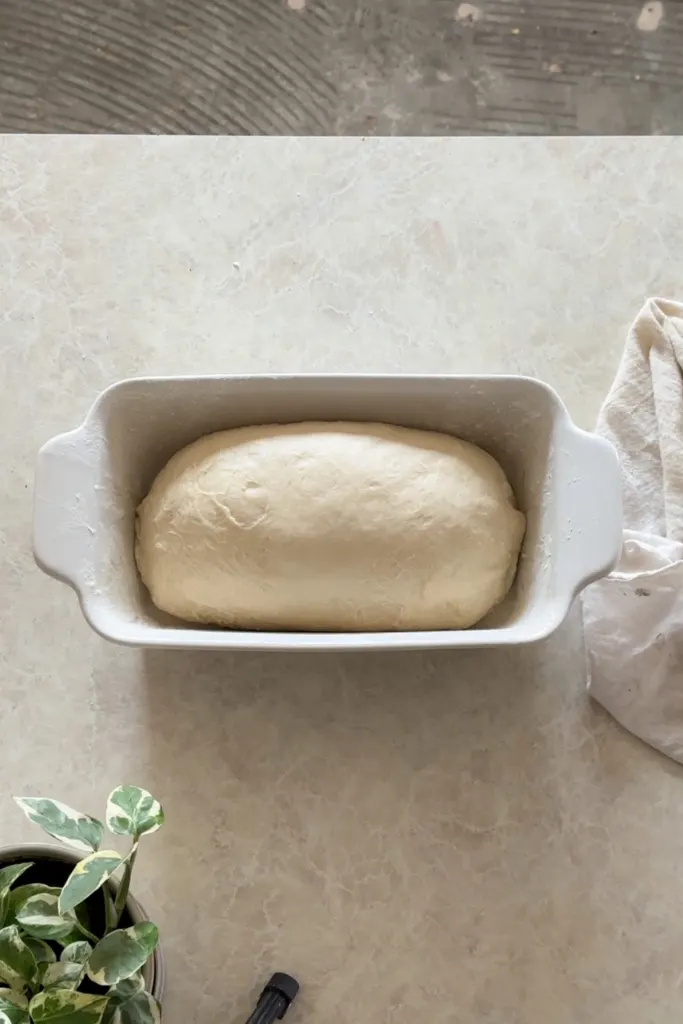
- Once the dough has risen overnight, gently deflate it and shape it into a loaf. I use a spoon and just swipe around the edges of the bowl a few times (like mixing) to gently degas the dough. Transfer the dough onto your counter, stretch it into a rectangle, and gently roll it into a loaf log and pinch the ends together.
- Place the dough into a greased bread pan (or use parchment paper). Cover and let it rise again until it domes about 1"-2" over the rim of the pan. I reuse the same plastic wrap that I used for the overnight rise. This second rise gives the bread its final shape and airy texture. This normally takes 1 -2 hours. Though, in the winter, I've had it take up to 3 hours. Keep an eye on it and just wait for it to rise a couple inches over the edges of the bread pan.
- When the loaf is starting to get close to 1"-2" above the edges of the pan, preheat your oven to 375°F. Cover the loaf with tin foil (or another bread pan) to protect the top from burning. Bake for 45 minutes, covered. Remove the cover and bake for an additional 5 minutes, until the crust is golden brown. Keep in mind, all ovens are different and you may have to adjust these times a bit.
- Patience is key! Remove from the oven and let the bread cool before slicing to ensure the perfect texture.
Notes
- Shredded Butter: This is, hands-down, the best method I've found to get the butter to mix well into the dough. Just mark 2 Tsbp on a stick of butter and use a cheese grater to shred it to the mark. I do the same for pie crusts, scones, pastries. Works like a charm!
- Second Rise: This is key! You want to wait until the loaf rises about 1 1/2" above the edges of the pan, even if it takes longer than 2 hours. If you bake it too soon, it will have way too much oven spring and split the top when it's in the oven (much like the round loaves). It takes longer when the house is cooler. In the winter, I like to keep the dough on the counter near the oven (warmest spot in our kitchen). Or sometimes, I'll turn the overhead light on above the stove and set the dough under that.
- Plastic Wrap: I've used both reusable bowl covers and plastic wrap successfully for the overnight rise. Since the dough is out for so long, a damp towel dries out way too fast and then the dough get's dry. The reusable covers do alright, but the dough still gets a bit of a skin over it, though not too much to still bake well. Plastic wrap really works the best to keep it airtight for that long. But I'm on the search for a reusable cover that will work overnight since I bake these loaves so often. Will keep you posted!
- Shaping: see above for photos to help or I shared a short video on Instagram showing the process.
Recommended Products
As an Amazon Associate and member of other affiliate programs, I earn from qualifying purchases.


Don’t forget to follow me on Instagram @tylynnm_ for more projects, crafts, recipes and all things home.
| Tylynn M |
This post contains affiliate links. If you make a purchase from one of the links, I may make a small commission at NO EXTRA COST to you. See my full disclosure here.


