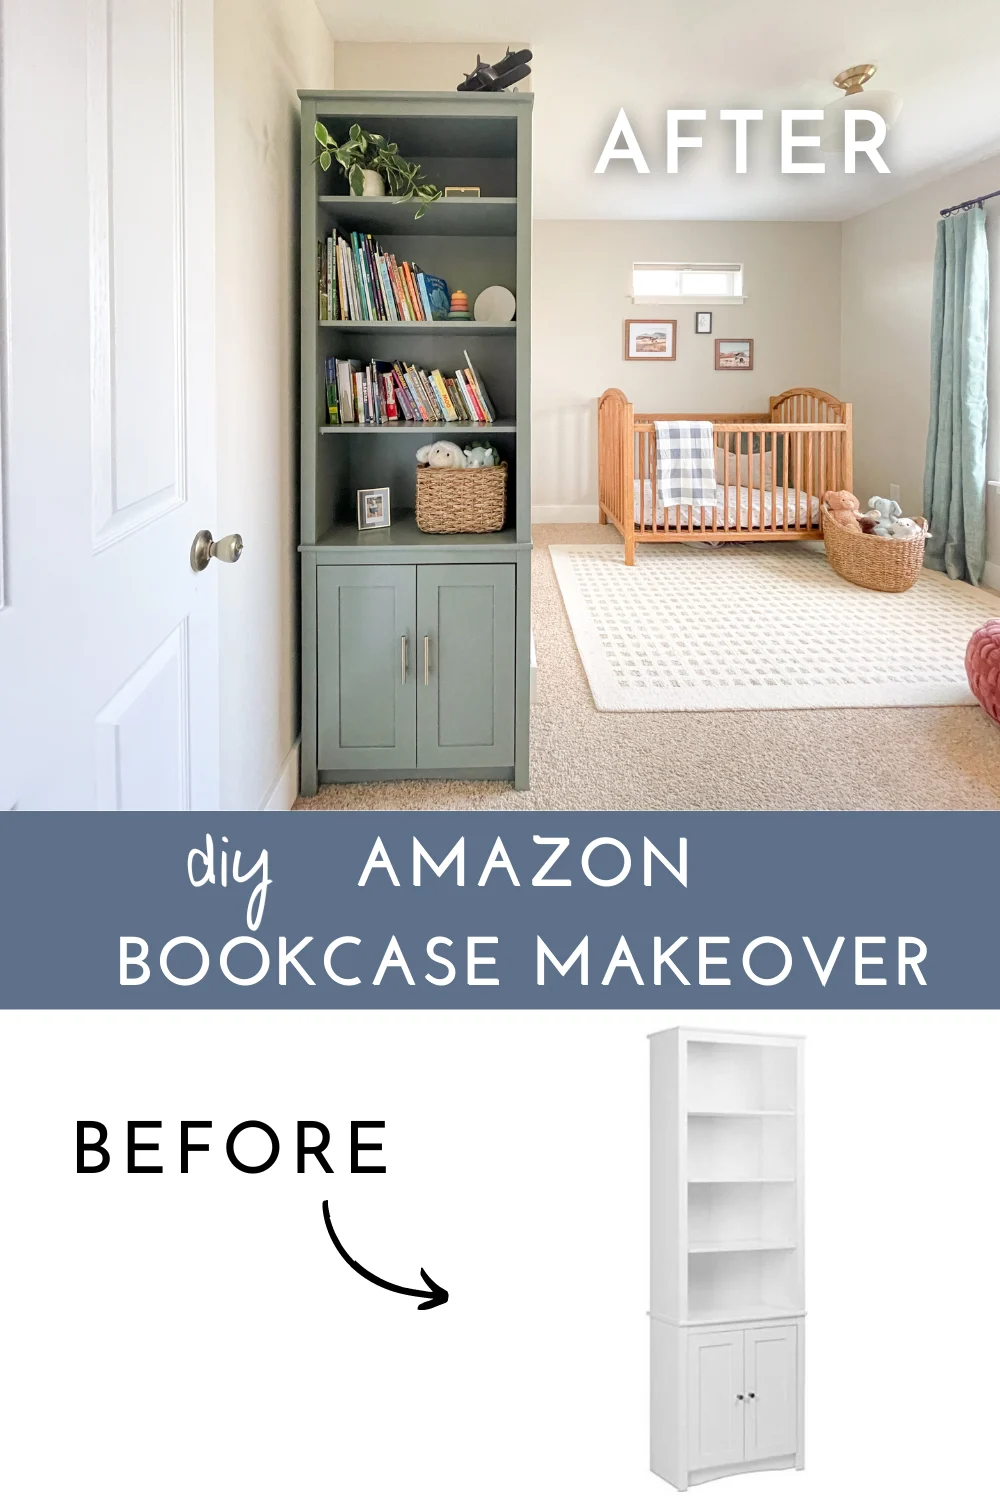
Update a plain bookshelf with this tutorial for a DIY Bookshelf Makeover.


This post contains affiliate links. If you make a purchase from one of the links, I may make a small commission at NO EXTRA COST to you. Thank you for your support so I can continue to share projects and home design ideas! See my full disclosure here.
- Amazon Prepac Tall Bookcase
- Franklin Brass 3″ Cabinet Pull
- KILZ Original (or any shellac based primer)
- Sherwin-Williams Urethane Trim Enamel, Retreat SW 6207 (satin)
- Paint Brush (my favorite shorty)
- Fine Finish Foam Rollers
I recently finished an airplane nursery for our son (see it HERE). When you walk into the room, there’s a small wall where the closet is built out into the room – the perfect spot for a bookshelf! After some back and forth on whether to build it from scratch or not, a disappointing Cragislist and Facebook Marketplace search, and a long quest to find one with the correct dimensions, I finally found the perfect bookshelf on Amazon [HERE]. It’s narrow enough to fit in this tight space, tall for ample shelves, and complete with cabinets on the bottom to hide ALL those kids’ craft supplies. A quick DIY bookshelf makeover and it looks like a custom piece!
Step 1 – Assemble
I assembled the bookshelf per the instructions. I added wood glue along all the joints for more stability, but otherwise just used the hardware and dowels provided.


Step 2 – Scuff
Then I scuffed up the original finish with a 120 grit sandpaper to give the primer a good, rough surface to bond with. I also did both sides of the doors.
I know it’s tempting when you just want to get the job done quickly, but DON’T skip the primer! Primer is extra “sticky” in order to bond to the original finish. Then the paint bonds to the primer. So the fresh paint job is really only as good as the primer. If you paint right onto the old surface, it will just peel up. And if the primer doesn’t bond well with the old surface, it can peel off, which will, ultimately, also cause the paint to peel. Scuffed surface = well bonded primer = durable paint job. Your paint will be flawless and stuck forever!


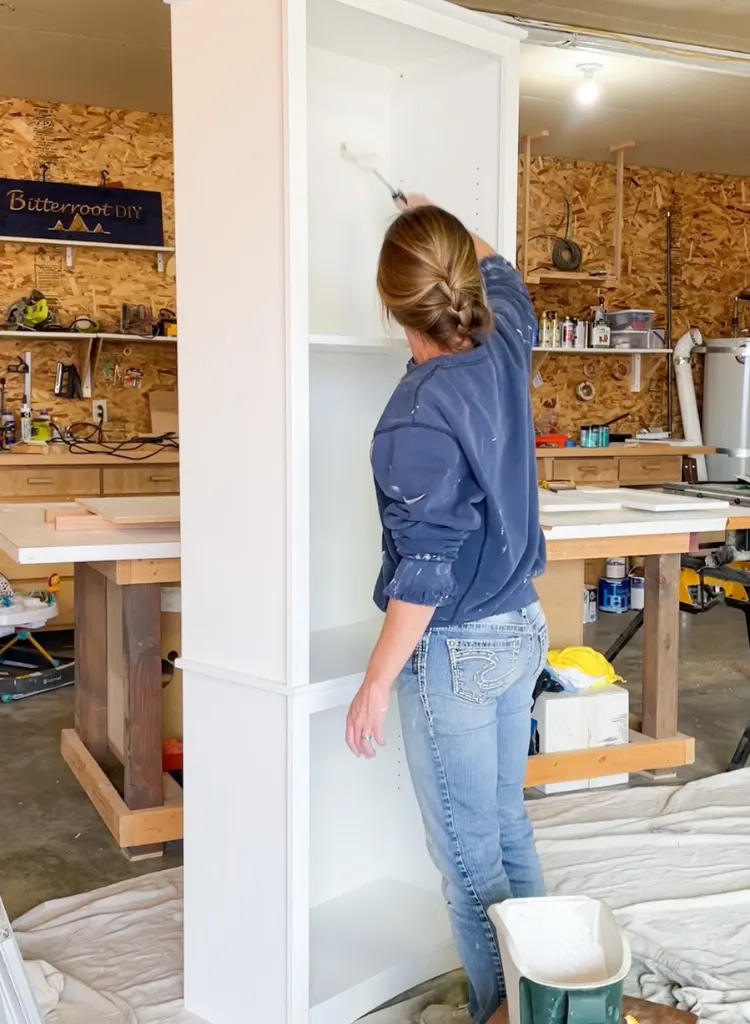
Step 3 – Prime
After I scuffed the surface really well, I applied a coat of KILZ Original Primer [HERE] to both the bookshelf and doors. The key to painting laminate furniture is to use an oil based primer. It has the best adhesion. Make sure to use a respirator since the fumes from oil based primer are pretty intense [find my go-to respirator HERE, cartridges HERE]. I used a brush for the tight spots and foam roller for the rest of the open surfaces [HERE and HERE].
Next to a sprayer, foam rollers are the best way to paint cabinetry or trim. They’re made of high density foam for a SMOOTH finish – basically the same smoothness as a sprayer. I use them on all my cabinetry and trim projects – whenever it doesn’t make sense to pull out the whole sprayer – and love them! Yes, you can spray primer, but it’s sticky and tough to clean out of the sprayer, so I usually stick with the brush foam rollers.
Once the primer dried, I lightly sanded the primed surface to make sure it was as smooth as possible.
** If you would prefer spraying, I’ve used RustOleum BIN spray primer on other projects and had great results. It’s also shellac-based.

There are some projects when it’s necessary to do multiple coats of primer, but, since this started as a plain white bookcase, it only needed one. If you have major stains or dark colors to block – anything that bleeds through the primer – do multiple coats (until it no longer bleeds through the primer). But, when you have something plain like this, one coat will seal it just fine.
Step 4 – Paint
Ok.
It’s assembled.
It’s scuffed.
It’s primed.
It’s dry.
Now for the reason we’re all here – time to paint!

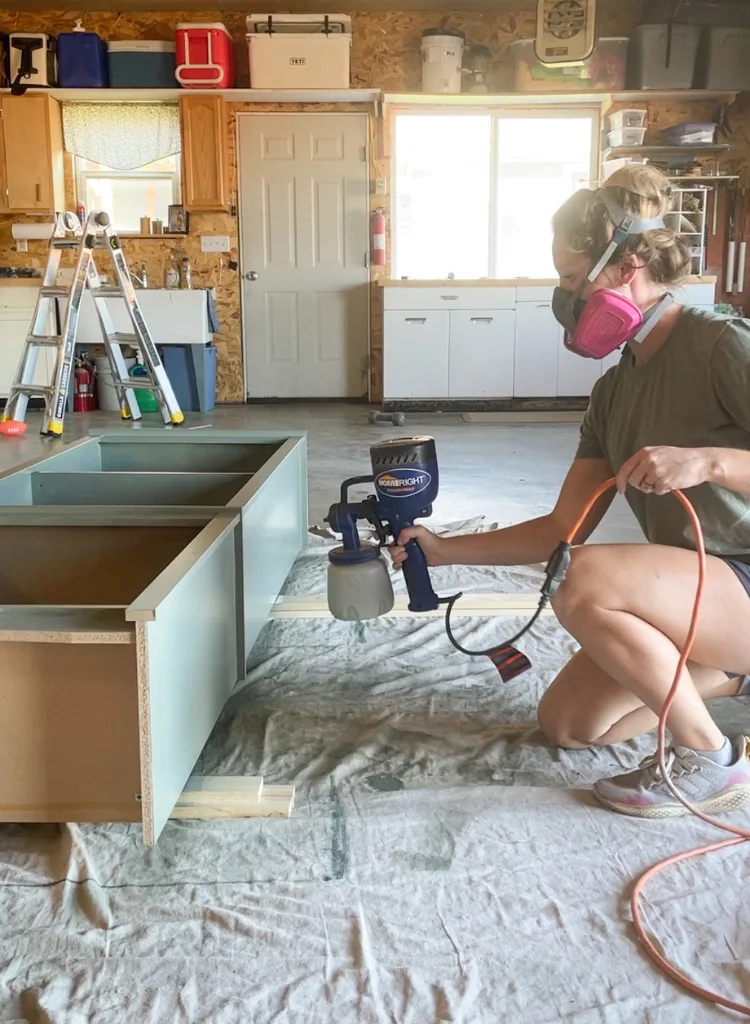
I pulled out the sprayer for this one [find my favorite affordable sprayer HERE]. I laid the bookshelf down so I didn’t have to worry about overspray on something so tall, propped it up on some scrap boards to keep it off the ground, and sprayed light, even coats. For the doors, I sprayed the inside faces first and then flipped them over to spray the outside faces.
The color Sherwin-Williams Urethane Trim Enamel in Retreat [SW 6207] in a satin sheen. It’s one of my favorite paint colors – the perfect soft blue green! I had it left over from the DIY bathroom vanity makeover in our first house. The urethane trim enamel is a bit more expensive, but I 100% recommend it for cabinetry and trim. It dries harder than regular paint and is self leveling for a nice, smooth finish.
If you don’t have a sprayer, grab your favorite brush and a fresh one of those handy dandy foam rollers and get after it! Use the brush for the tight corners and joints, then roll the open surfaces.
Let the paint dry completely between coats, and apply as many coats as necessary for an even, complete finish. It took three coats with the sprayer to get full coverage.
Step 5 – New Hardware
Once the paint was dry, I attached the cabinet doors and finished it off with new brass door pulls [HERE].
The doors already had holes for the included knobs, so I just drilled an extra one at the proper dimension (3″ for the pulls I used). I held a scrap 2×4 against the back of the door as I drilled to prevent tear out on the back side (probably smarter to clamp it, but I was being lazy haha).
**TIP – make sure not to push the drill too hard or you’ll still get tear out even if you use a scrap block – just let the bit cut its way through slowly.


We moved it into his room, filled it with all the kids books, the cutest airplane model I found at a local shop, and hid all the craft supplies in those bottom cabinets, and there you have it – a DIY bookshelf makeover to take an Amazon bookcase from plain to custom!

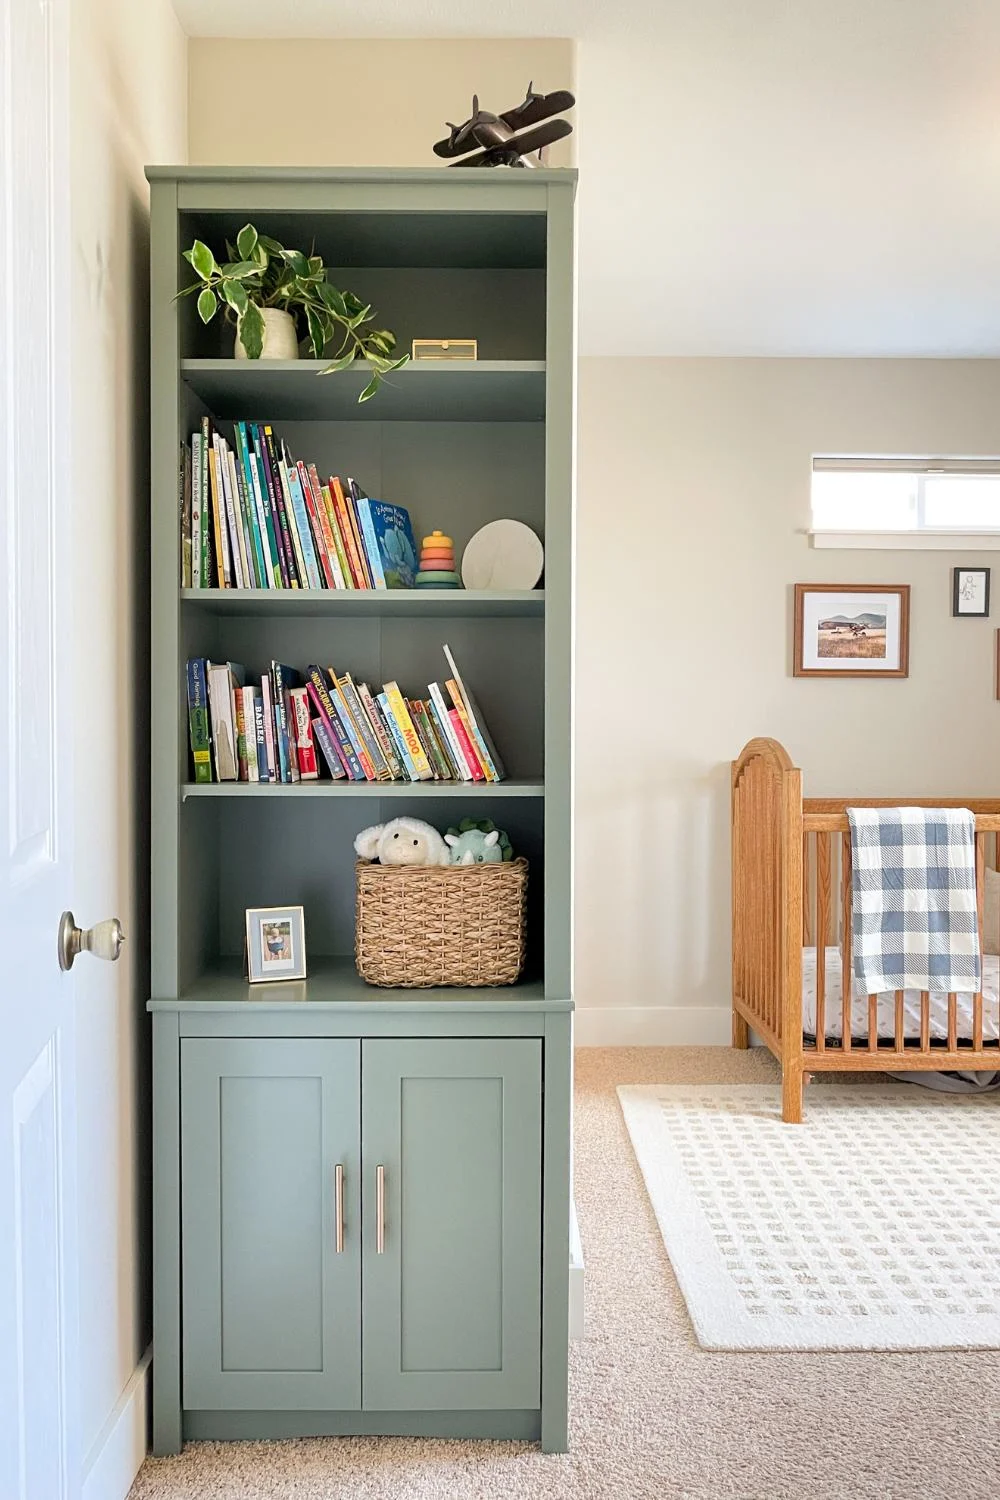
In all honesty, I had no idea I would love it so much! I wasn’t even planning to write a tutorial haha. But it ended up one of my favorite furniture flips ever and the PERFECT bookshelf for this room. This room sits at the end of our hallway, so when the door is open this is the view you see from the most of the house (it’s very open concept). Who knew a bookshelf makeover could have such impact everywhere!
SOURCES
- Amazon Prepac Tall Bookcase
- Franklin Brass 3″ Cabinet Pull
- Bullseye 123 Primer
- Sherwin-Williams Urethane Trim Enamel, Retreat SW 6207 (satin)
- Paint Brush (my favorite shorty)
- Fine Finish Foam Roller
- Rug – Chris Loves Julia x Loloi Polly Collection
SHOP THE POST

Thanks for stopping by today! As always, please let me know if you have any questions and I’ll get back to you as soon as possible.
| Tylynn |
Don’t forget to pin this for later!