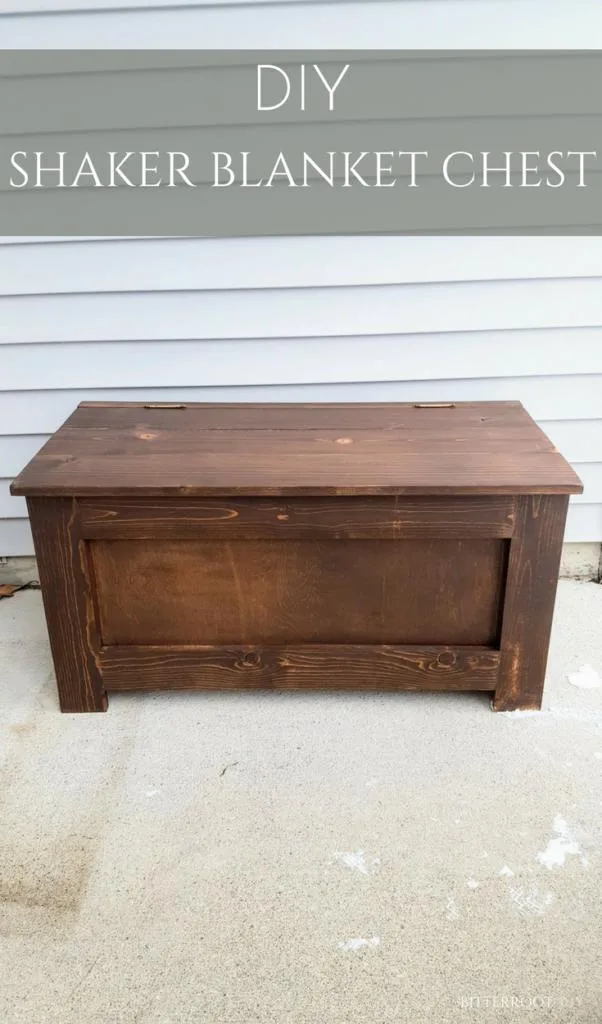
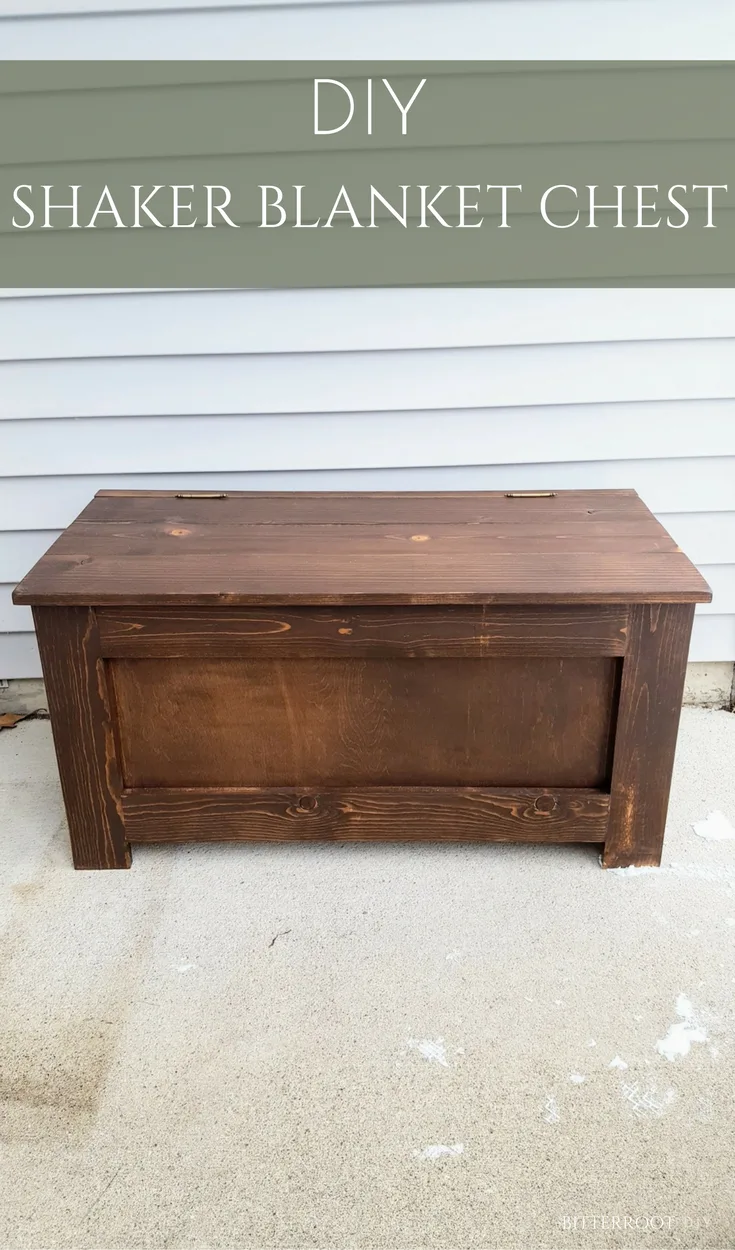
My sister was visiting recently and noticed the storage chest I built for our living room last spring. She’s been in need of more storage space at her place and loved the chest, so I volunteered to build her one!
It’s similar to our storage chest but with slightly different details in order to match her home decor. Plus, I wanted to try something new!
So here it is! Blanket chest #3 for Bitterroot DIY and a perfect Christmas present for my sister!
Enjoy the free plans!
This post contains affiliate links. See my full disclosure here. Thank you for supporting Bitterroot DIY!
Tools & Supplies:
- Kreg Jig
- 1-1/4” PH Screws
- 2 Non-Mortise Hinges
- Decorative Handles
- Wood Filler
- Finish Nailer
- Drill
- Miter Saw
- Corner Sander
- Tape Measure
- Square
- Pencil
- Safety Glasses
- Hearing Protection
Lumber:
- 2 | 1 x 2 @ 6′
- 2 | 1 x 6 @ 8′
- 3 | 1 x 4 @ 8′
- 1 | 1/2″ Plywood Sheet @ 4′ x 8′
Cuts:
- 8 | 1 x 4 @ 18″ (legs)
- 4 | 1 x 4 @ 29″ (front & back frame)
- 4 | 1 x 4 @ 8 1/2″ (side frame)
- 3 | 1 x 6 @ 37″ (lid)
- 1 | 1 x 2 @ 37″ (lid hinge piece)
- 4 | 1 x 2 @ 15 1/2″ (cleats)
- 2 | 1/2″ Plywood @ 34 1/2″ x 15 1/4″ (interior front & back)
- 2 | 1/2″ Plywood @ 14 1/2″ x 15 1/4″ (interior sides)
- 1 | 1/2″ Plywood @ 33 1/2″ x 14 1/2″ (interior base)
Step 1.


Build four legs for the blanket storage chest. Position two 1 x 4s as shown in the diagram and attach with wood glue and 1 1/4″ pocket hole screws. Place pocket holes at the inside of the legs in order to best hide them.
Step 2.


Assemble the front and back frames. Position the top brace flush with the top of the legs. Position the bottom brace to leave a 2″ gap to the floor. Attach the top and bottom 1 x 4 braces with wood glue and 1 1/4″ pocket hole screws. Place pocket holes on the inside of the frame to best hide them. Repeat for the back frame.
Step 3.
Connect the front and back frame sections.


Position the top side braces flush with the tops of the legs. Position the bottom side braces to leave a 2″ gap to the floor. Attach with wood glue and 1 1/4″ pocket hole screws. Place pocket hole screws on the inside of the frame.
Step 4.
Add the 1 x 2 cleats for the base of the chest.
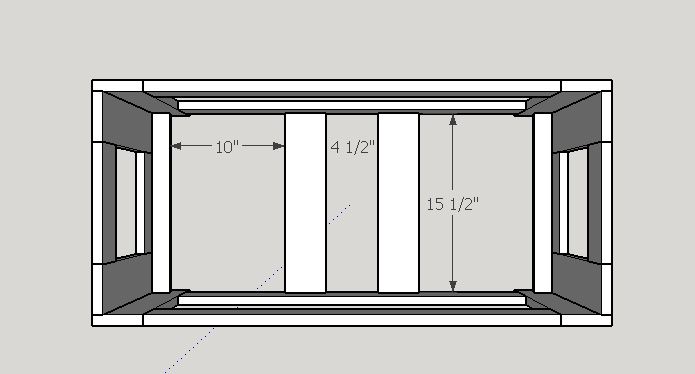

This diagram shows 1 x 4s for the middle cleats. You may notice that I listed them as 1 x 2s in the lumber and cut list. I had extra 1 x 4 lying around when I drafted and built the chest, so I used it. However, when I was making the lumber list, I realized it’s a better use of materials (more efficient) to use 1 x 2s for all four cleats. It won’t make a huge difference either way … follow your heart 😉
Step 5.
Insert and attach the inside front and back panels of the chest.


Set the panels on top of the base cleats, flush with the top and sides of the chest. Use wood glue and 1 1/4″ finish nails to attach the panels to the front and back framing and clamp in place until the wood glue dries.
Step 6.
Insert and attach the side interior panels.


Set the panels on top of the base cleats, flush with the front and back interior panels. It may take a sludge hammer and fierce willpower some finagling to fit the side panels into place … it should be a tight fit with the front and back interior panels.
Step 7.


Set the base of the chest into place. Attach to the base cleats with wood glue.
Step 8.


Position the lid hinge piece (1 x 2) flush with the inside of the interior back panel and overhanging 1/2″ on each side. Attach with wood glue and 1 1/4″ pocket hole screws (from the inside of the interior back panel).
***Option: You could attach the lid hinge piece before putting the interior panels into place to avoid exposed pocket holes. Simply position the lid hinge piece to overhand the back frame 1/2″ into the interior of the chest (so it will be flush with the panel once you put it into place). Attach to the frame with wood glue and 1 1/4″ pocket hole screws.


Chest Lid
For more details on how to build the lid, see the lid diagram at the bottom of the Cedar Rustic Blanket Chest post.
I made the same lid for this blanket chest, but with different dimensions (this lid is 37″ long, rather than 43″).
Attach the 1 x 6 boards using two 1 x 2s:
Begin by attaching the 1 x 2s to the first lid board with 1 1/4″ self-tapping wood screws. Apply wood glue to the exposed edge of the 1 x 6, position the second lid board and attach the 1 x 2s to the second board. Repeat for the third lid board.
Step 10.
Attach the hinges and lid.


I used two non-mortise hinges spaced 3″ from the outside edges of the lid.
Sand and finish as desired!


I finished this chest with Minwax Dark Walnut Stain and Wipe-On Polyurethane.


Let me know if you have any questions and I’ll get back to you as soon as possible!
![]()
![]()