
We were out visiting my family the other weekend when my mom started discussing all her plans for updating and improving my childhood home. Let me tell ya, she’s got some great ideas up her sleeves! As she was going over all the updates for the master bedroom, she happened to offhandedly mention that she’s been shopping around for a blanket chest …
Well …
I mentioned that I could build one for a fraction of the price, customized and perfect for the room, and she loved the idea!
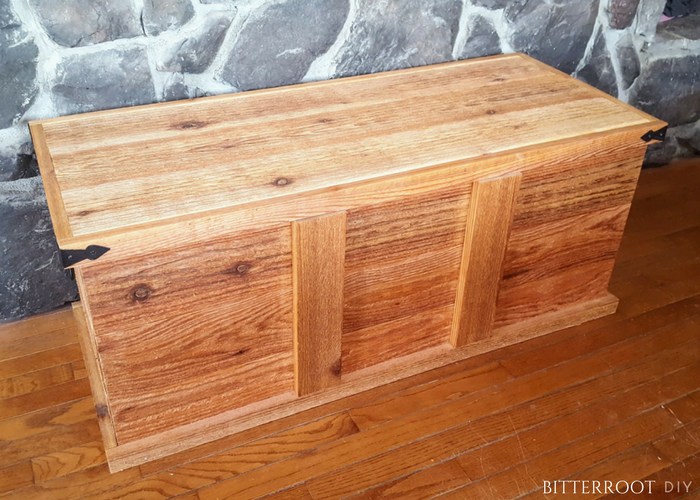

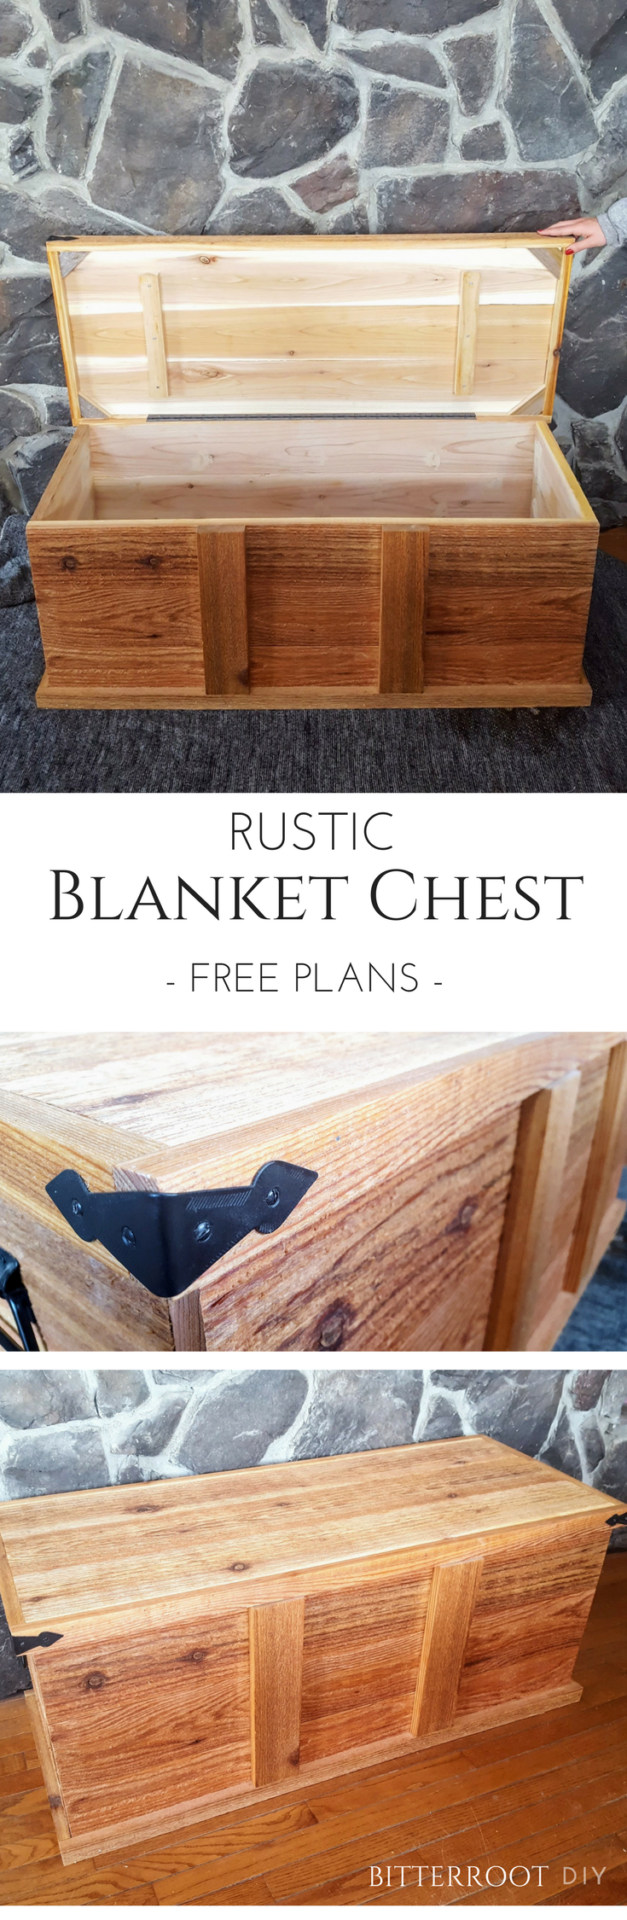
A note on the style – the house is log with rough cedar trim and rustic country decor. She requested a cedar blanket chest finished with boiled linseed oil and awesome hardware to match.
So here we are.
Blanket chest #2 for Bitterroot DIY and a perfect Christmas present for my mom!
Enjoy the free plans!
You can also download the plans at the bottom.
This post contains affiliate links, which means I may make a small commission from purchases you make from the links at NO EXTRA COST to you. See my full disclosure here. I appreciate the support to help keep the tutorials and plans free here at Bitterroot DIY!
Tools & Supplies:
- Kreg Jig
- 1-1/4” PH Screws
- Continuous Hinge
- Decorative Corner Bracket Hardware
- Wood Filler
- Finish Nailer
- Drill
- Miter Saw
- Corner Sander
- Tape Measure
- Square
- Pencil
- Safety Glasses
- Hearing Protection
Lumber:
- 6 | 1 x 6 – 8′ CEDAR
- 3 | 1 x 2 – 8′ CEDAR
- 1 | 1 x 4 – 6′ CEDAR
- 1 | 1/2″ Square Dowel – 3′
- 1 | 2′ x 4′ Tempered Hardboard Sheet
- 1 | 1 x 4 – 6′ PINE (or spare lengths around your shop)
- 1 | 1 x 2 – 6′ PINE (or spare lengths around your shop)
Cuts:
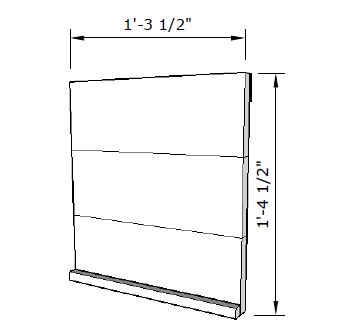
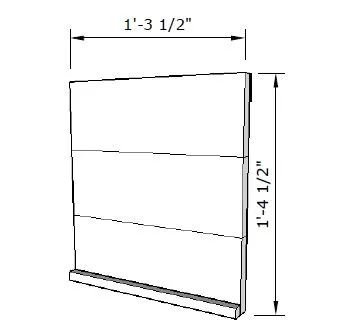
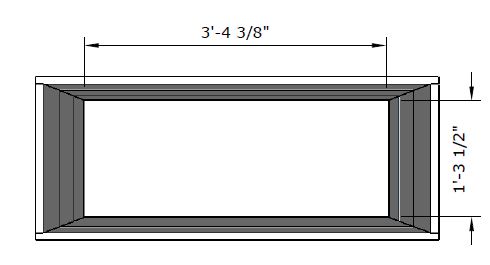
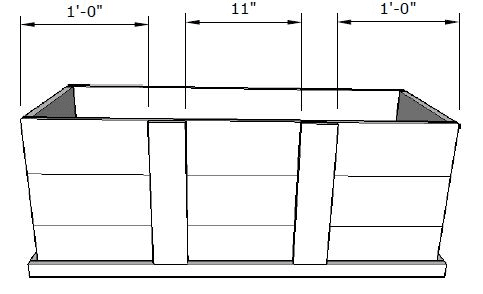
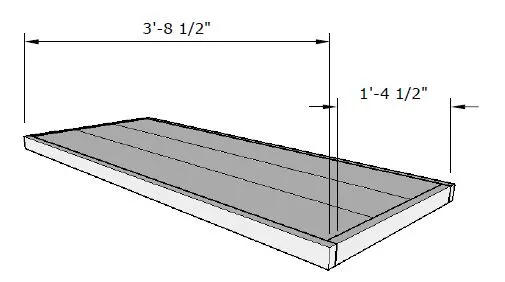
- 6 | 1 x 6 @ 42″ (front & back)
- 6 | 1 x 6 @ 15 1/2″ (ends)
- 2 | 1 x 2 @ 43 1/2″ (front & back trim)
- 2 | 1 x 2 @ 17″ (end trim)
- 2 | 1 x 4 @ 15″ (front upright trim)
- 2 | 1 x 4 @ 15 1/2″ (base supports)
- 2 | 1/2″ Square Dowel @ 15 1/2″ (base
supports) - 1 | Hardboard @ 40 3/8″ x 15 1/2″
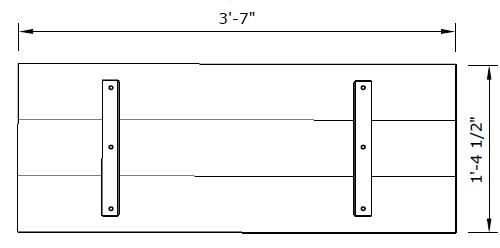
(base) - 3 | 1 x 6 @ 43″ (lid)
- 2 | 1 x 2 @ 44 1/2″ (lid trim)
- 2 | 1 x 2 @ 16 1/2″ (lid trim)
- 2 | 1 x 2 @ 13″ (lid supports)
- 4 | Spare corners (lid supports)
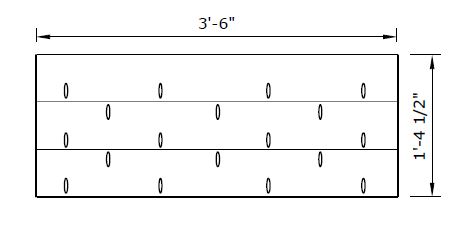
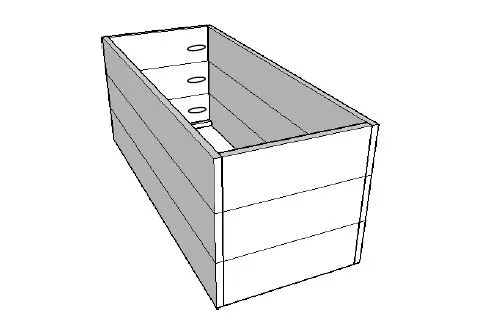
Step 1.
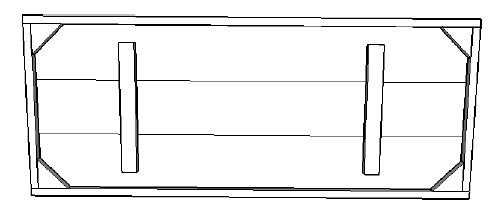
Start by building the front and back of the chest. Attach boards to each other with 1-1/4″ pocket hole screws and
wood glue. Stagger the pocket holes as shown on the diagram. You should have two sides once you are finished.
*UPDATE: Do not add the pocket holes on the bottom of the bottom board as shown in the diagram below. I made an error when drafting the plans … though I have also done that during builds as well haha … but there is no reason to put pocket holes on the bottom since there are no more boards to attach to. I’ll update the photo asap.

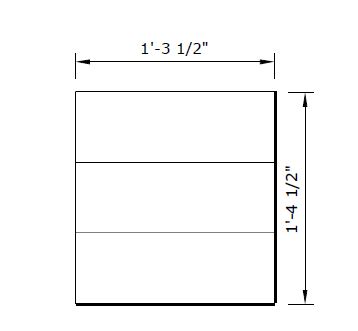
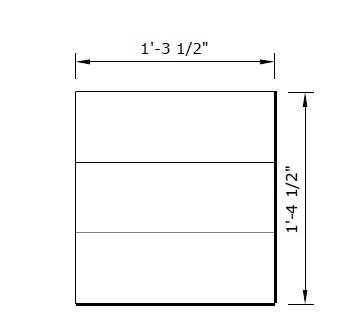
Step 2.
Build the ends of the chest. Attach boards to each other with 1-1/4″ pocket hole screws and wood glue. Stagger
the pocket holes the same as for the front and back of the chest (Step #1). You should have two of the same ends once you are finished.
Step 3.
Add a square dowl to the ends of the chest. Position the dowel flush with the bottom of the ends. Attach with wood glue and finish nails. The dowel will provide a support to set the base of the chest on.
Step 4.
Attach the front, back, and sides of the chest. Attach the ends to the front and back pieces with 1-1/4″ pocket hole screws and wood glue.

Step 5.
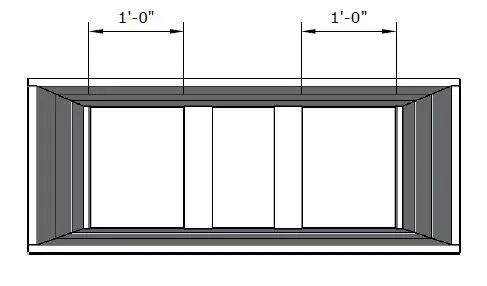
Add base supports along the bottom of the chest to support the hardboard base. Place two 1 x 4s flush with the bottom of the chest and attach with 1-1/4″ pocket hole screws and wood glue.

Step 6.
Insert the hardboard base into the chest. Use wood glue to attach it to the dowels and center braces along the bottom of the chest.
Step 7.
Attach base trim to the bottom of the chest with wood glue and finish nails.
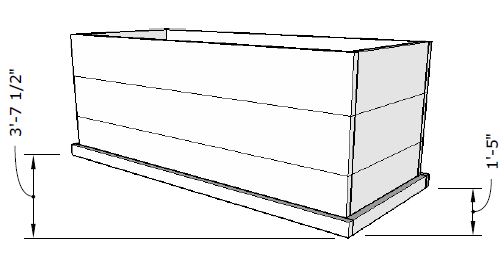
Step 8.
Attach front upright trim to the chest with wood glue and finish nails.

Chest Lid
Attach the 1 x 6 boards using two 1 x 2s. Begin by attaching the 1 x 2s to the first lid board with 1 1/4″ self-tapping wood screws. Apply wood glue to the exposed edge, position the second lid board and attach the 1 x 2s to the second board. Repeat for the third lid board.
Attach trim to the lid with wood glue and finish nails. Position trim so that it is flush with the top of the lid.
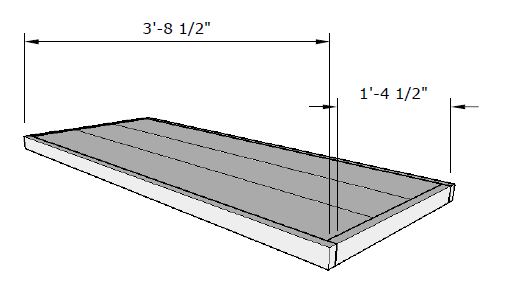
Finish the lid by adding extra support pieces in the corners.
I used some spare boards that were lying around, cut them off at 45° perpendicular miters, and attached them in the corners with wood glue and finish nails.
Step 8.
Finish as desired.

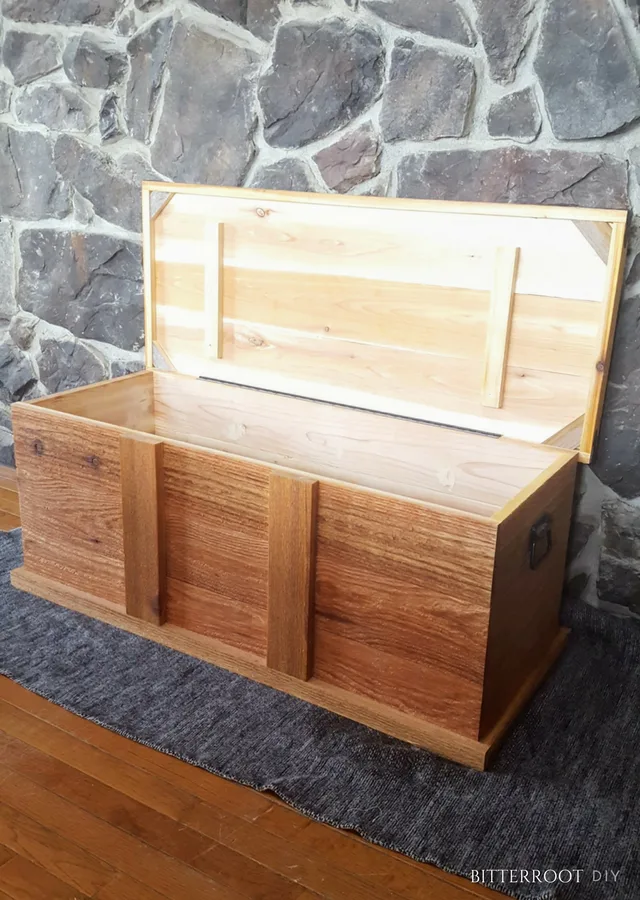
I finished the exterior of this chest with boiled linseed oil, which gave the cedar really nice depth and emphasized the natural wood tones. It’s up to you, but I highly recommend the linseed oil look!
I also filled the interior pocket holes with wood filler and sanded them smooth. However, I recommend leaving the interior of the chest unfinished other than that. Let that wonderful cedar smell soak into all your blankets!


Once the oil dries, add your hardware.
I found these great decorative corner brackets and chest handles on Amazon.

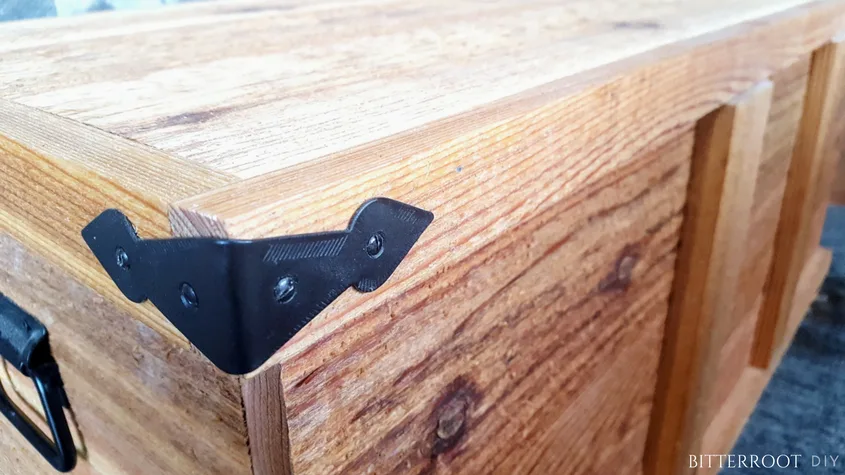
They add great character to the chest and help to reinforce the trim on the lid.
Win-win!
Download the Rough Cedar Rustic Blanket Chest Plans
Let me know if you have any questions and I’ll get back to you as soon as possible.
Thanks for stopping by Bitterroot DIY!
For more project ideas, you can find me on Pinterest. And to stay up to date with the latest shenanigans, follow me on Instagram.
![]()
![]()

Mitch owens
Saturday 9th of January 2021
Lid does not fit. Nominal thickness of a 1x6 being a actually 5 1/2 inches makes the lid 1/2 inch to narrow
tylynn_sattler
Monday 25th of January 2021
Did you put the 1x2 trim all the way around? I'm sure it fits since those are the exact boards, dimensions, and cuts I used.
Ralph Delgado
Thursday 10th of January 2019
Great job Tylynn! Keep up the good work and I'll keep looking for your posts on your projects.
tylynn_sattler
Friday 11th of January 2019
Thanks so much Ralph - glad to have you!