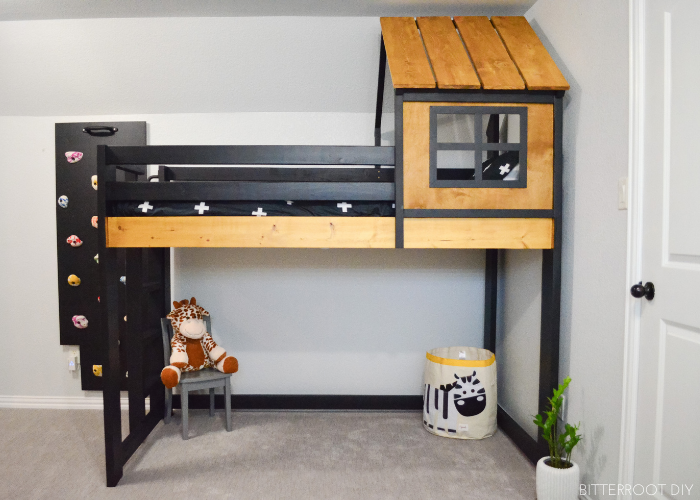
Build a house loft bed with these plans.
This post may contain affiliate links. If you make a purchase from one of the links, I may make a small commission at NO EXTRA COST to you. This helps keep the tutorials and plans free here at Bitterroot DIY. Thank you for your support! See my full disclosure here.
This DIY loft bed was such a fun collaboration with my friend Adriana @texasdiymama over on Instagram. She got ahold of me a few months ago as she was planning a playroom makeover for her kids and we started brainstorming a sort of playhouse/bed situation to add to the room. Her son loves enclosed spaces and climbing, so we tossed some ideas around until we came up with this climbing wall and loft bed combo!
All credit goes to Adriana for tackling this big build - don't forget to head over and check out her Instagram @texasdiymama for tons more great projects like this!
Enjoy the plans.
Tools & Supplies
- Kreg Pocket Hole Jig
- Miter Saw
- Orbital Sander
- Drill
- Tape Measure
- Wood Glue
- ½" x 3 ½" carriage bolts - 8
- ½" flat washers - 8
- ½" locking washers - 8
- ½" cap nuts - 8
- 2 ½" screws
- 1 ¼" screws
- ¾" screws
- Clamps
- Level
- Speed Square
- Pencil
- Safety Glasses
- Ear Protection
Lumber List
- 2 | 2x6x6 (footboard legs)
- 5 | 2x6x8 (headboard legs & bed frame)
- 12 | 2x4x8 (frame)
- 3 | 2x2x8 (house frame and trusses)
- 2 | 1x2x8 (window frame)
- 6 | 1x4x8 (mattress rails)
- 2 | 1x8x6 (roof)
- 1 | ¼"x2x4 plywood (wall and window)
Cut List
- 2 | 2x6 @ 5' 3" (footboard legs)
- 2 | 2x6 @ 6' 4 ⅝" with 40° miter (long side) (headboard legs)
- 2 | 2x6 @ 6' 8" (mattress frame)
- 2 | 2x6 @ 3' 4" (mattress frame)
- 1 | 2x4 @ 6' 5" (center mattress support)
- 2 | 2x4 @ 6' 1" (mattress side rails)
- 4 | 2x4 @ 6' 8" (bed frame side rails)
- 1 | 2x4 @ 4' 5" (bed frame side rail short)
- 4 | 2x4 @ 2' 10" (headboard & footboard frame)
- 2 | 2x4 @ 1' 5 ½" (footboard frame)
- 1 | 2x4 @ 5' 3" (ladder side rail long)
- 1 | 2x4 @ 4' 2" (ladder side rail short)
- 4 | 2x4 @ 1' 3" (ladder rungs)
- 4 | 2x2 2' 7 ¾" with 40° miter (long side) (house roof trusses)
- 2 | 2x2 @ 2' 4 ⅜" with 40° miter (long side) (house frame sides)
- 2 | 2x2 @ 2' 3" (house truss end & ridge boards)
- 1 | 2x2 @ 3" (bed frame side rail support)
- 2 | 1x2 @ 2' 3" (wall top & bottom trim)
- 2 | 1x2 @ 1' 6" (window frame)
- 2 | 1x2 @ 11 ¾" (window frame)
- 12 | 1x4 @ 3' 4" (mattress rails)
- 4 | 1x8 @ 2' 8" (roof)
- 1 | ¼" Plywood @ 2' 3" x 1' 10" (wall & window)
** due to the number of cuts, I recommend cutting as you go to make sure everything fits.
notes
This design fits a TWIN mattress.
Since this is a large build, I recommend cutting the pieces to fit as you go. Small discrepancies in cuts can add up over the whole project.
It's best to build this bed in sections and move it into the room for final assembly. If you're placing this in a finished room, you may want to paint or stain it as you go as well.
Most of the pocket holes are hidden so you can disassemble the bed easily if necessary. However, if you don't want to see the joints at all, feel free to fill them with wood plugs.
Good luck and happy building!
Step 1.
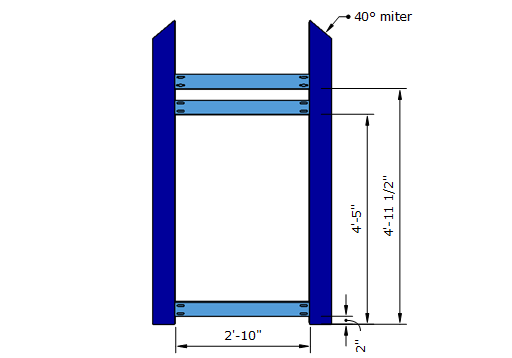
Build the headboard frame. Use wood glue and 2 ½" pocket hole screws to attach the rails to the legs. If the bed will be against a wall, place the pocket holes along the back of the headboard to hide them once the bed is in place.
Step 2.
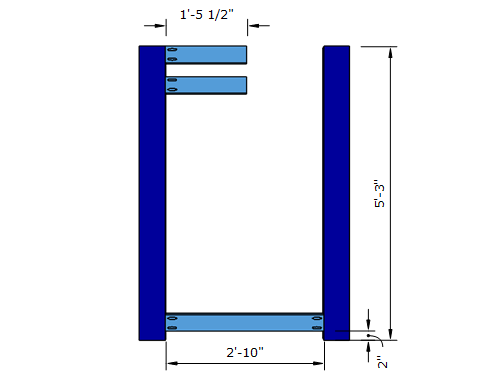
Build the footboard frame. Use wood glue and 2 ½" pocket hole screws to attach the rails to the legs. Place the pocket holes along the inside of the frame to hide them once the bed is in place.
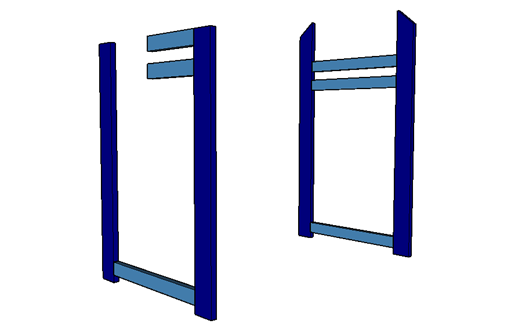
You should end up with both the headboard and footboard as shown above.
Step 3.
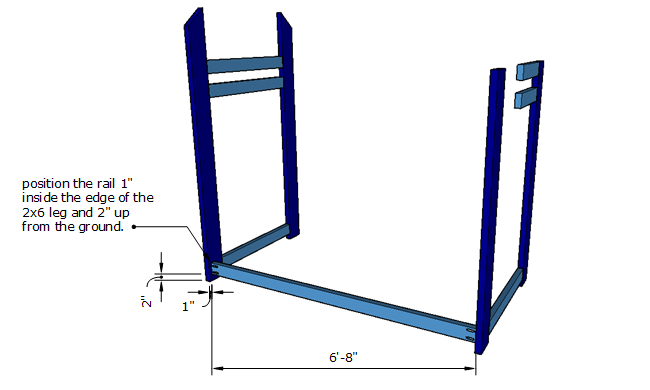
Join the headboard and footboard together with the bottom rail. Use 2 ½" pocket hole screws. Place pocket holes along the wall side to hide them (above is a view from the wall side of the bed). DO NOT use wood glue here in case you ever need to disassemble the bed.
Step 4.
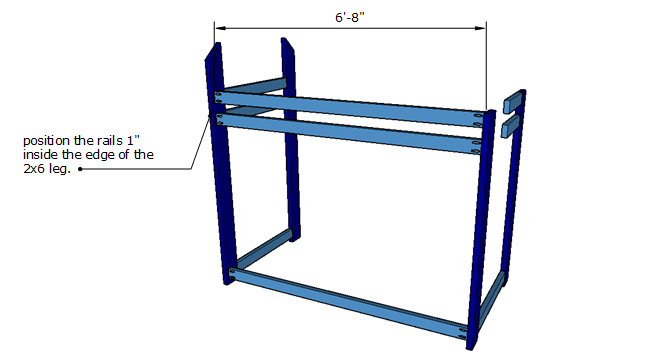
Attach the top rails along the wall side. Again, use 2 ½" pocket hole screws, but I recommend skipping the wood glue in case you need to disassemble the bed.
Step 5.
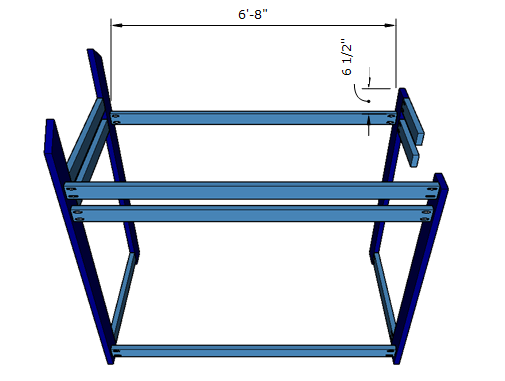
Attach the top rail along the front side with 2 ½" pocket hole screws. Skip the wood glue in case you need to disassemble the bed.
Step 6.
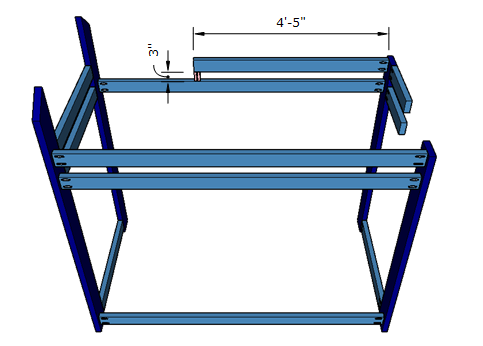
Attach the top rail along the front side with 2 ½" pocket hole screws. Skip the wood glue in case you need to disassemble the bed.
Use a small 2x2 to secure the top rail to the bottom rail. This will be further secured later. Attach the 2x2 to the rails with 2 ½" pocket hole screws.
Step 7.
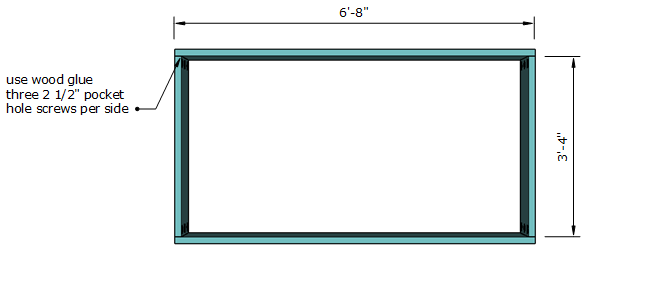
Build the mattress frame. Attach the 2x6s with wood glue and 2 ½" pocket hole screws.
Step 8.
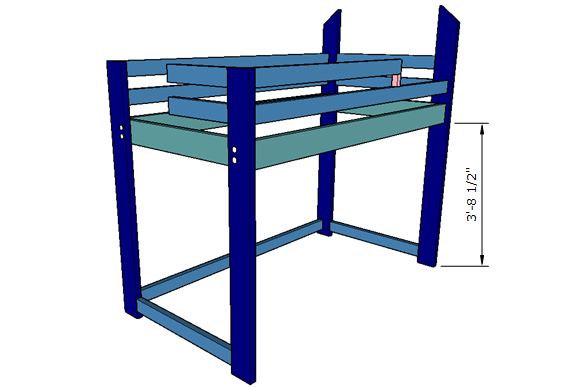
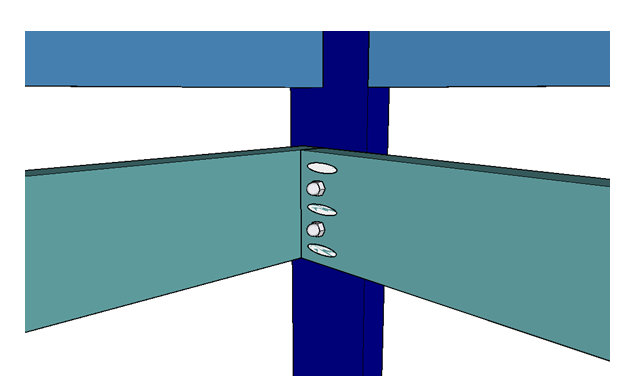
Secure the mattress frame to the bed frame with eight 3 ½" carriage bolts, a flat washer, a locking washer, and cap nut. Use two per corner. Drill them between the pocket holes you used to build the mattress frame:
Step 9.
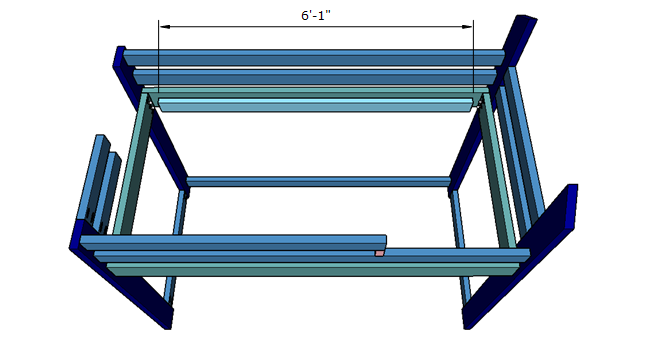
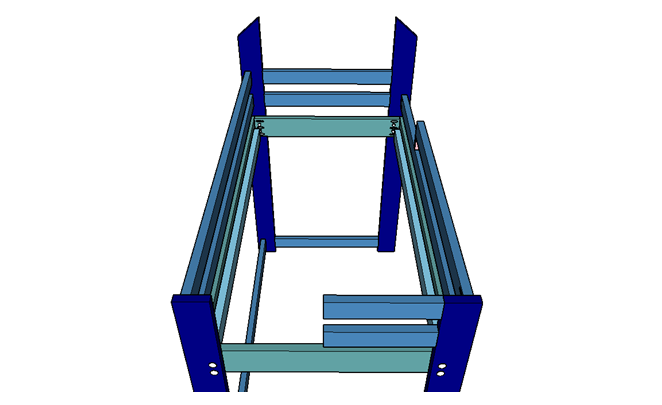
Attach the mattress side rails to the mattress frame. There should be a 2" gap on either end so the rail doesn't interfere with the carriage bolts. Drive 2 ½" screws through the rail into the 2x6 mattress frame every 6"-8" to secure it.
Here's a view from the inside so you can see both rails:
Step 10.
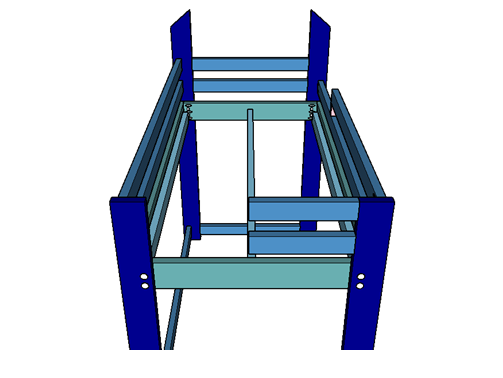
Attach the center support rail to the mattress support frame. You can either use 2 ½" pocket hole screws or joist hangers.
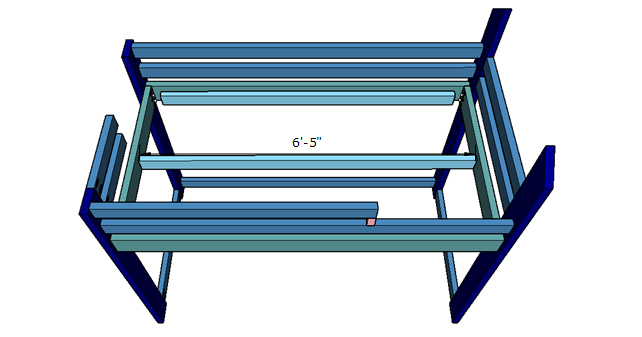
Step 11.
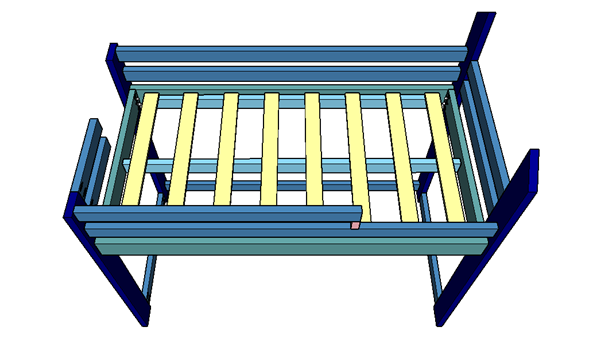
Attach the mattress rails to the side rails. I just drew eight for illustration purposes, but space them as often as you feel necessary for supporting the bed (Adriana said she used 12). Secure them with screws or brad nails.
Step 12.
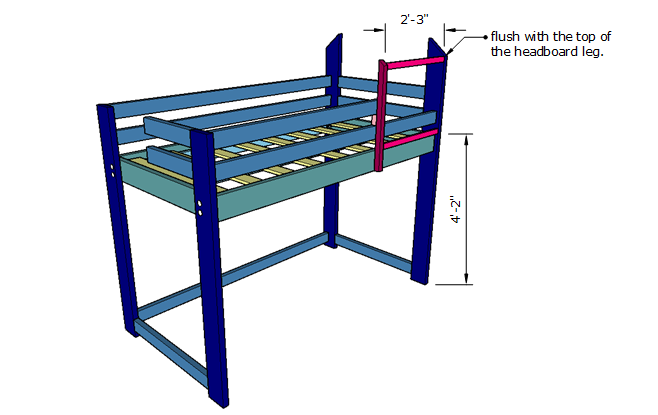
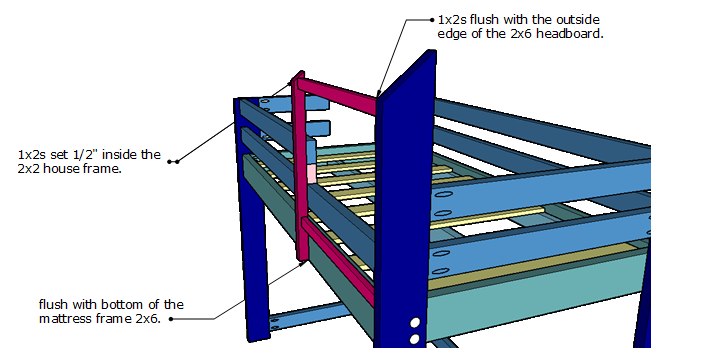
Begin building the first side of the house frame by attaching the top and bottom 1x2s to the headboard 2x6. Position the 1x2s flush with the outside edge of the 2x6. There should be a ¼" gap between the mattress frame and bottom 1x2 (you'll fill this with the plywood in a few steps). Then attach the 2x2 frame board to the 1x2s and bed frame.
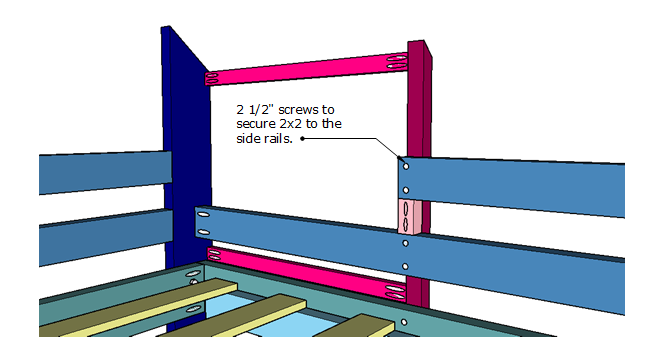
Here's a view from the inside to clarify.
Use 1 ¼" pocket hole screws to attach the 1x2s to the 2x6 headboard leg. Then attach the 1x2s to the 2x2 house frame board with 1 ¼" pocket hole screws. Secure the 2x4 rails to the 2x2 with 2 ½" screws as well. Position the 2x2 so the bottom is flush with the bottom of the mattress frame 2x6.
Step 13.
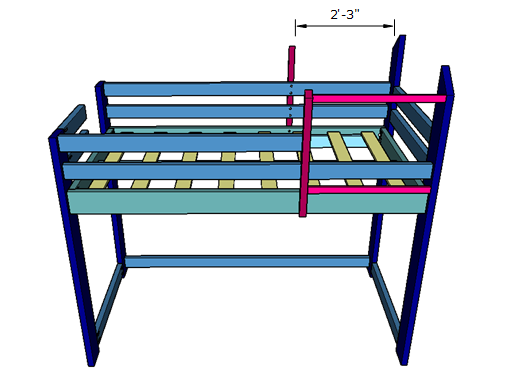
Add the 2x2 house frame board to the other side of the bed frame. Attach it to the side rails and mattress frame 2x6 with 2 ½" screws.
Step 14.
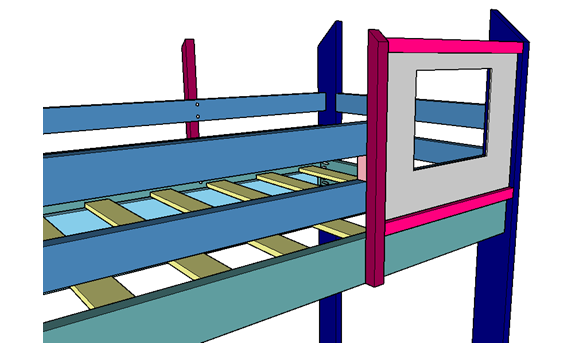
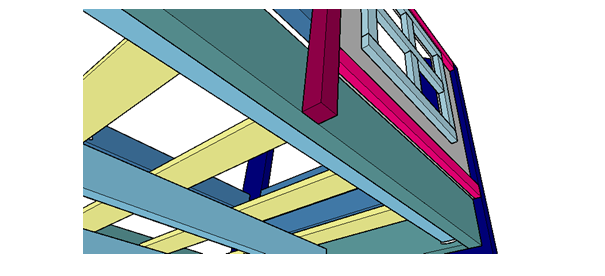
Slide the plywood wall & window into that ¼" gap between the mattress frame 2x6 and the 1x2. Secure it to the top and bottom 1x2s with ¾" screws.
Step 15.
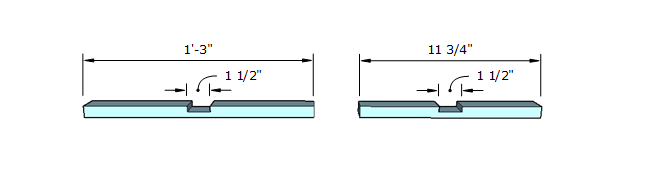
Cut half laps in the vertical and horizontal center window frame 1x2s.
Once you've cut the half laps, sandwich the boards together to form the center of the window frame.
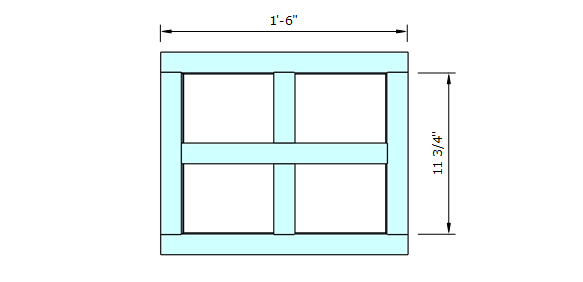
Attach the center of the window frame to the top and bottom with wood glue and 1 ¼" pocket hole screws.
Step 16.
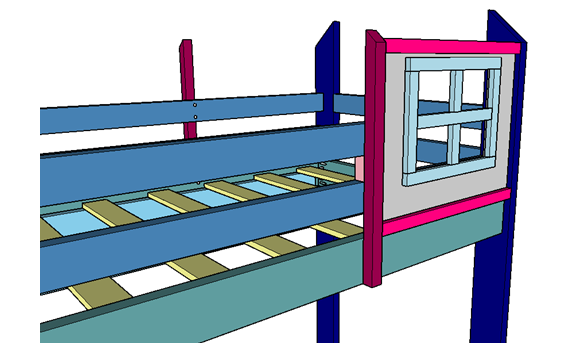
Secure the window frame to the plywood wall with wood glue and brad nails.
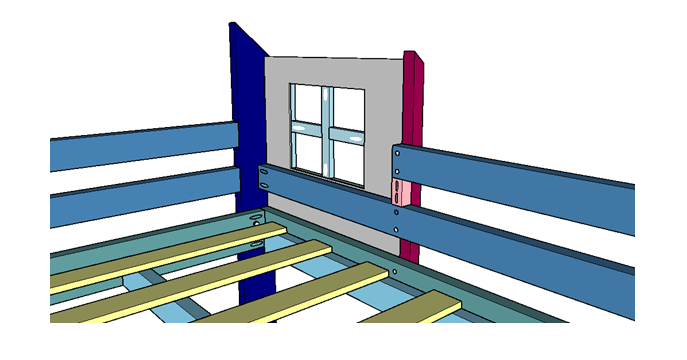
View from the bottom to see how that ¼" plywood fits in to fill the gap between the 1x2 and mattress support frame:
Step 17.
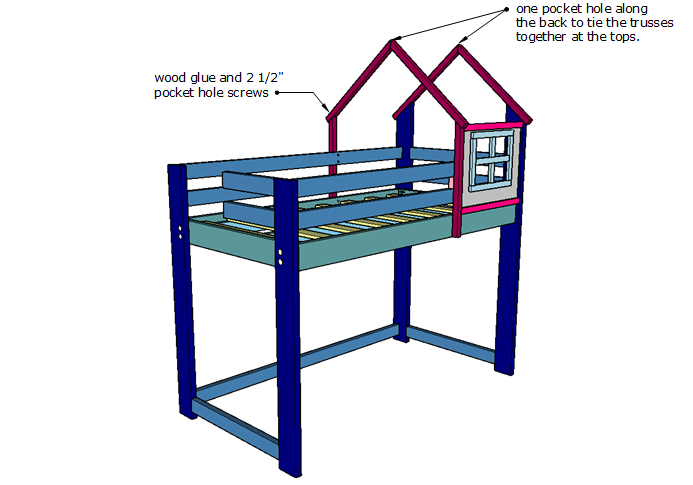
Attach the roof truss 2x2s to the headboard and side frames. Use wood glue and 2 ½" pocket hole screws. Place pocket holes along the back of the boards to best hide them.
Step 18.
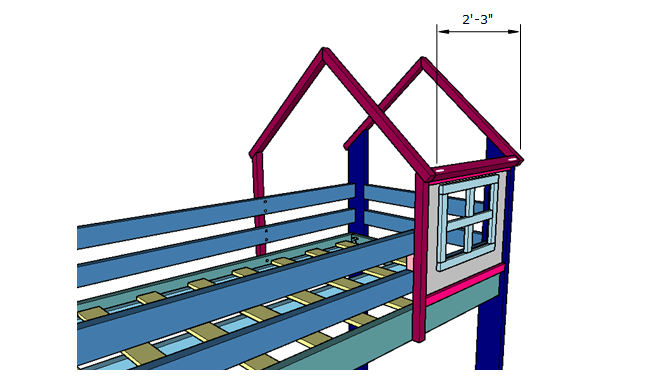
Tie the bottom of the trusses together with the truss end board on the near side of the bed. Use wood glue and 2 ½" pocket holes. Place pocket holes on the top. The roofing 1x8s will cover them.
Step 19.
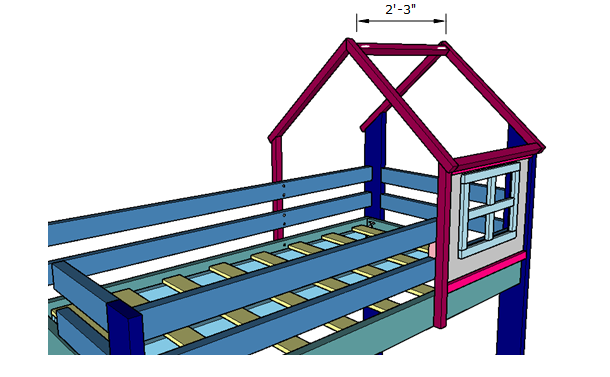
Tie the tops of the trusses together with the 2x2 ridge board. Position the ridge board on the near side of the top truss joint so you don't drive screws through that center joint. This will also give the roofing a place to attach. Use wood glue and 2 ½" pocket hole screws.
Step 20.
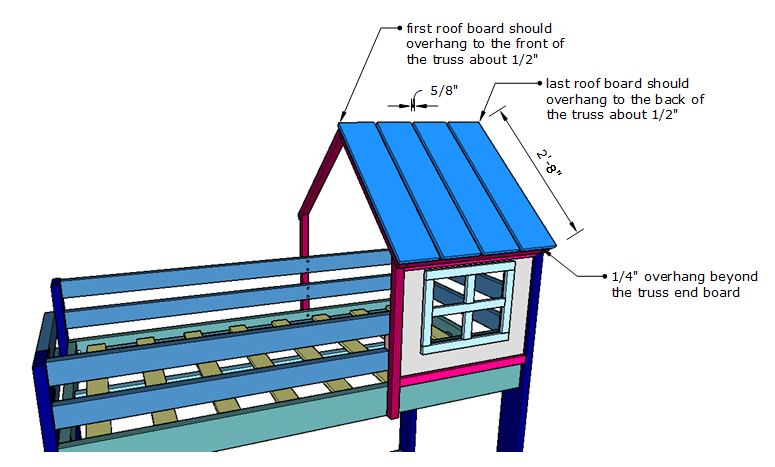
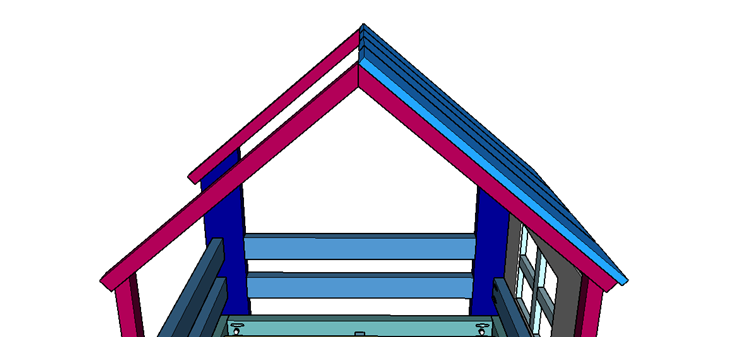
Finish the house off with the 1x8 roofing. Attach the 1x8s to the trusses with 1 ¼" screws. Countersink the screws for a more finished look.
Align the 1x8s flush with the top of the trusses and leave ¼" overhang beyond the truss end board.
The first and last roof boards should overhang the trusses about ½" to get the spacing correct. Don't make it too complicated - just space them so it looks nice.
Step 21.
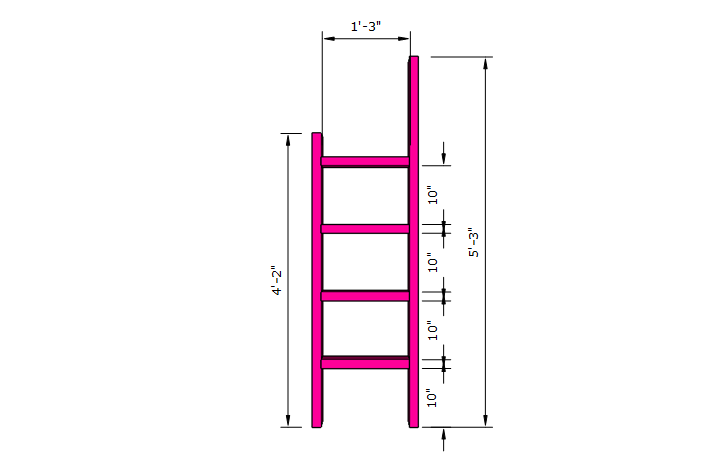
Assemble the ladder. Use wood glue and two 2 ½" pocket hole screws per side to attach the rungs to the rails.
Step 22.
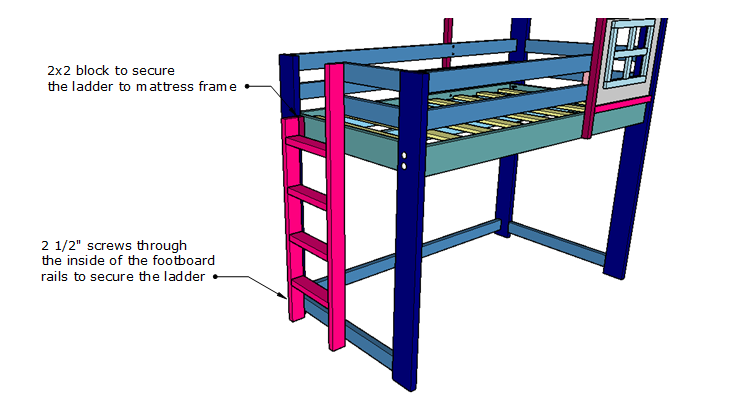
Attach the ladder to the bed frame with 2 ½" screws. Drive screws from the inside of the footboard rails into the ladder to secure it.
Add a small 2x2 block to fill the gap between the short ladder rail and mattress support frame. Secure the ladder to the mattress support frame.
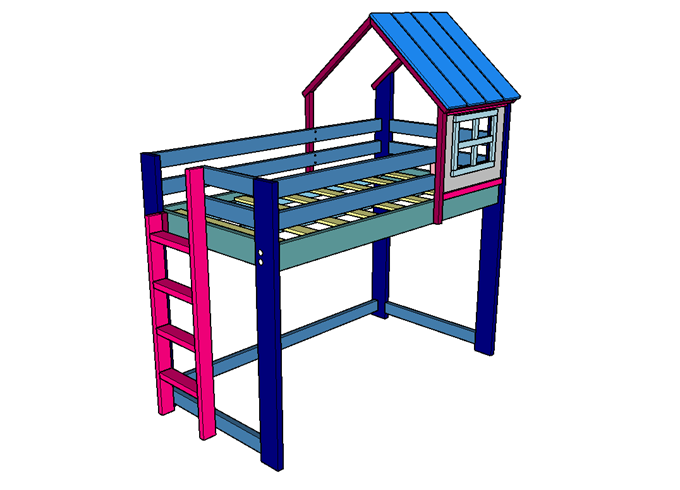
Adriana mentioned that she added a small handle at the top left next to the ladder to give the kids something to grab onto when they're climbing up. You can see it here:
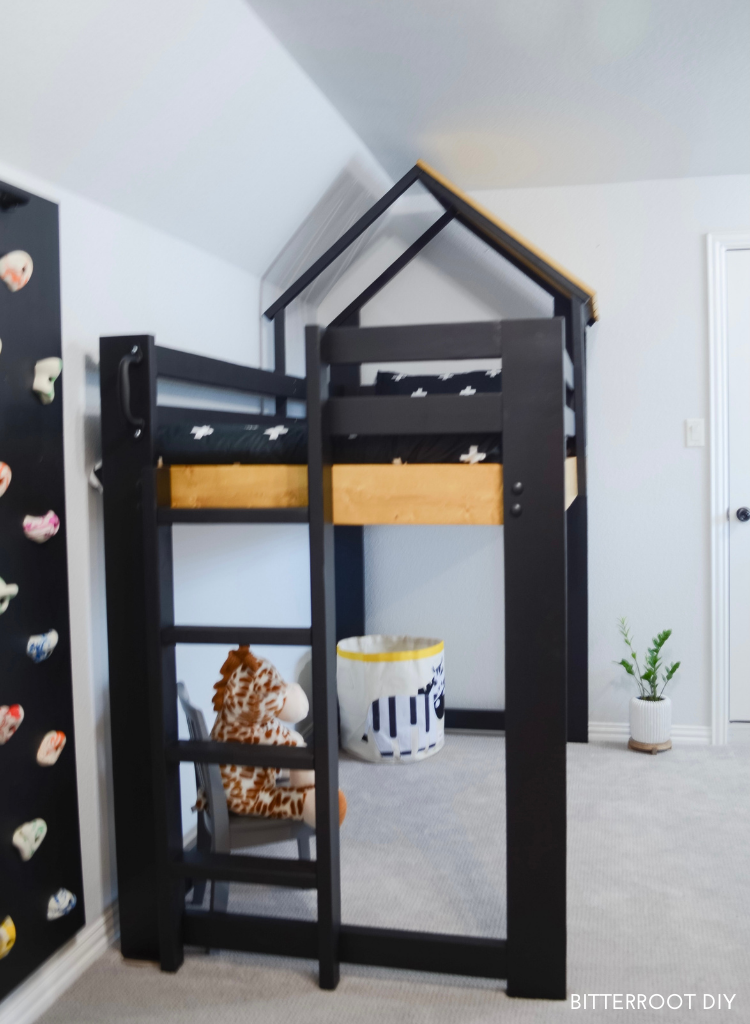
It's a great idea if your kiddos need a little extra boost!
We’d love to see your take on this DIY house loft bed! Tag me and Adriana over on Instagram @bitterrootdiy and @texasdiymama or shoot me an email at bitterroot.diy {at} gmail.com if you build it.
Please let me know if you have any questions and I’ll get back to you as soon as possible!

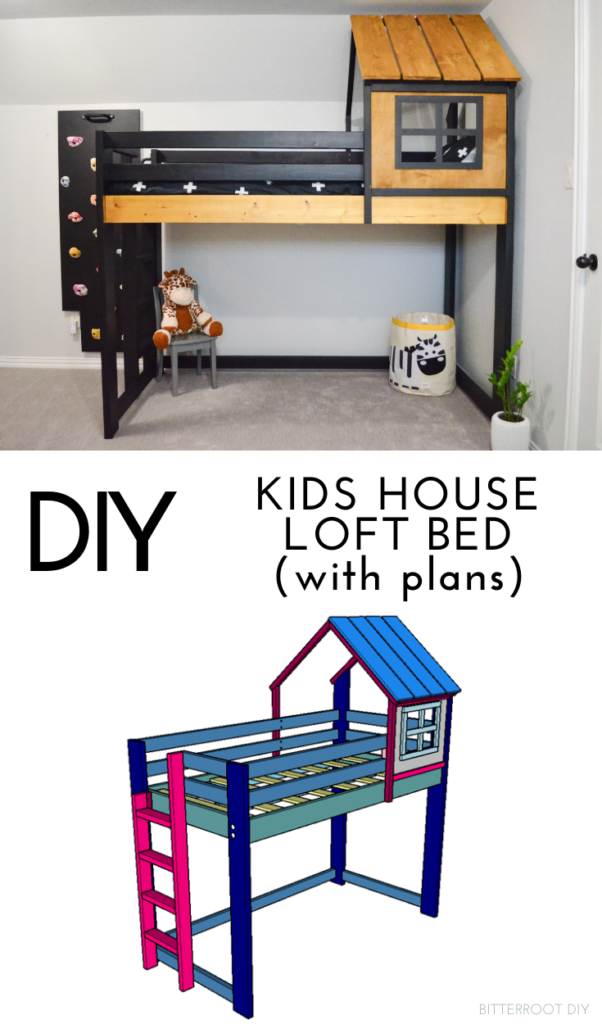
Don't forget to pin it for later!
Disclaimer
This bed and design has not been weight tested.
Bitterroot DIY is meant for entertainment and general purposes only. Although we do our best to keep information up to date and accurate, we make no warranties, express or implied, about the completeness, accuracy, or suitability with respect to the website, or information and products on the website. Any use of the information from this website is to be used at your own risk. In no event will Tylynn Sattler or Bitterroot DIY be held liable for any loss or damage (including, but not limited to, indirect or consequetial loss, damage, personal injury, or death) from using or with connection to the use of this website. Please follow all manufacturer’s safety instructions and consult a professional before attempting a project you are unsure about.