
This is probably the most nervous I’ve been to make a renovation decision. For a long time, I thought a walk-in pantry was the dream. More space, more storage, more organization… right?
While the space was nice, we really wanted to add a garage entry somewhere in the house. The garage was added after the house was built, but no door to access it. So it functioned more like a detached garage. When we parked in there, we had to go out and around the front or back of the house and then back inside. This was quite literally the only spot we could add a door without doing an addition. There was an unused wall on the other side of the kitchen where we figured we could add pantry cabinets. So when we renovated the kitchen (see it here: Classic Kitchen Renovation), we decided to go for it.
It felt like a bit of a gamble. But I’m happy to report, I think we like the cabinets more! At least compared to how our pantry was set up. The new kitchen layout just makes so much sense and everything flows more smoothly for how we use the space. And with cabinets, there’s really not space to catch a bunch of junk … which tended to happen in the bigger pantry. It’s streamlined and simple to keep organized. For us, the trade for the garage door was totally worth it.
And we LOVE being able to park in the garage and go right into the house. I’m working on a set of mudroom lockers by this door as well. But that’s another project for another day!
Today, we’re all about the DIY Pantry Cabinets.
The Plan: A Pantry Cabinet Wall Using RTA Cabinets
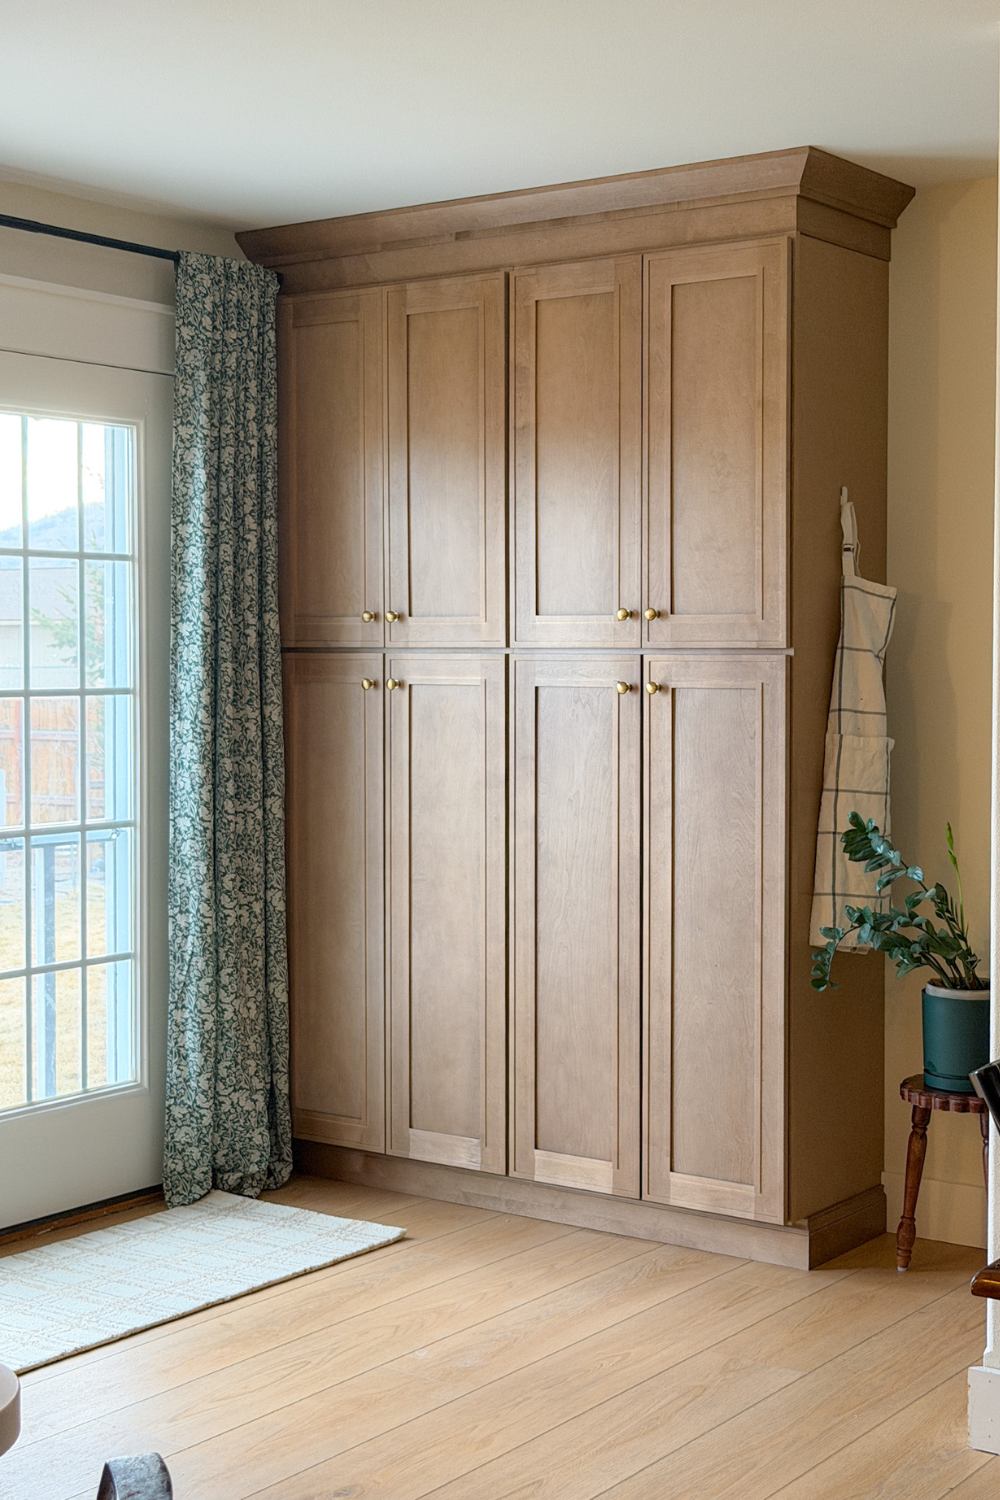
To replace the walk-in pantry, I wanted a wall of tall pantry cabinets that would look built-in and intentional — not like something we added as an afterthought.
We used RTA (ready-to-assemble) cabinets, which kept the project budget-friendly while still giving us a custom look. The kitchen renovation was the first time we used RTA cabinets. The process was so smooth and quality is far-and-above anything we could have afforded otherwise that we didn’t hesitate to use them again. I really wanted wood cabinets over here, so we went with the “Craftsman Natural Shaker Cabinets” from LilyAnn Cabinets. The color is stunning. It looks unfinished in a few of the photos on their website, but it’s actually a soft warm brown like it looks in our photos.

The goal was to:
- Maximize vertical storage
- Keep everything visible and accessible
- Make the cabinets feel original to the house
- Work around a tight space (with a door on one side and stairs on the other)
I decided on two utility cabinets and customized them to 30″ wide x 90″ tall x 18″ deep. LilyAnn Cabinets was one of the only RTA companies I found that offers all sorts of customizations. You can adjust for pretty much any size you might need.
Installing the DIY Pantry Cabinets
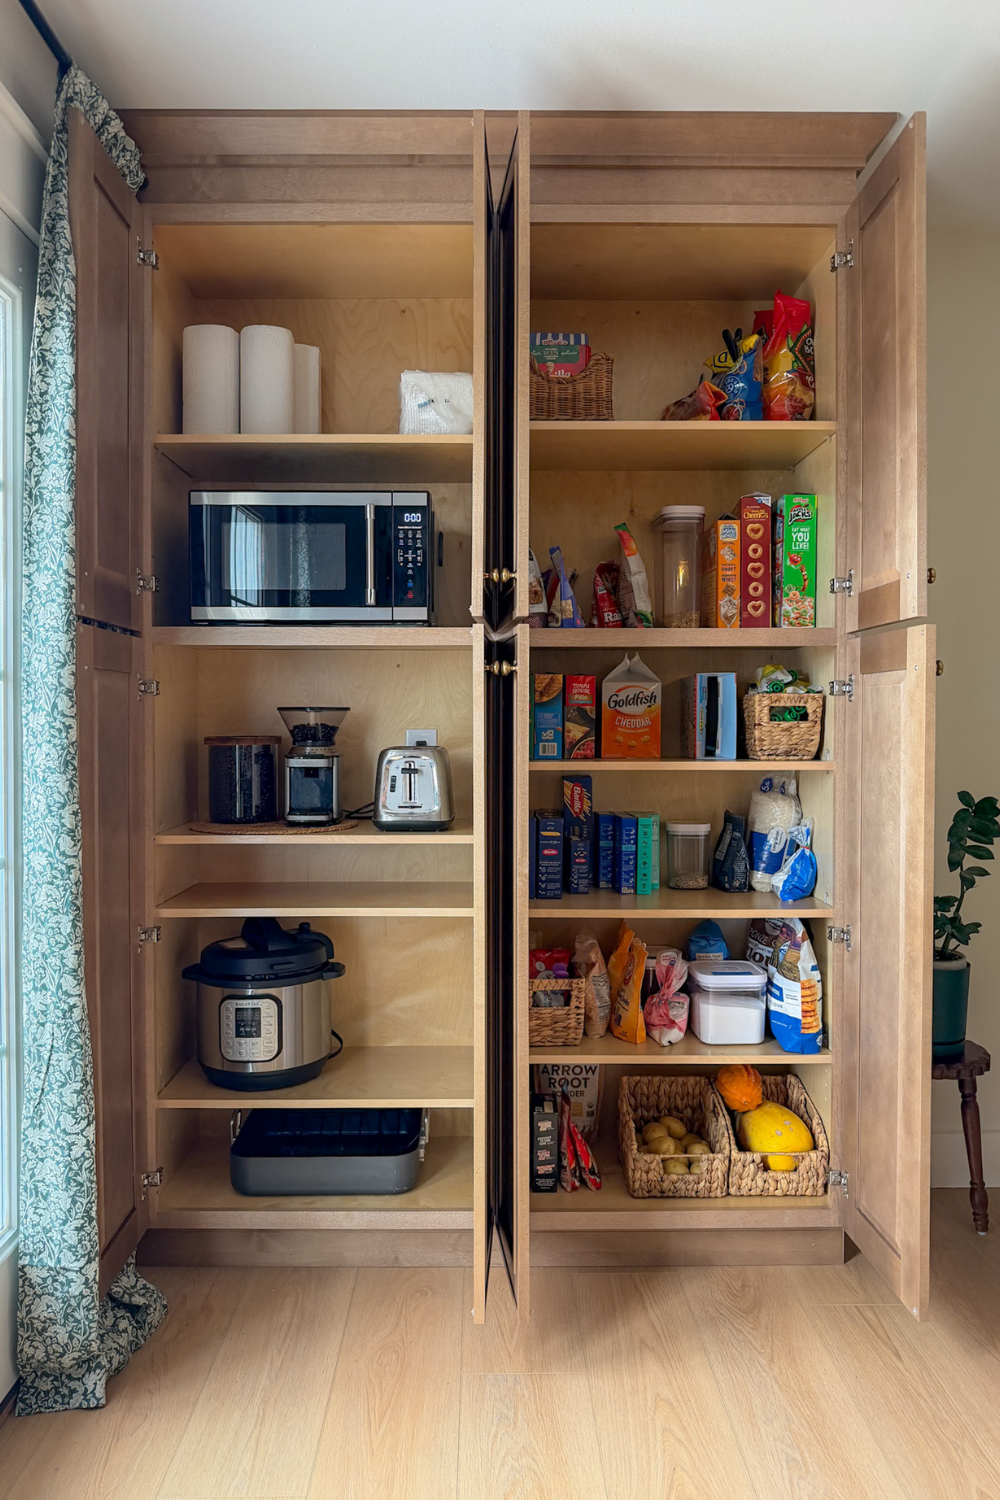
Assembly was a breeze. I build the cabinet boxes, then we moved them into the house. The left cabinet houses some of our bigger appliances – microwave, toaster, coffee grinder. Luckily, there was already an outlet in this wall, so we cut out space for the boxes in the backs of the cabinets to be able to access them. I added a 3″ spacer along the left wall to give the doors plenty of room to open and then attached both cabinets to the studs in a few places.

Making the Cabinets Look Built-In
Once the cabinets were installed, I added crown molding to the top and trim along the bottom to make them look more built-in.
I’ve extended cabinets to the ceiling a few times, but this time I decided to try a new method! Rather than attach blocks to the top of the cabinet and then blocks to the ceiling, (which is always a pain to get those lined up perfectly), I built little frames and then attached them to the tops of the cabinets. No need to try to line up blocks on the ceiling!
Then I attached a 1×6 board to the vertical pieces of those frames.
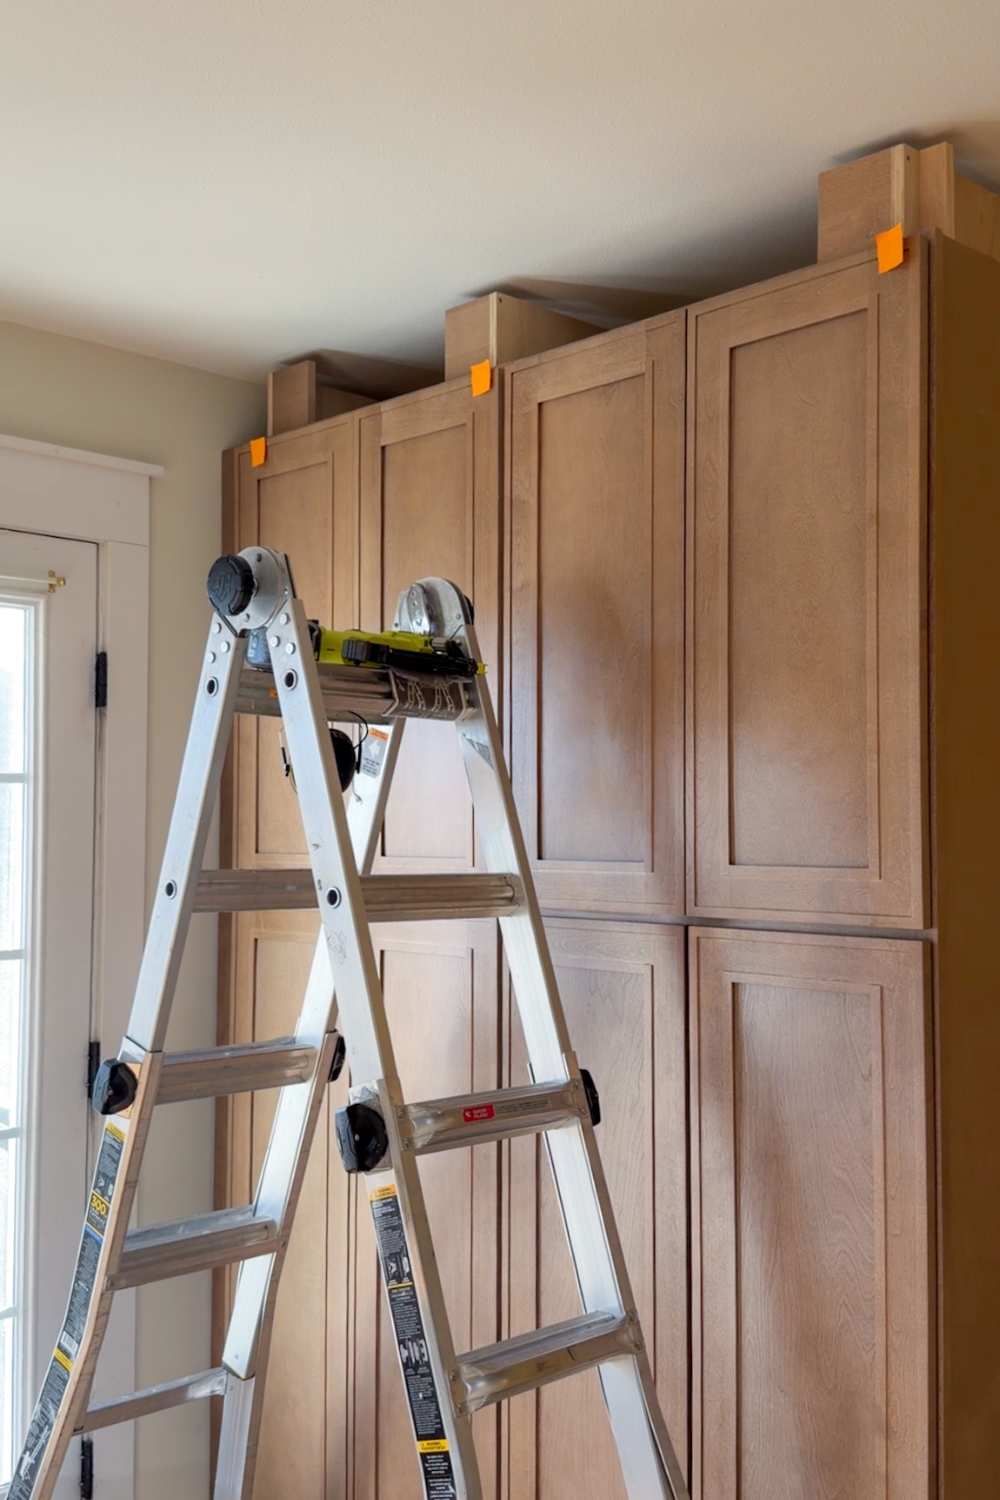

I used orange sticky notes to mark where the vertical boards were so I knew where to nail. Worked like a charm and I didn’t have to mark the cabinets!
I installed the crown molding over the 1×6. And finished it off with baseboards around the bottom. I got all the trim and spacers from LilyAnn Cabinets as well, so the stain color matches perfectly.
The hardware is the as the rest of the kitchen: Top Knobs Mushroom Knobs.

Organizing the DIY Pantry Cabinets
The microwave used to be in the kitchen island. When we renovated the kitchen, we took it out with every intention of moving it into the pantry cabinets. As you probably know, the kitchen got delayed with the twins. So our microwave lived out in the shop for about a year and a half. And, as much as we thought maybe we could try to be no-microwave people, it just wasn’t gonna happen 😂 But it was a good test run having it out there for so long!
Here’s a look at how we organized everything, with a home for the microwave and all.
Craftsman Natural Shaker Utility Cabinet // ChrisLovesJulia Polly Rug // Hyacinth Semi-Sheer Printed Curtains // Pantry Baskets with Handles // Pantry Rectangular Baskets // Woven Rattan Pantry Basket // Top Knobs Mushroom Knobs // Basic Curtain Rod // Green Plant Pot // Countertop Microwave
Now, I love a Pinterest-pantry as much as the next person. All the pretty containers, baskets, and bins that make everything look so organized. However … this is our only pantry. So we don’t have room to do a “pretty pantry” and then backstock pantry somewhere else. So I used baskets or containers where they make sense. But, otherwise, most items stay in their original packaging.
I can’t believe how much space we actually ended up with! This holds all our food and most of the main appliances. We have the blender in a cabinet in the main part of the kitchen, closer to the sink. And the coffee pots live on the counter.
My favorite things about switching to cabinets:
✔ Everything is easy to see and access
✔ No more forgotten items shoved in the back
✔ It feels open instead of cramped
✔ The storage is flexible and customizable
✔ We still have extra space — which shocked me
I usually put the school lunch boxes on that little shelf above the Instapot, just incase you’re wondering why it’s there. We even ended up with some open space (a rare moment in a house with five kids).
Here’s a look at the before and after:

After 2 years of living in complete kitchen chaos, it all makes sense again. Woohoo!
Sources
- Craftsman Natural Shaker Utility Cabinet
- ChrisLovesJulia Polly Rug
- Hyacinth Semi-Sheer Printed Curtains
- Pantry Baskets with Handles
- Pantry Rectangular Baskets
- Woven Rattan Pantry Basket
- Top Knobs Mushroom Knobs
- Basic Curtain Rod
- Green Plant Pot
- Countertop Microwave
| Tylynn |

This post contains affiliate links. If you make a purchase from one of the links, I may make a small commission at NO EXTRA COST to you. Thank you for your support so I can continue to share content and ideas with you. See my full disclosure here

