
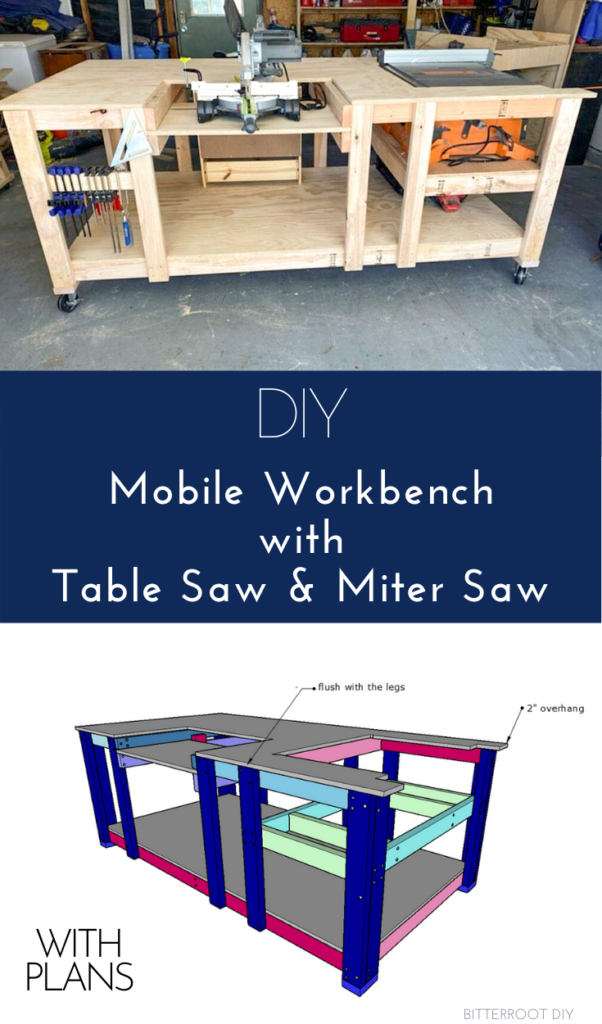
Build a DIY mobile workbench that fits both your table saw and miter saw with these plans.
This post may contain affiliate links. If you make a purchase from one of the links, I may make a small commission at NO EXTRA COST to you. This helps keep the tutorials and plans free here at Terrace Place. Thank you for your support! See my full disclosure here.
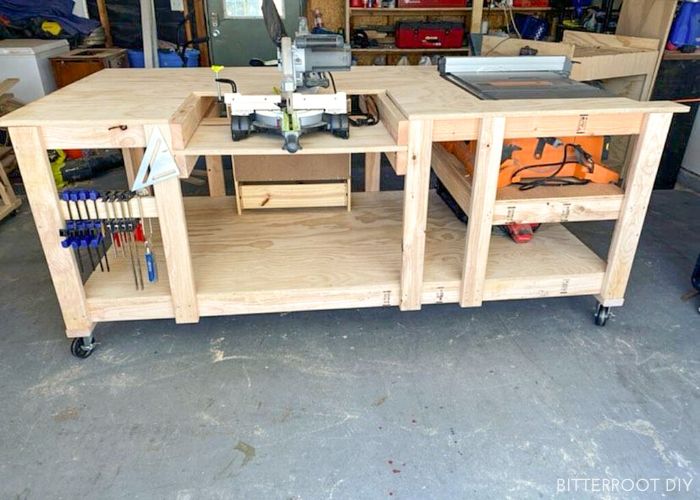
You all loved the DIY Mobile Workbench with Table Saw so much that I brought it back for round #2! I teamed up with my friend Ashley from Shes the Carpenter for this new and improved mobile workbench with BOTH a table saw and miter saw.
I used the dimensions for a RIGID table saw in the post below, but you can adjust the table saw shelf to fit any table saw. The only thing you have to change is the size of the shelf and location of the support leg that the shelf attaches to.
Tools & Supplies
- Four 3″ Locking Casters
- Miter Saw
- Jigsaw
- Circular Saw or Table Saw
- Drill
- Tape Measure
- Clamps
- Level
- Speed Square
- Pencil
- Safety Glasses
- Ear Protection
- 2 ½” Screws
- 1 ¼” Screws
Lumber List
- 14 | 2x4 @ 8' (legs & frame)
- 1 | 2x3 @ 8' (miter saw shelf)
- 2 | ¾" Particleboard @ 4'x8' (tabletops & shelves)
- 1 | ¾" Particleboard @ 2'x4' (miter saw shelf)
Cut List
- 3 | 2x4 @ 7' 5" (top & bottom frame)
- 5 | 2x4 @ 3' 6" (top & bottom frame)
- 14 | 2x4 @ 2' 7 ½" (legs)
- 2 | 2x4 @ 3' 9" (long table saw shelf frame)
- 4 | 2x4 @ 1' 10" (short table saw shelf frame)
- 2 | 2x4 @ 4' (miter saw shelf frame)
- 1 | 2x4 @ 3' 1 ¼" (top frame)
- 1 | 2x4 @ 1' 6 ¾" (top frame)
- 2 | 2x3 @ 3' 9" (miter saw shelf frame)
- 4 | 2x4 @ 5" (caster feet)
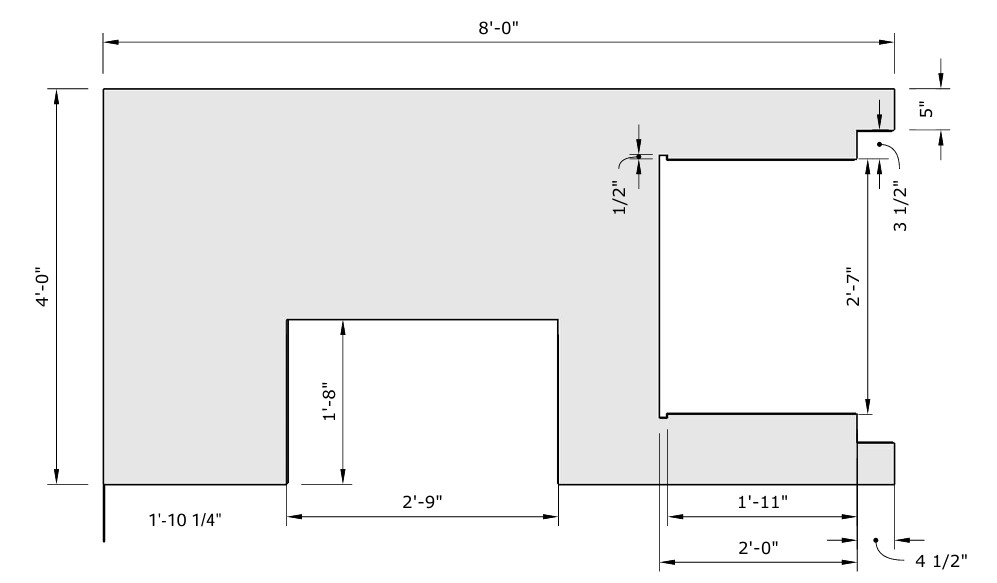
- 1 | ¾" Particleboard @ 4' x 8' (see plywood cut diagram below)
- 1 | ¾" Particleboard @ 2' 9" x 1' 8" (miter saw shelf)
- 1 | ¾" Particleboard @ 3' 9" x 7' 5" (bottom shelf)
Plywood Cut Diagram for Tabletop:
Step 1.
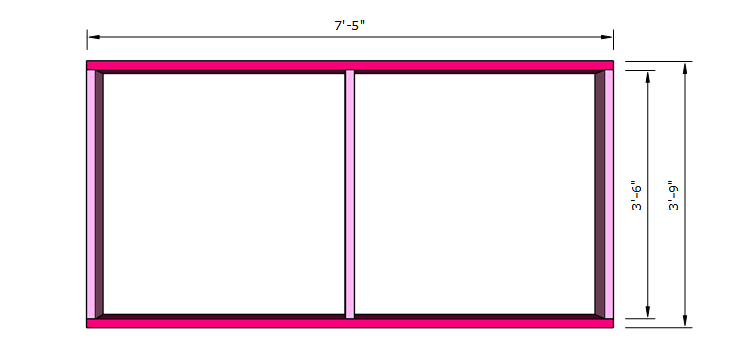
Assemble the bottom frame according to the diagram. Use 2 ½" self tapping screws through the frame to attach the 2x4s. Pocket holes are a great option if you don’t want to see the screws from the front of the bench. However, since this is just a workbench, I simply screwed through the frame into the shorter 2x4s.
Step 2.
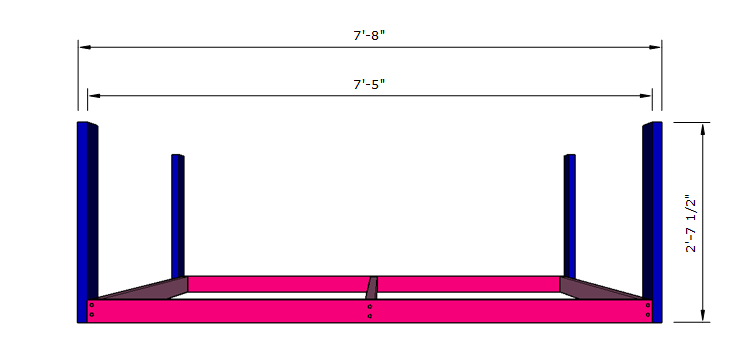
Attach the side legs to the bottom frame with 2 ½″ screws. The bottom of the frame should sit flush with the bottom of the legs.
Step 3.
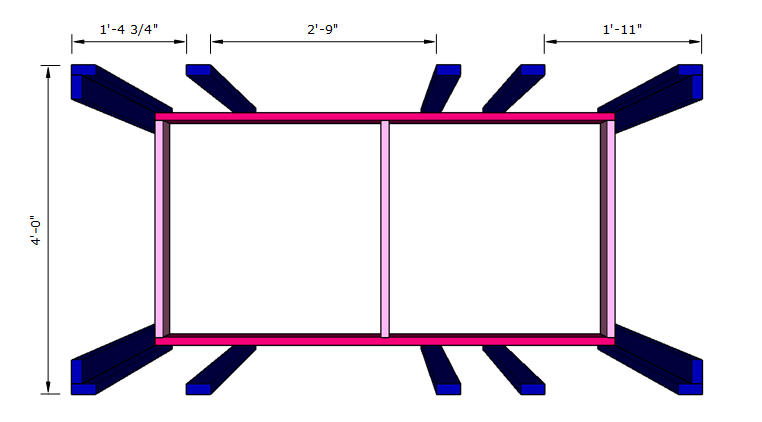
Attach the front and back legs to the frame and side legs with 2 ½″ screws. I attached the legs to the frame first and then drove a couple screws through the legs into the narrow side of the front and back legs to secure them together. You can see the approximate location of the screws in the diagram above.
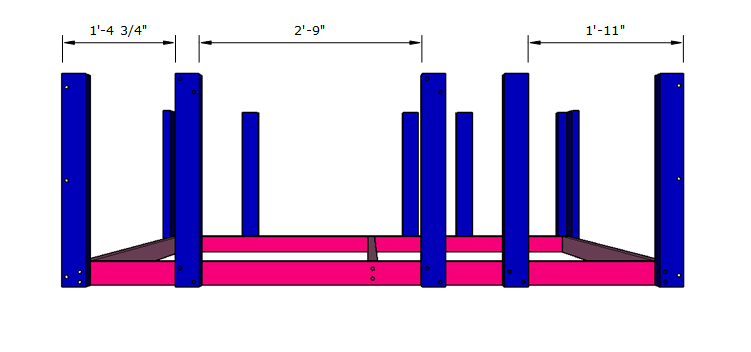
The diagram only shows dimensions on the front legs. The back legs exactly mirror it.
Here's a top view of how the legs go together:
Step 4.
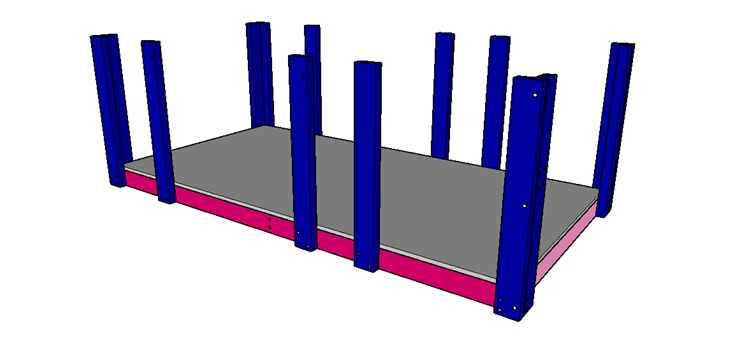
Put the bottom shelf in place on the bottom frame and attach with 1 ¼″ screws. Countersink the screws so they won’t get in the way. It’s very difficult to put the bottom shelf in later, so definitely put it in before attaching the top frame in Step 5.
Step 5.
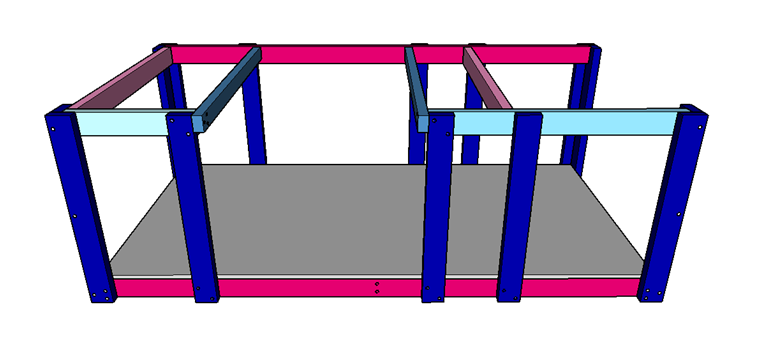
Build the top frame in place as shown. Use 2 ½″ screws to attach the frame to the legs.
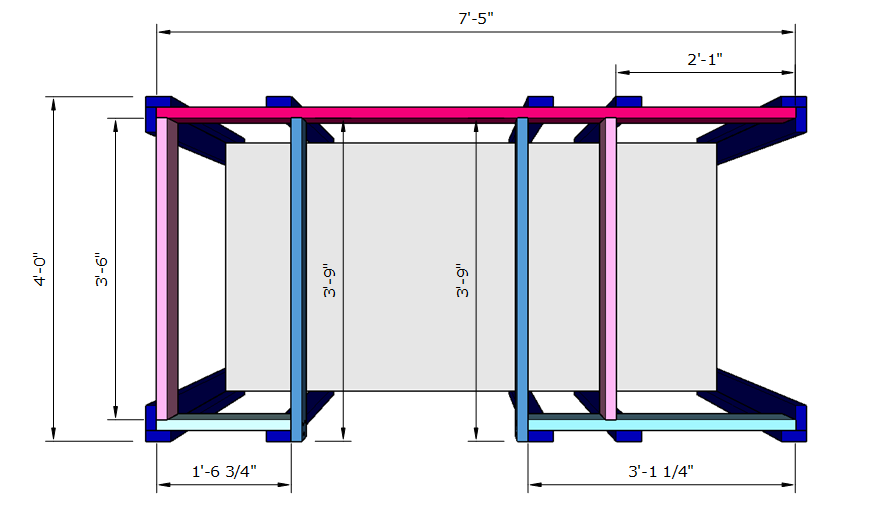
Here's a different view from the front to show you what it looks like at this point:
Step 6.
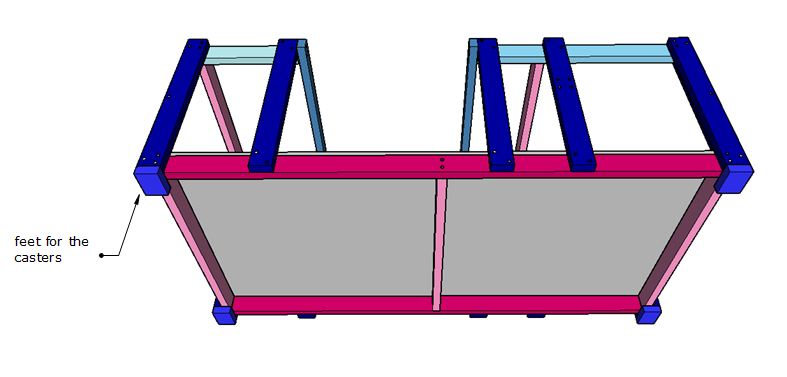
Attach the 2×4 feet to the legs with 2 ½″ screws. Fasten the locking casters to the feet with 1 ¼″ screws. I used washers on each screw since the screw heads were smaller than the holes in the caster wheels. You could also use washer head screws.
Step 7.
Assemble the frame for the table saw shelf with 2 ½″ screws. Place those two center 2x4 supports wherever necessary to support the base of your table saw.
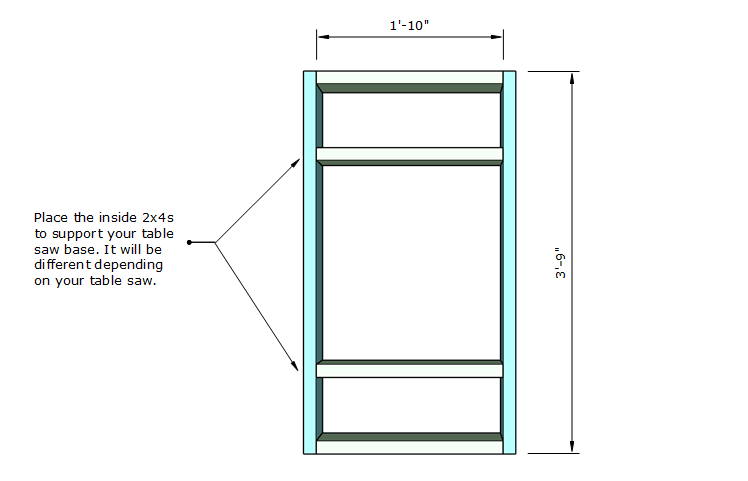
You could also add particle board on top of the 2x4 frame to set the table saw on. Just make sure to leave room in the bottom for dust collection (or at least for the sawdust to fall out).
Step 8.
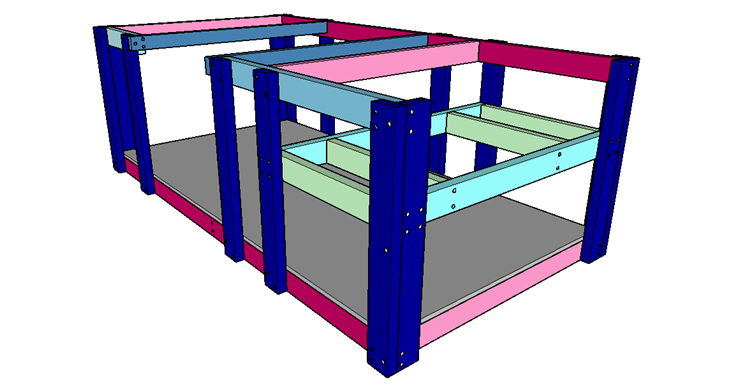
Place the shelf at the appropriate height for your table saw and attach to the workbench frame with 2 ½″ screws. Use clamps to hold the shelf in place while you attach it to the frame.
Side View:
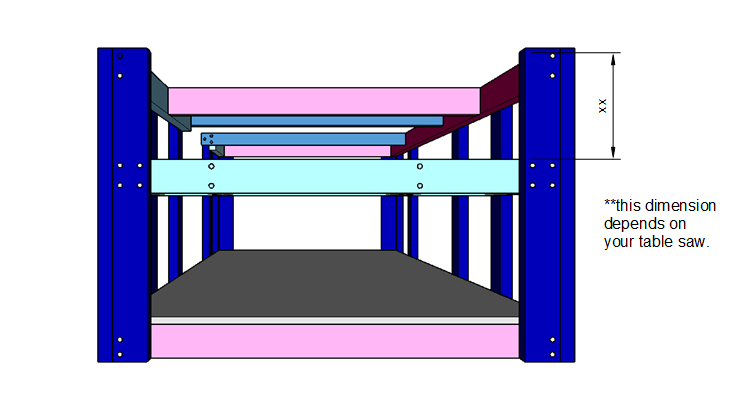
Step 9.
Measure the height of your miter saw's tabletop. A good way to do this is to set your saw on a flat surface, lay a board across the saw so it extends off the edge, and measure from the flat surface to the bottom of the board.
Position the 2x4 miter saw shelf supports at the appropriate height so the top of the miter saw will sit flush with the tabletop when it's on the shelf.
Attach the 2x4 miter saw shelf supports to the inside of the midSlide the miter saw shelf particleboard into place on top of the 2x4s you just attached.dle legs. Drive two 2 ½" screws on each side into the legs.
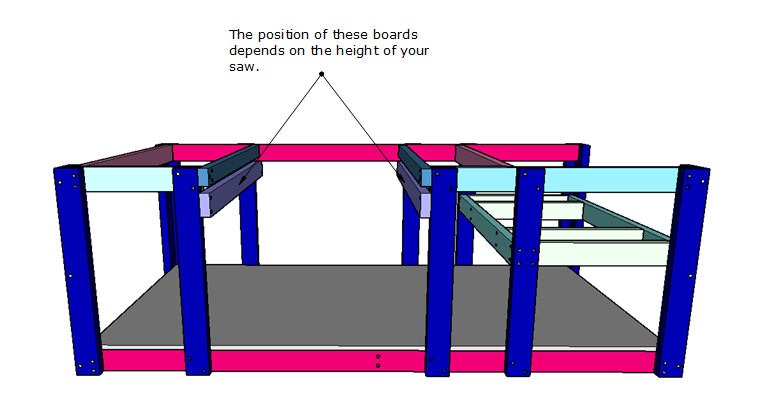
Slide the miter saw shelf particleboard into place on top of the 2x4s you just attached.
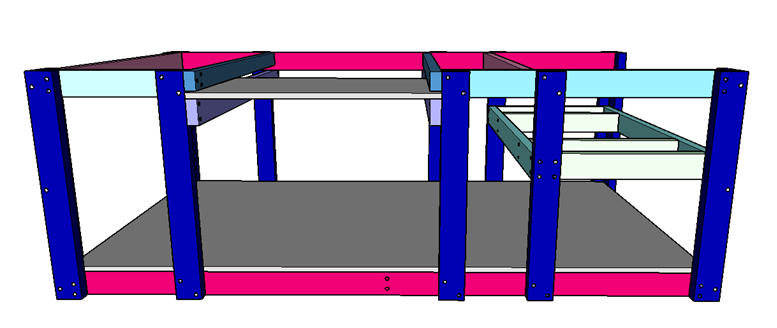
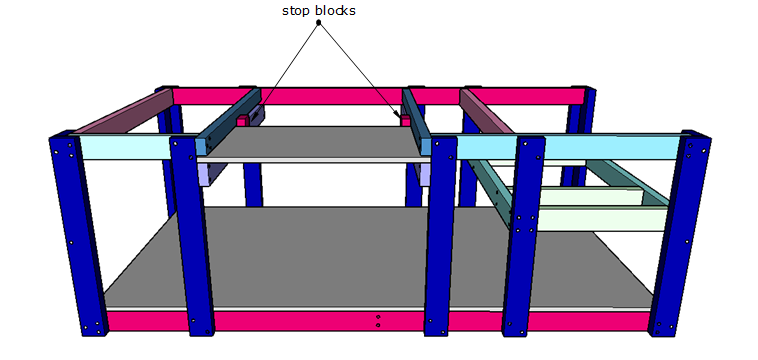
Step 10.
Attach a stop block on each side behind the miter saw shelf to prevent the shelf from sliding backward under the bench.
You can just use an extra piece of 2x4 cut to fit and attach it to the 2x3 and 2x4 shelf support.
Step 11.
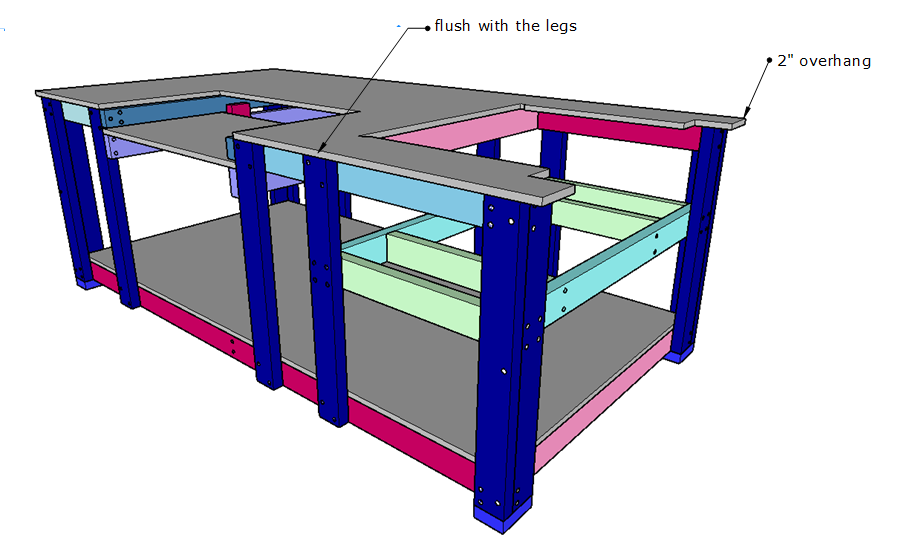
Center the tabletop and attach it to the frame with 1 ¼″ screws. There should be a 2" overhang on the sides of the table top and it should be flush with the outside edge of the legs along front and back. Countersink the screws into the particle board so they won’t get in the way of your work.
Step 12.
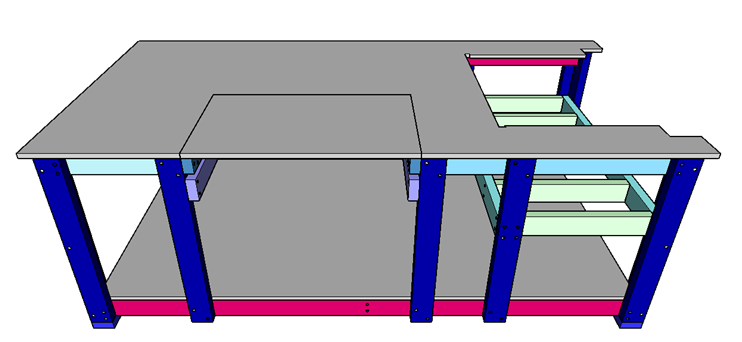
Since the miter saw shelf is just held in place by the stop blocks you attached in Step 11, you can use that same piece of particle board (or plywood) to fill in the tabletop when you need the full workbench.
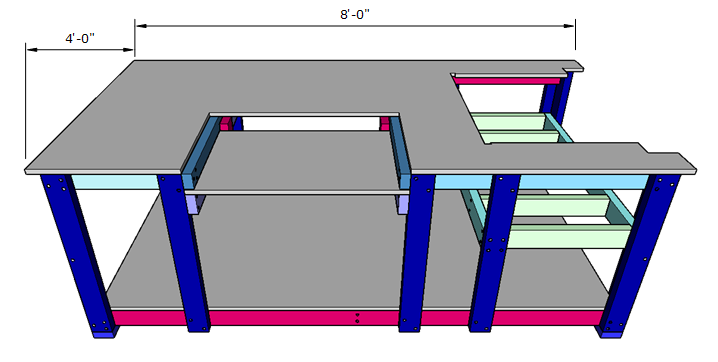
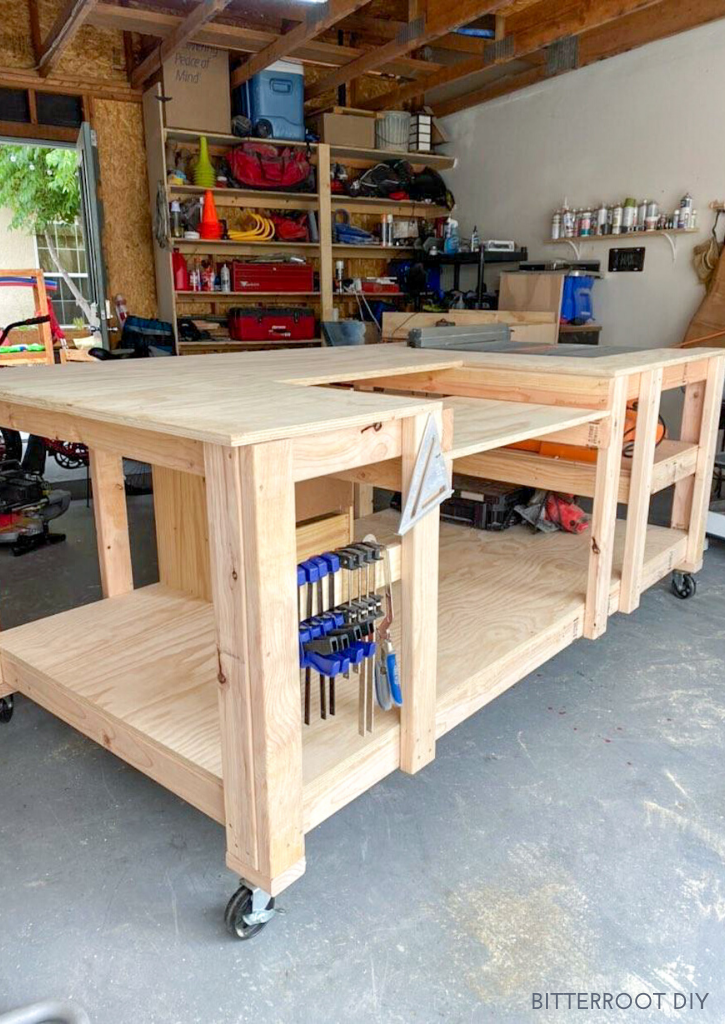
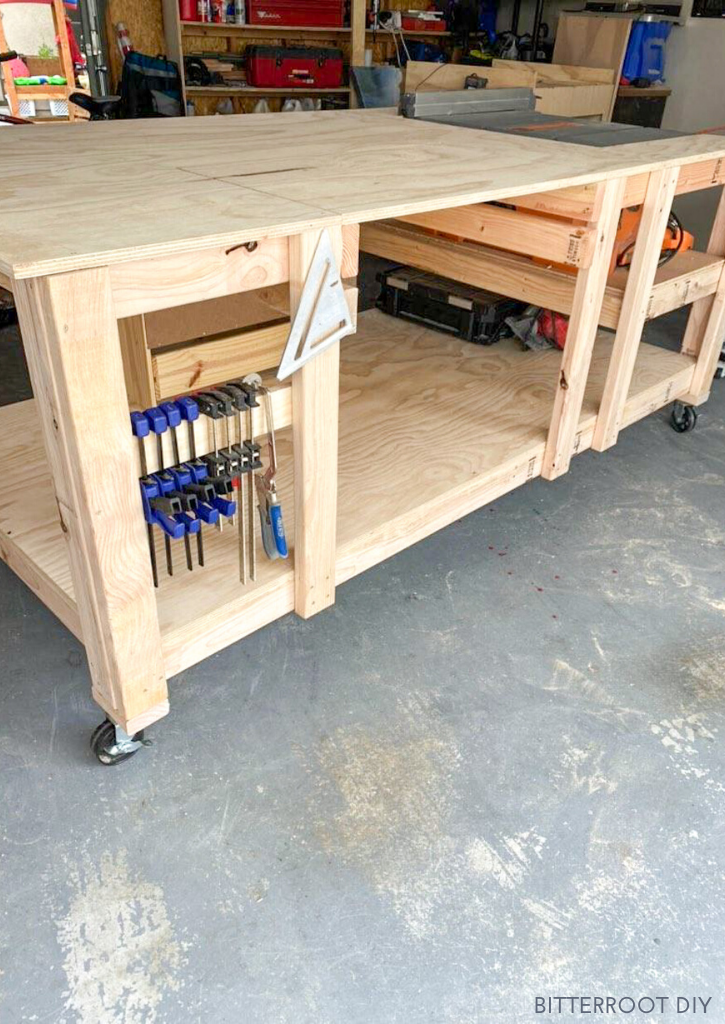
Place the miter saw shelf in the shelf slot when you want to use the saw:
Move the shelf up to the top of the workbench when you need a full out-feed table:
Step 13.
**Optional: Add a small clamp rack along the end of the workbench once it's finished. On the first DIY mobile workbench, I just used a small scrap board and screwed it to the inside of the legs.
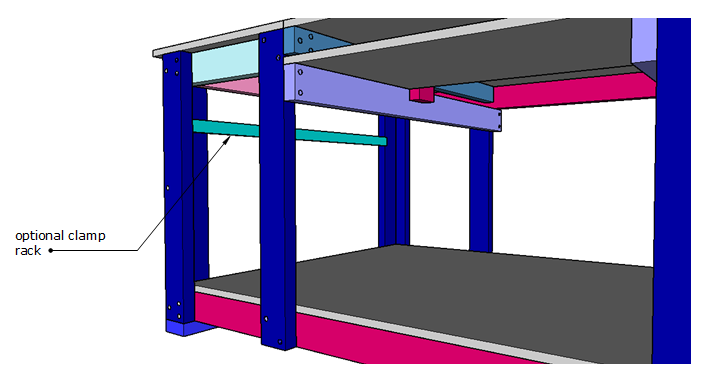
Ashley added the clamp rack in a little different spot, so feel free to do whatever works best for your shop.
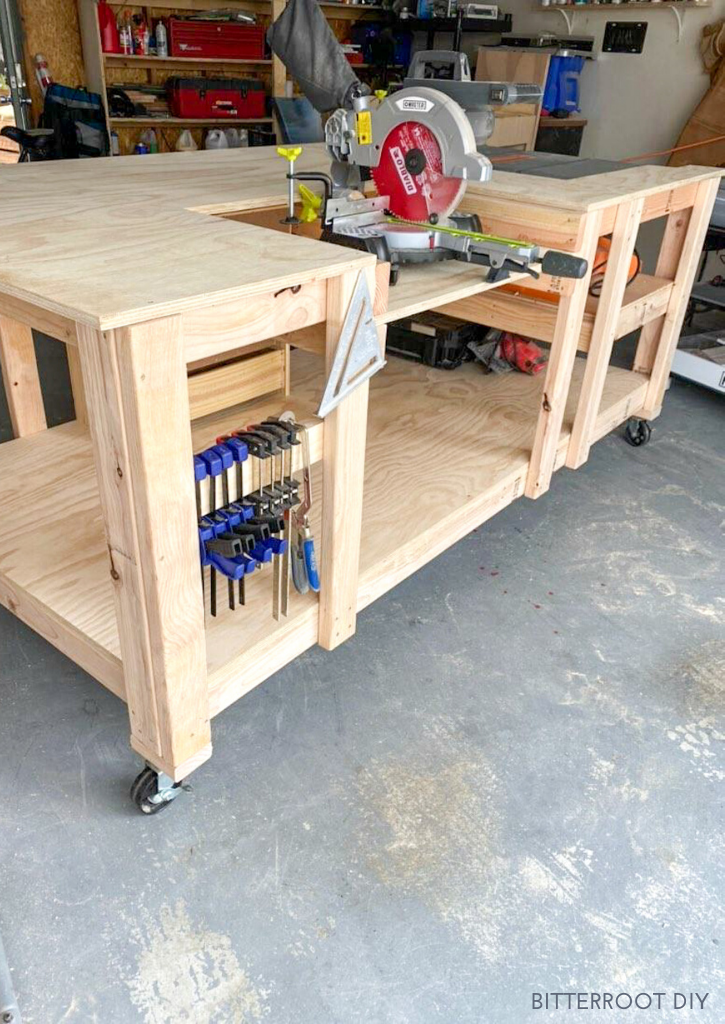
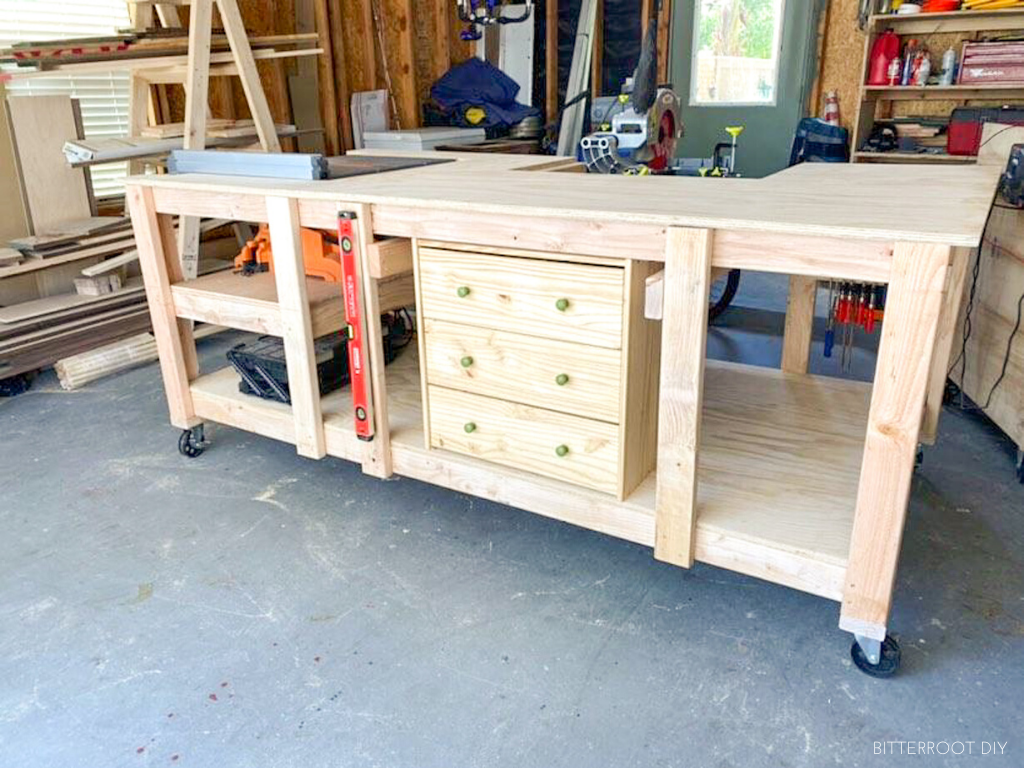
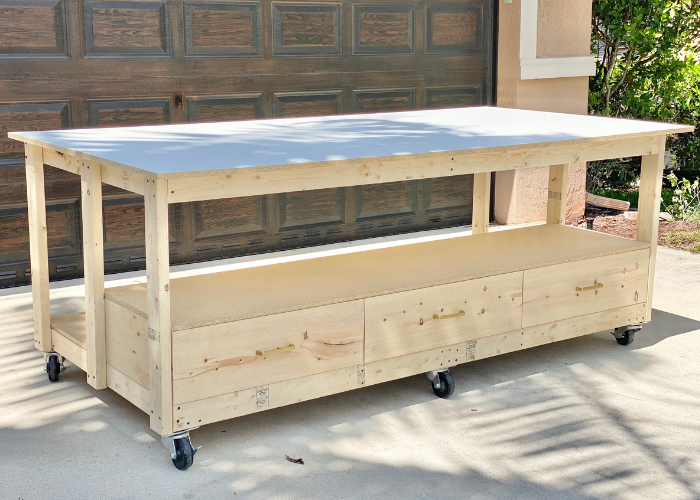
She also added a small nightstand along the far side of the workbench for some extra drawer storage, which is such a great use of space:
And just for good measure, here are a few more photos to show how that miter saw shelf works:
Good luck, happy building, and don't forget to tag me @terrace.place and Ashley @shesthecarpenter over on Instagram if you build this Ultimate DIY Mobile Workbench. We'd love to see it!
Please let me know if you have any questions and I'll get back to you as soon as possible.
| Tylynn |
Thanks for stopping by!
For more project ideas, you can find me on Pinterest. And to stay up to date with the latest shenanigans, follow me on Instagram.

Just finished ours! It’s a bit tall for me being 5’2” but it’ll work!
Haha I'm 5'1", so I hear ya! I built it that height so I didn't have to bend over for sanding 😉
Hello! I am a complete newbie and love the plans. My question is about the height of the saws. Should the table top be flush with the saws or no? Also you give a tip on how to measure for the miter saw would it be the same for the table saw?
The tabletop should be flush with the table top of the table saw, as well as the tabletop of the miter saw. The shelf for the miter saw has to be a little lower than the tabletop so the tabletop of the miter saw ends up flush (so you can run a board across it to cut).
Hi there,
This work table looks great!
I'm wondering what program you use to design this on?
Many thanks!
Thanks! I use SketchUp.
Tylynn this is my second build from your collection. I’m not new to this, but you have had some really cool ideas. I built your miter saw station with the flip up extensions and loved it. Just finished this table and really like it a lot. I added a flip top miter station and a router table at the far end. Going to add T Track in a couple of locations, but hats off, great plans and better ideas!
Hi Steve,
Thanks so much! Those are great additions to this one. I hope you get tons of good use out of both workbenches!
Hey Tylynn I made this a love it .changed up some stuff but very easy to work with what you have to Follow.i was wondering what Software you used to make your print.
Thanks Devin
That's great to hear! I hope you get tons of good use out of it. I use SketchUp to draw all my plans. There's a free online version if you're interested in trying it out.
Will this work with the 10 in slider saw??
It should. I designed it for a 12" sliding saw, which is bigger.
Hi, I need to modify the plans for Metabo saw and miter, plus I want to add a router station. Could I get the sketch plans so I can tweak it? I bought the plans but only got the PDF.
Hi Jimmy,
Unfortunately I do not have a shareable plan set that you can modify.
What was the grand total $$ to build this?
Unfortunately, I don't give cost estimates since prices fluctuate so much depending on location. Lumber prices are also up right now due to COVID.
This is a great work bench. Built it this week over 3 evenings.
I have a 7 1/4" mitre saw, so had to make feet for my saw to get it over the 3" self, works great.
Very clear instructions and sketches.