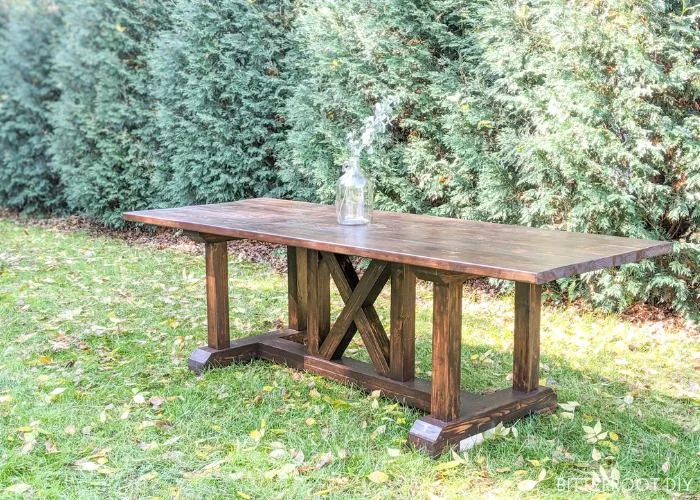
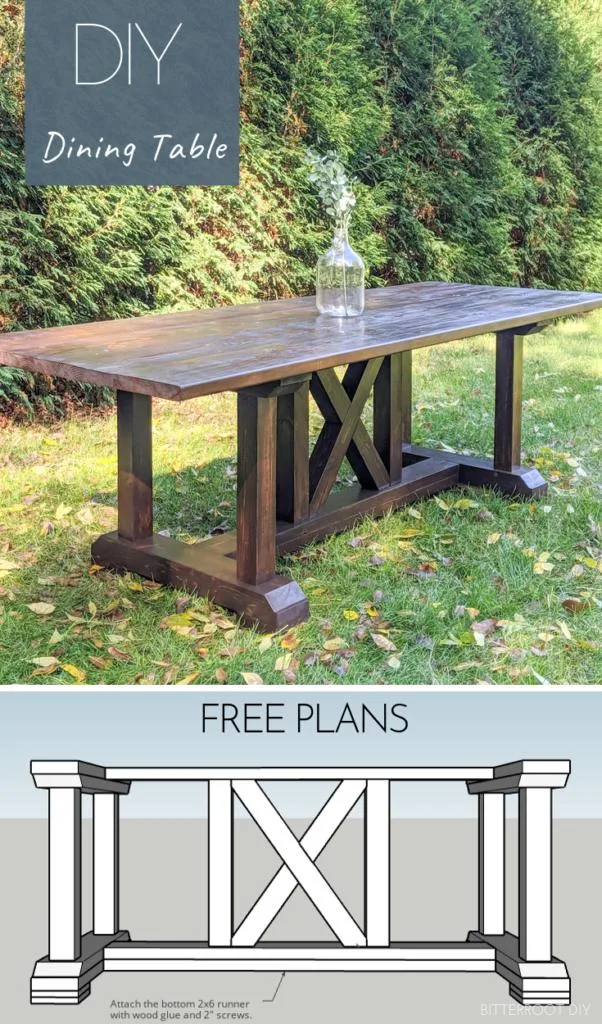
Woodworking plans to build a DIY dining table inspired by Restoration Hardware.
This post contains affiliate links. If you make a purchase from one of the links, I may make a small commission at NO EXTRA COST to you. This helps keep the tutorials and plans free here at Bitterroot DIY. Thank you for your support! See my full disclosure here.
TOOLS & SUPPLIES
- Kreg Pocket Hole Jig
- 2 1/2″ Pocket Hole Screws (I use Spax screws – just make sure whatever you use is self tapping)
- Miter Saw
- Table Saw (optional)
- Drill
- Orbital Sander
- Tape Measure
- Clamps
- Wood Glue
- Level
- Speed Square
- Pencil
- Safety Glasses
- Ear Protection
Lumber:
- 4 | 2 x 10 @ 8′ (tabletop)
- 2 | 2 x 4 @ 8′ (legs)
- 1 | 2 x 4 @ 8′ (center x frame)
- 2 | 2 x 4 @8′ (center x)
- 1 | 2 x 4 @8′ (top runner)
- 4 | 2 x 6 @ 8′ (top & bottom feet)
- 2 | 2 x 6 @ 8′ (bottom runner)
- 1 | 1 x 6 @ 6′ (bottom feet – you only need a little over 40″, but 6′ is usually the smallest they sell) OR you can use 2x6s.
I chose to make my own 4x4s for this dining table by gluing 2x4s together. To make your own 4x4s, cut the 2x4s according to the cut list below, then glue and clamp two 2x4s together to make a 4×4. Once the glue is completely dry, remove the clamps. You can cut the rounded edges off the 2x4s for a more square look, or leave them rounded. I cut the rounded edges off with a table saw, but it’s completely optional.
**If you prefer to buy the 4x4s, here is an alternate lumber list:
- 4 | 2 x 10 @ 8′ (tabletop)
- 1 | 4 x 4 @ 8′ (legs)
- 1 | 4 x 4 @ 8′ (center x frame)
- 1 | 4 x 4 @8′ (center x)
- 1 | 2 x 4 @8′ (top runner)
- 4 | 2 x 6 @ 8′ (top & bottom feet)
- 2 | 2 x 6 @ 8′ (bottom runner)
- 1 | 1 x 6 @ 6′ (bottom feet – you only need a little over 40″, but 6′ is usually the smallest they sell)
Cuts:
- 4 | 2 x 10 @ 8′ (tabletop)
- 8 | 2 x 4 @ 20 3/4″ (legs)
- 4 | 2 x 4 @ 22 1/4″ (center x vertical frame)
- 2 | 2 x 4 @ 27 3/16″ with both ends cut at 30 degree parallel miter (see step 7 for a diagram)
- 4 | 2 x 4 @ 13 9/16″ with one end cut at 30 degree miter and the other cut at 20 degree miter (see step 7 for diagram)
- 1 | 2 x 4 @ 63 1/2″ (top runner)
- 4 | 2 x 6 @ 31″ (feet with straight ends)
- 4 | 2 x 6 @ 30″ with the ends cut back 1 1/2″ at 45 degrees (see diagram below)
- 2 | 2 x 6 @ 63 1/2″ (bottom runners)
- 8 | 1 x 6 @ 6″ (bottom feet)
**Alternate cut list if you buy 4x4s:
- 4 | 2 x 10 @ 8′ (tabletop)
- 4 | 4 x 4 @ 20 3/4″ (legs)
- 2 | 4 x 4 @ 22 1/4″ (center x vertical frame)
- 1 | 4 x 4 @ 27 3/16″ with both ends cut at 30 degree parallel miter (see step 7 for a diagram)
- 2 | 4 x 4 @ 13 9/16″ with one end cut at 30 degree miter and the other cut at 20 degree miter (see step 7 for diagram)
- 1 | 2 x 4 @ 63 1/2″ (top runner)
- 4 | 2 x 6 @ 31″ (feet with straight ends)
- 4 | 2 x 6 @ 30″ with the ends cut back 1 1/2″ at 45 degrees (see diagram below)
- 2 | 2 x 6 @ 63 1/2″ (bottom runners)
- 8 | 1 x 6 @ 5 1/2″ (bottom feet)
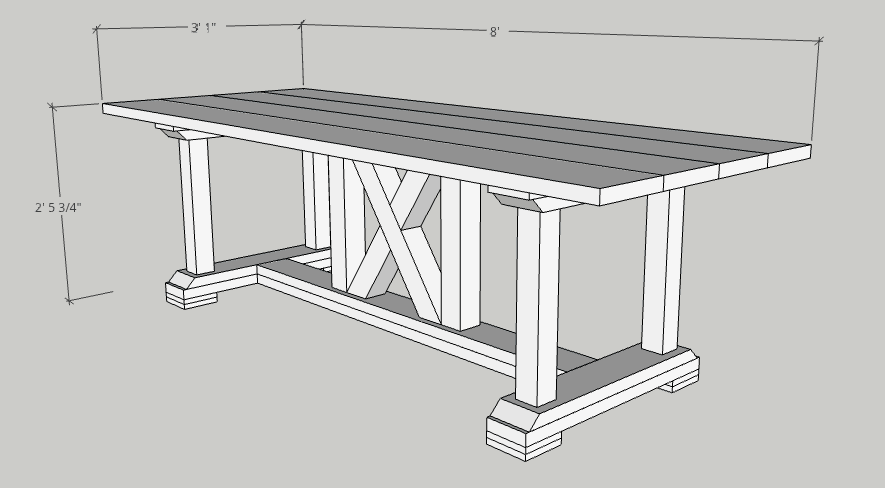
There are more details on how to cut the center criss cross boards below. I listed the cuts in the cut list, but I recommend waiting to cut them until the rest of the frame is assembled just in case there’s any discrepancy in measurements once it’s all put together.
I also recommend sanding the boards before assembly. There are a lot of corners once it’s all put together, which are pretty hard to reach with a sander. I sanded both before and after assembly.
Make sure to clean up any leaked wood glue before it dries because wood glue does not accept stain.
Enjoy the plans!
Step 1.
Glue a straight 2×6 board and a mitered 2×6 board together to make one table foot. Make sure to clamp them until the glue is completely dry.
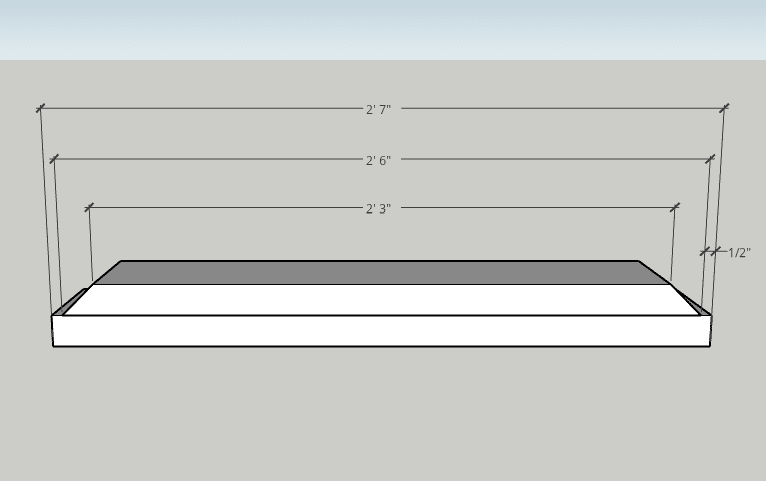
Repeat for all four table feet.
When you’re done, you should have four sets of feet that look like the above diagram (two for the bottom of the legs and two for the top of the legs).
Feel free to rip the rounded edges off if you want to, but it’s completely optional!
Step 2.
Attach two 1x6s on either end of one of the feet you built in Step 1. Attach the 1x6s to the foot with wood glue and clamp in place until dry. Alternatively, you can drive a few finish nails through the bottom of the 1x6s into the 2×6 foot if you don’t want to wait for glue to dry.
Repeat for the second bottom foot.
You should end up with two feet that look like this:
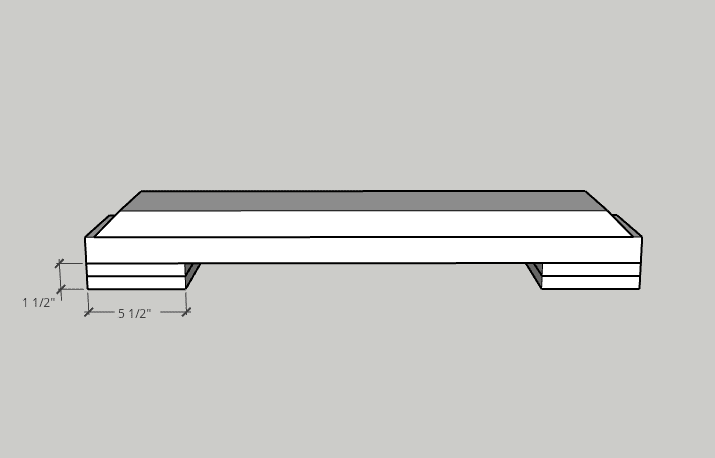
And two feet that still look like this (no 1x6s):

**If you ripped the rounded edges off the 2×6 feet in Step 1, the 1x6s will be a little wider than the 2×6. I simply cut the extra width off the 1x6s with my miter saw so they match up perfectly with the 2x6s. If you don’t rip the rounded edges off the 2x6s, everything is the same width and you don’t have to worry about this at all.
Step 3.
Attach the 4×4 legs to the feet with wood glue and 2 1/2″ pocket hole screws as shown:
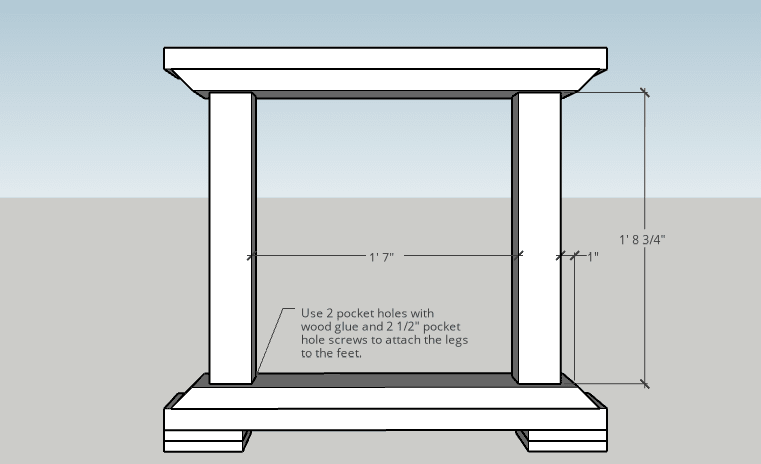
I used two pocket holes on the bottom and two pocket holes on the top of each leg to attach them to the feet. I turned the pocket holes toward the inside of the leg in order to best hide them (I also filled them with wood plugs, as stated below).
Build two sets of legs.
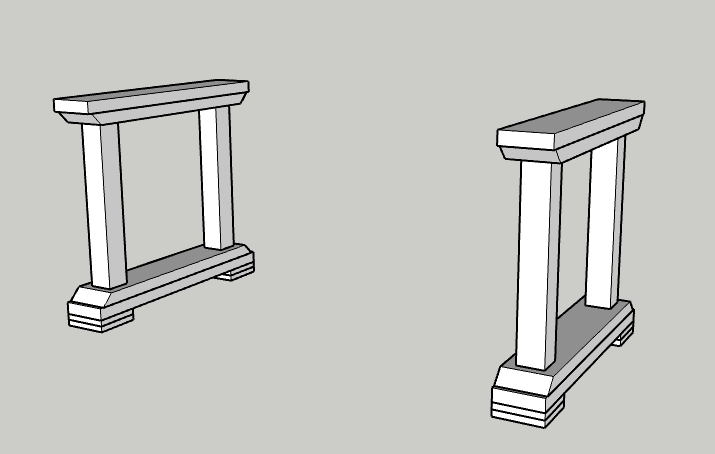
Step 4.
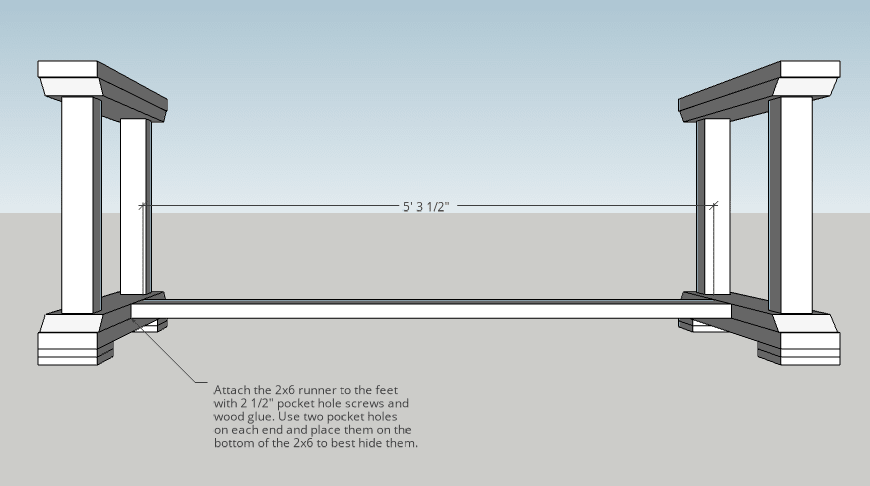
Join the legs together with the bottom 2×6 runner. Position the runner so it is flush with the top of the feet and attach with wood glue and 2 1/2″ pocket hole screws.
Step 5.
Add the top 2×4 runner to join the top of the legs together.
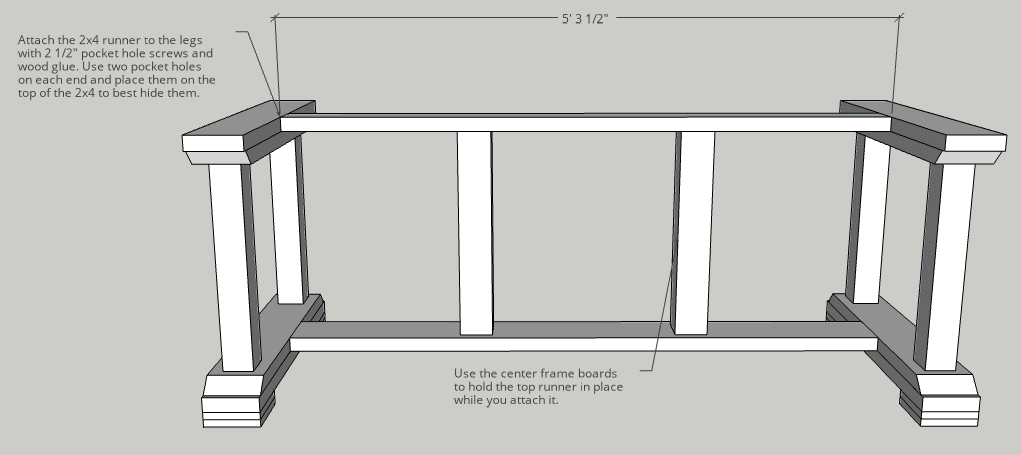
I used the center frame 4x4s as blocks to hold the 2×4 runner in place while I attached it. Use wood glue and 2 1/2″ pocket hole screws to attach the 2×4 runner to the legs. Place them on the top of the 2×4 so the tabletop will hide them once it’s attached.
Step 6.
Adjust the center frame boards into place and attach them to the top and bottom runners with wood glue and 2″ self tapping screws.
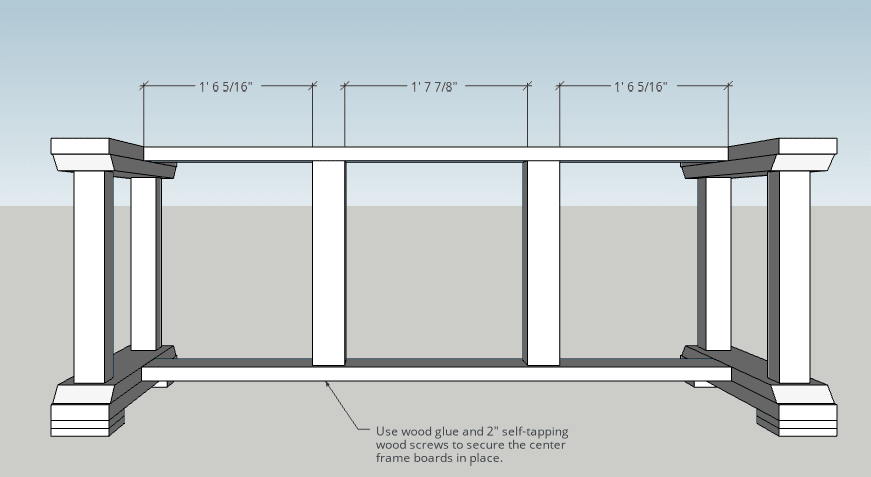
You can use pocket holes here if you prefer, but it just leaves more holes to fill later. I recommend simply driving screws through the runners into the 4x4s. You’ll never see them once the final bottom 2×6 and tabletop are in place. Make sure to countersink the screws.
Step 7.
Double check the center vertical frame you just build in step 6 to make sure all the measurements are the same as listed.
If they are, cut the center criss cross boards as shown:
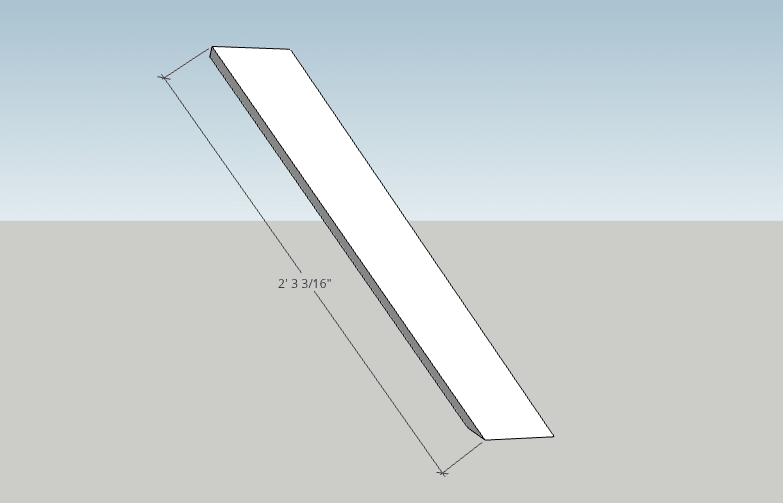
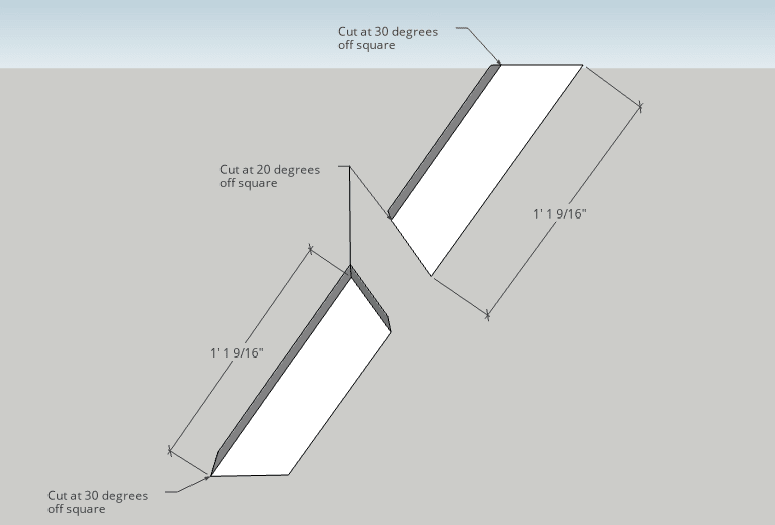
To make criss crosses, I usually just hold the boards against the frame and trace the cuts. However, since the bottom runner is a 2×6 it’s difficult to hold the boards flush against those vertical 4x4s (there’s a little ledge between them and the edge of the 2×6). So I ended up just cutting the criss cross to the measurements as listed.
I recommend cutting the boards a little long and then trimming them down to get the best fit.
Once you’re happy with how they fit, attach them to the table frame.
I used 2″ self tapping screws and wood glue to attach the boards to the top and bottom runners (same as the 4x4s in Step 6).
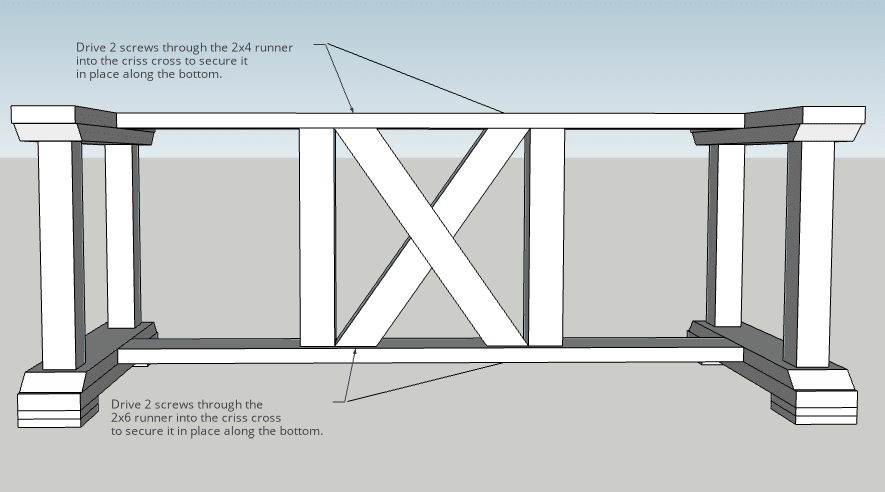
I used wood glue and drove 1 1/2″ finish nails diagonally into the full length X board at the center intersection. I used two finish nails in the front and two in the back on both of the shorter X boards. Between the finish nails and wood glue, it’s a strong joint.
You could also use pocket holes (more holes to fill) or cut half laps – completely up to you!
Step 8.
Last but not least, attach the bottom 2×6 runner and you have a table frame!
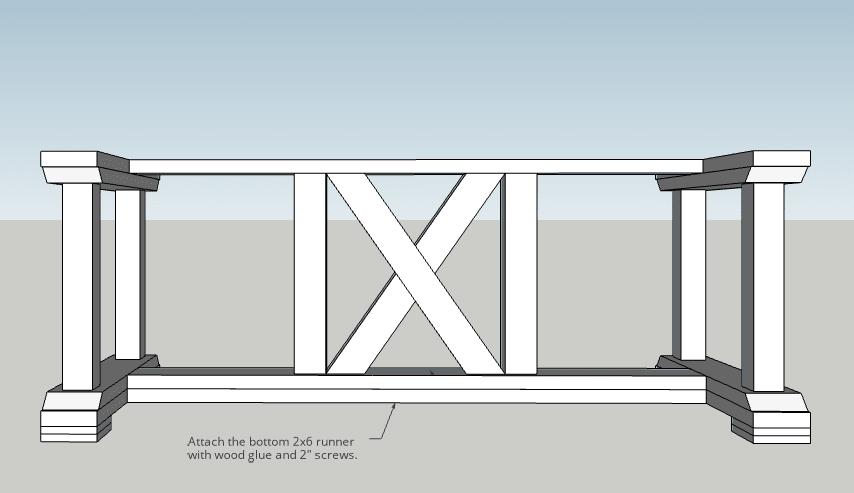
I used wood glue and 2″ self tapping screws and simply screwed it to the other 2×6 runner. You can use pocket holes to attach it to the feet if you so choose, but it’s plenty strong just attached to the other runner.
Step 9.
Build the tabletop. Use wood glue and 2 1/2″ pocket holes to attach the 2×10 boards to each other.
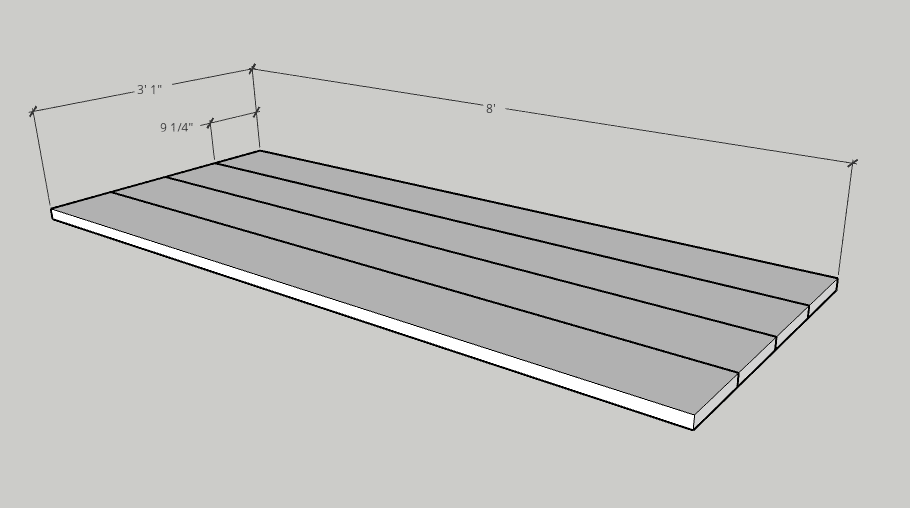
Stagger the pocket holes along the back of the boards for a strong, secure tabletop. For more information see How to Build a Tabletop.
Once I joined all the tabletop boards together, I trimmed both ends of the tabletop with a circular saw to make sure it was smooth and flush (about 1/8″ off each end). You can trim the boards with a miter saw before joining them together if you don’t have a circular saw, or just leave them rough if you prefer.
Step 10.
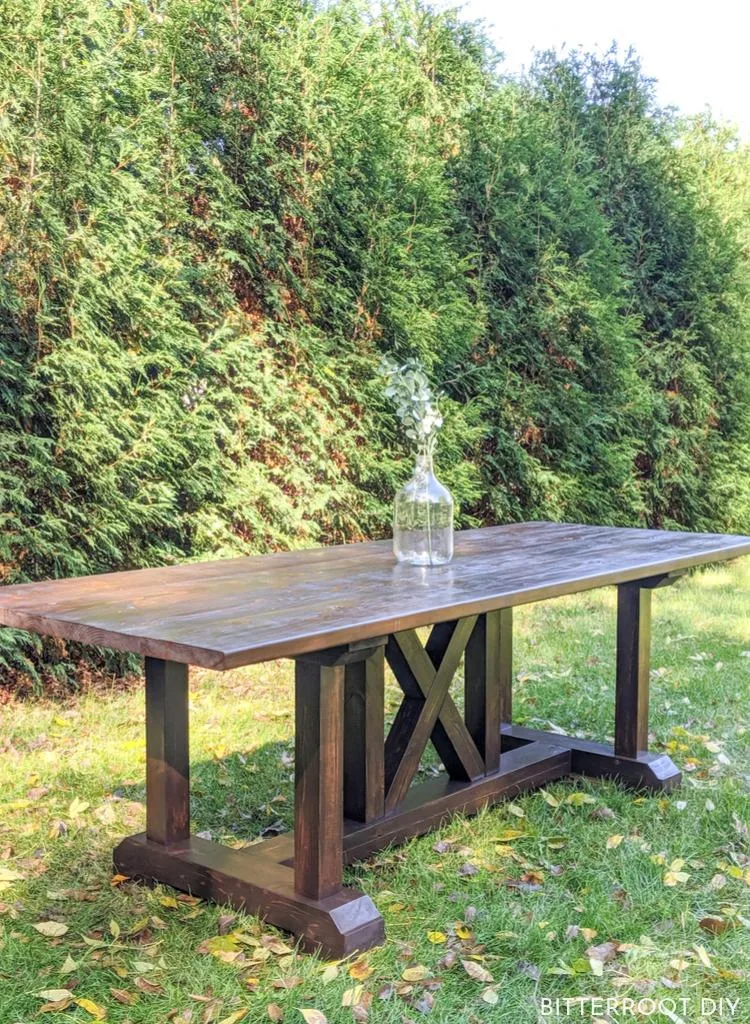
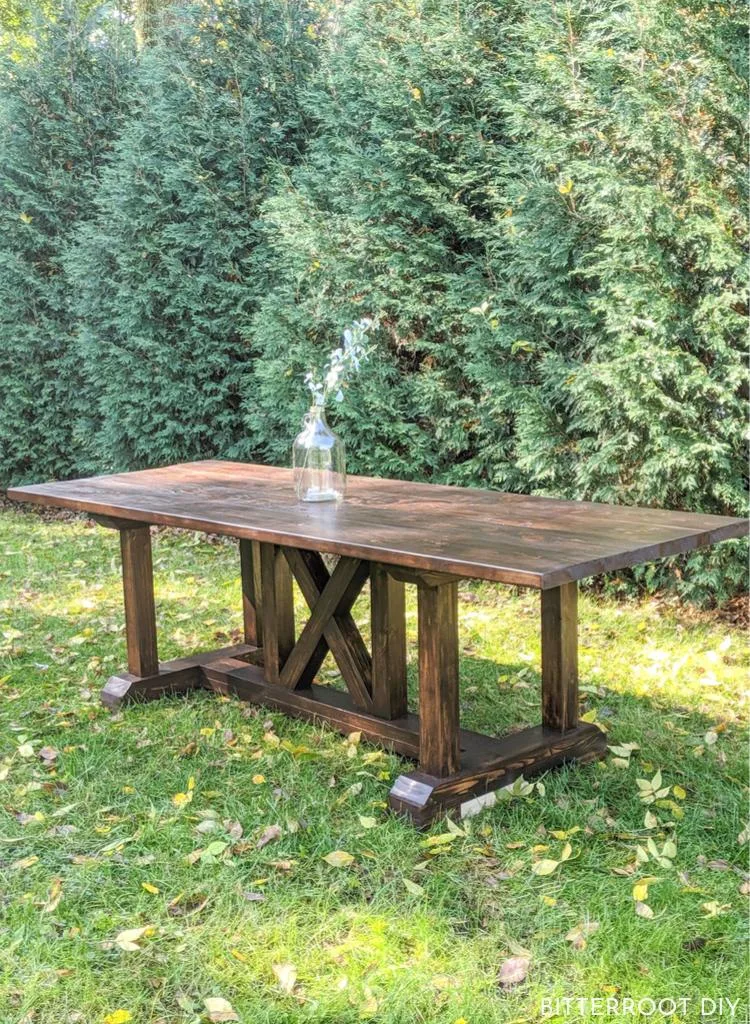
Sand everything a final time and finish as desired. As stated above, I sanded both before and after assembly. I stained the table with Varathane “Kona” and sealed it with Varathane oil-based polyurethane in “Gloss”.
Finally, attach the tabletop with corner braces. I used eight 1″ corner braces – four along the top 2×4 runner and two on each leg. The braces allow the table top and base to move independently as the wood swells and shrinks with temperature and humidity changes.
Please let me know if you have any questions and I’ll get back to you as soon as possible.

Thanks for stopping by!
For more project ideas, you can find me on Pinterest. And to stay up to date with the latest shenanigans, follow me on Instagram.

Michele Schroeder
Friday 22nd of January 2021
Beautiful table!!! I am wanting to build this but my question is instead of using wood as the top would the wood base be able to hold a 200 pound glass top? Any suggestions of how to modify the instructions if it won't hold a glass table top. Thanks!
tylynn_sattler
Monday 25th of January 2021
Yeah it should be plenty strong to hold a glass top. I'd recommend adding extra supports through the middle though so the glass doesn't have to span the full width.
Megan
Sunday 10th of January 2021
Good morning! It says you were going to add the benches to the list, have you done that? I cannot seem to find and it we really like this table and would love to have matching benches. Thanks!
tylynn_sattler
Monday 25th of January 2021
I'm sorry, but no I haven't gotten to the benches. I recommend building smaller versions of the two bases on either side of the table and then just put the bench seat on top of that. So pretty much build the table again, but small version.
Vance Beckner
Monday 28th of September 2020
Do you have plans for matching benches?
tylynn_sattler
Thursday 1st of October 2020
I don't at the moment, but I've gotten a few requests for them. It's on my list!
Trista
Saturday 12th of September 2020
Hi, the table is beautiful! My dad and I are hoping to build it for my house😀 I am curious about the wood warping/twisting etc...My friend’s husband built her a table and the wood has twisted and it’s an uneven surface now. Do you run into this problem? If so, any ideas to avoid it? Possibly better lumber from a builder’s source instead of Lowe’s or Home Depot type of stores? Thank you in advance!!
tylynn_sattler
Monday 21st of September 2020
If you buy lumber with a high moisture content, it can bend and warp when it dries out. Try not to buy lumber with too high a moisture content or let it dry out before you try to build with it.
Ada
Tuesday 23rd of June 2020
Beautiful table! This is just one more thing added to My honey-do list. Thanks for sharing.
tylynn_sattler
Wednesday 24th of June 2020
Thank you!