
A well-aligned table saw is one of the most useful and accurate tools in the shop. As with all of your prized tools, you want to keep them in tip-top shape. So I’ve written up this step-by-step tutorial to help you align your table saw to maximize its precision and accuracy.
This post contains affiliate links. See my full disclosure here.
Tools & Supplies
- Table Saw (I’m guessing you have one of those since you clicked on this post … )
- Framing Square
- Speed Square
- Combination Square
- Level
- Lumber for test cuts
Step 1: Check that the Blade and Slot are Parallel
First, unplug the table saw. Then, raise the saw blade to just below its top position and remove the anti-kickback pawls and blade guard.


Next, mark a tooth at the back of the blade and measure the distance from the right miter gauge groove to the tooth. Turn that same tooth to the front and measure from the right miter gauge groove to the tooth again. If the measurements are the same, the blade is aligned.
If the blade is out of alignment, place the riving knife in the “down” position and loosen the adjusting screws on top of the saw table.
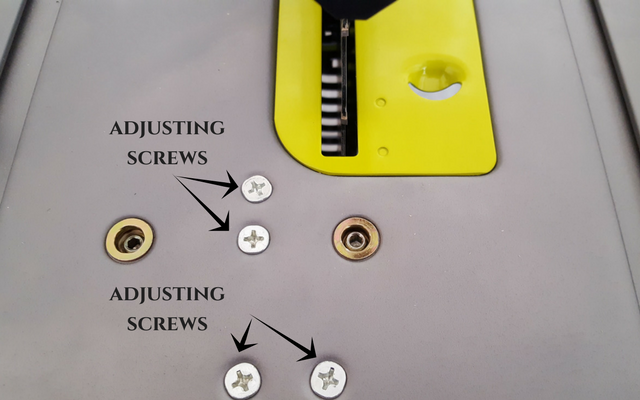
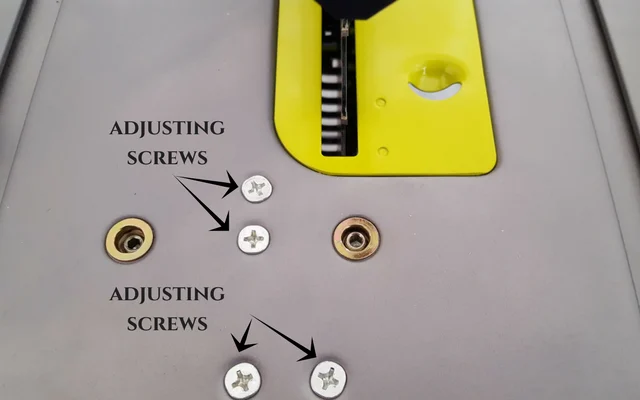
Adjust the blade to square and re-tighten the alignment screws.
*Make sure to align the rip fence to the blade after any blade adjustments. To reduce the risk of kickback, always ensure the rip fence is parallel to the blade.
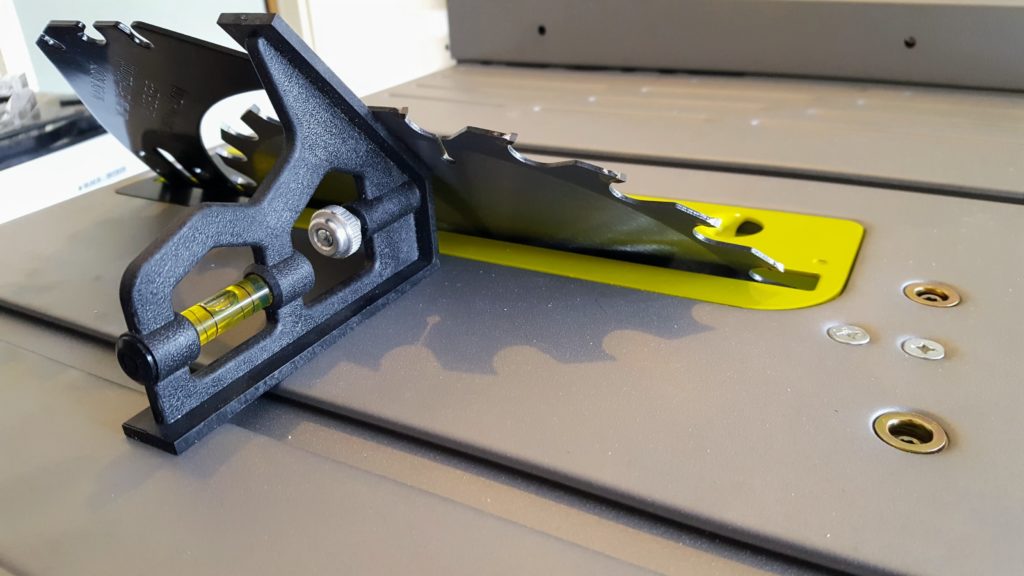
Step 2: Align the Riving Knife and Saw Blade
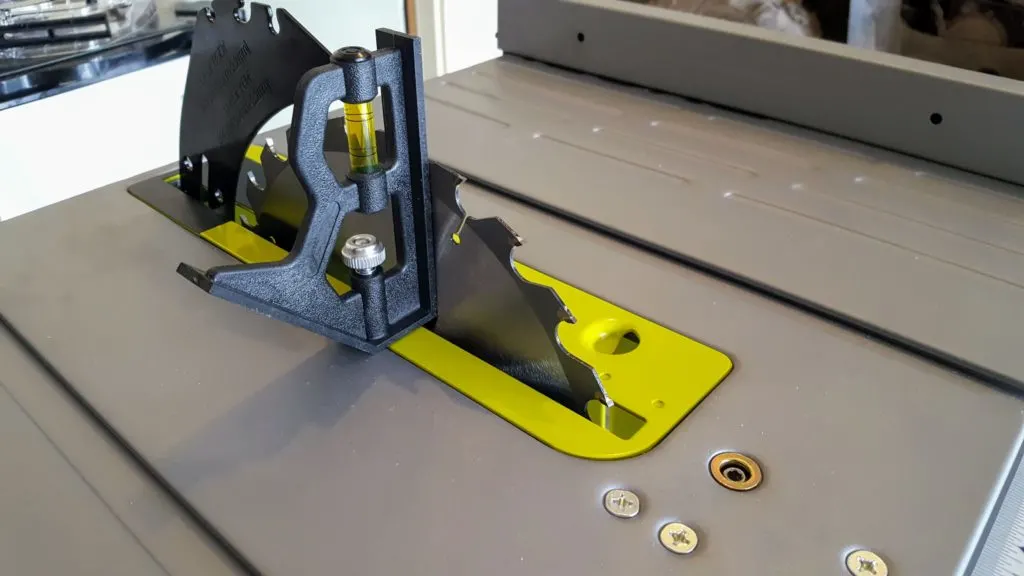
To check for horizontal alignment, lie a framing square or speed square horizontally against the riving knife and saw blade. If the square contacts both the saw blade and riving knife evenly, with no gaps, the saw blade and riving knife are in alignment.
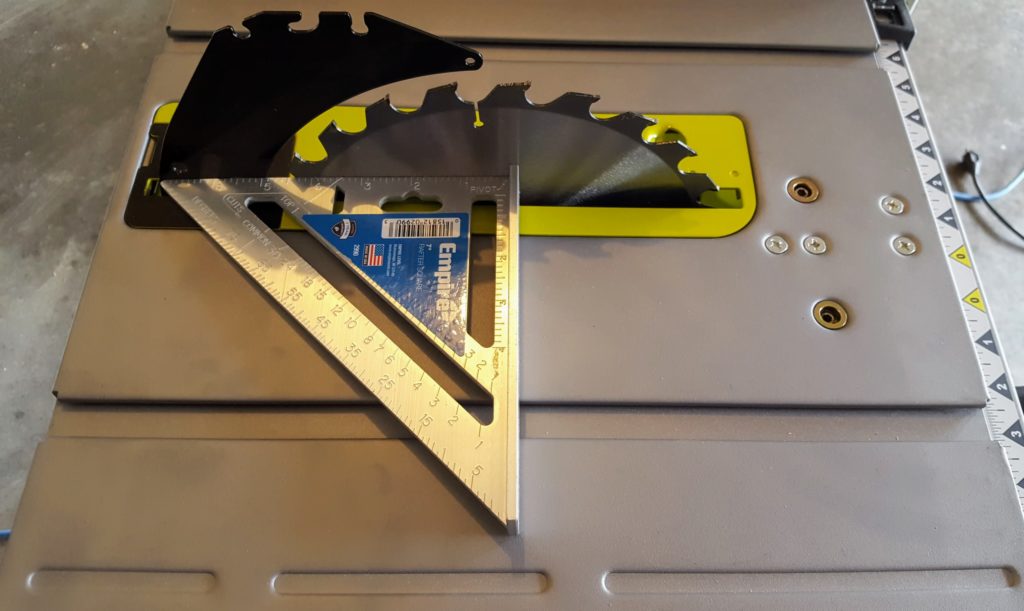

To check for vertical alignment, place the framing square or speed square vertically against the riving knife. If the square contacts the riving knife evenly, with no gaps, the riving knife is in alignment.

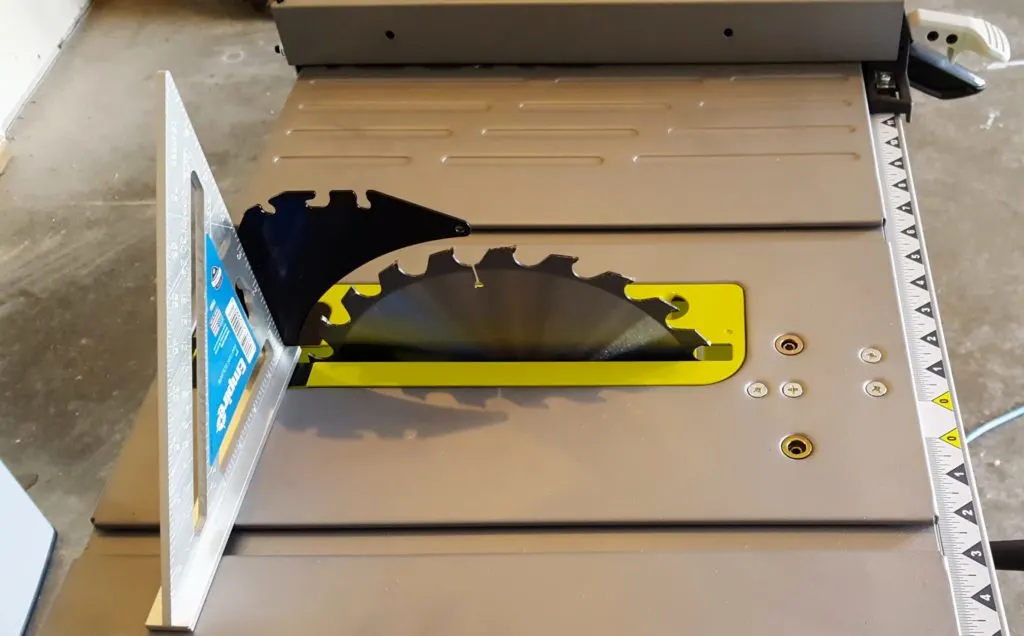
The riving knife must be in alignment both horizontally and vertically.
If necessary, to adjust the riving knife, first remove the throat plate. Next, unlock the release lever by pulling up and ensure the riving knife is fully extended.


At the back of the saw, loosen the screws holding the mounting bracket and reposition the riving knife to align it with the saw blade. Once it is aligned, tighten the screws. Check again for square and continue to adjust if necessary. Finally, reinstall the throat plate.
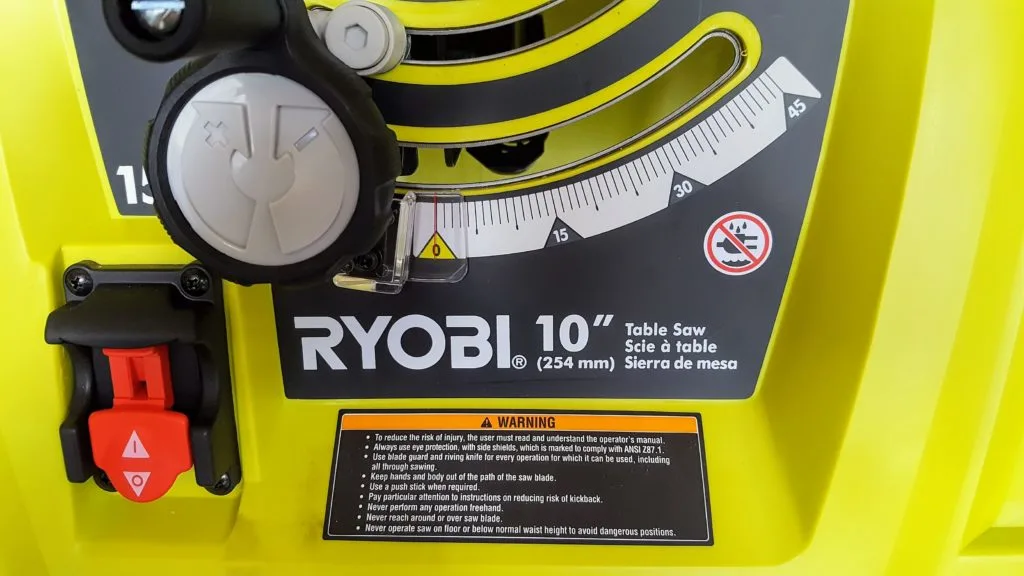
Step 3: Check and Adjust the Blade Bevel
Vertical
Set the blade to vertical (0 ̊ ). Place a combination square beside the left of the blade. If the square contacts the blade evenly, the blade is perfectly vertical.
If the blade is not perfectly vertical, an adjustment is necessary.
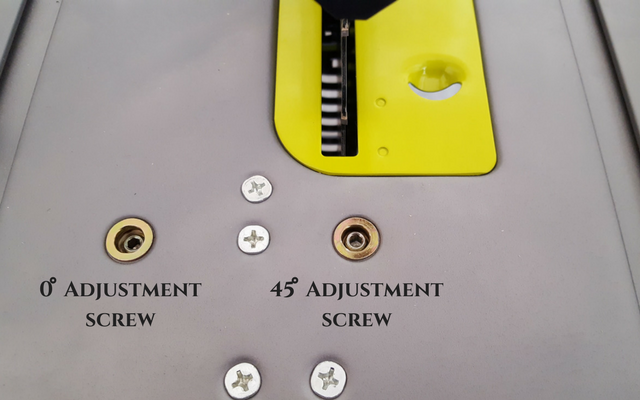
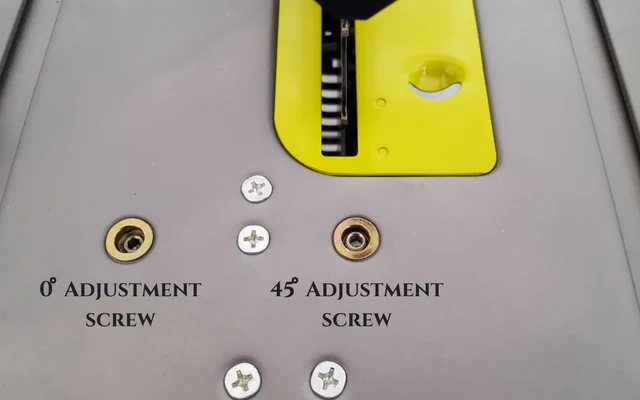
Start by placing the combination square on the left of the blade and then turn the bevel handle as far to the left as possible (the zero position). Lock the angle by pushing the bevel locking lever down. If the blade is not perfectly vertical (flush with the square), loosen the adjustment screw, and adjust the blade until it is perfectly flush with the square. Re-tighten the adjustment screw.

If the handle is turned as far as possible and the blade is perfectly vertical but the bevel indicator does not show zero, adjust the bevel indicator by removing the handle and loosening the indicator screw.

Adjust to zero and re-tighten the screw.
45 ̊ Bevel
Set the blade to 45 ̊. Place the combination square beside the left of the blade at its 45 ̊ setting. If the square contacts the blade evenly, the blade is at 45 ̊. If the blade is not at an exact 45 ̊, an adjustment is necessary.
Place the combination square on the left of the blade and turn the bevel handle until the blade is on the far left side of the slot. Lock the angle by pushing the bevel locking lever down. Loosen the adjustment screw and adjust the blade until it is perfectly flush with the 45 ̊ square. Re-tighten the adjustment screw.

If the handle is turned as far as possible and the blade is at a perfect 45 ̊ but the bevel indicator does not show 45 ̊, adjust the bevel indicator by removing the handle and loosening the indicator screw (same as the vertical setting). Adjust to 45 ̊ and re-tighten the screw.
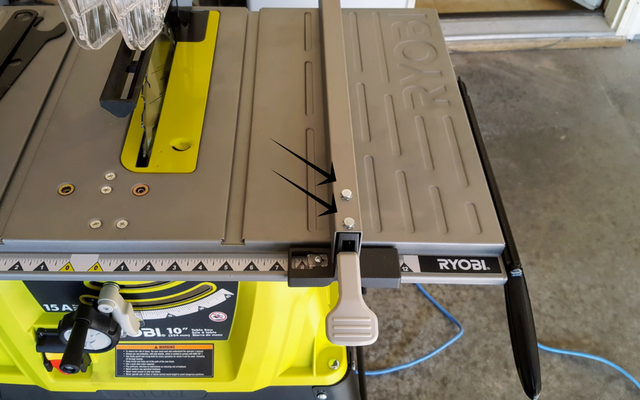
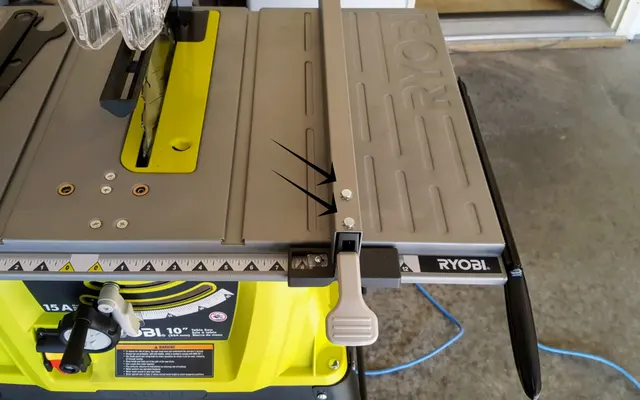
Step 4: Align the Rip Fence
First make sure the miter slot is parallel to the saw. Next, slide the rip fence over to the miter gauge slot and lock it in place. If the fence aligns with the entire length of the slot, the rip fence is in alignment. If the fence diverges from the miter slot at all, it is out of alignment. To adjust the rip fence, loosen the bolts on top of the fence and align it. Re-tighten the bolts.
After you’ve completed all of the alignments, reinstall the anti-kickback pawls and blade guard.
Make a few test cuts on scrap wood to ensure the alignments are accurate. If the cuts are not true, repeat any alignments necessary.
Once you’ve ensured all alignments are accurate, carry on with your projects!
I hope you find this tutorial straightforward and helpful. Please leave any questions and/or comments and I’ll get back to you as soon as possible!
![]()
![]()
Irene
Saturday 12th of January 2019
Hey Tylynn, Thanks for the guide. I just checked the alignment on my saw today, but I am having an issue with the bevel locking lever. I can't get it to lock. It's really loose, like REALLY loose. It's pretty much useless. It doesn't do anything and pretty much just dangles there. Any idea how to fix/tighten this? I have googled everything I can think of, but have not found any answers. Any help would be much appreciated.
tylynn_sattler
Monday 14th of January 2019
Hi Irene,
Here is an excerpt from the Ryobi table saw owner's manual that should help: " Tighten bevel control by turning bevel lock lever to the right. If it needs to be tightened more, pull the spring-loaded bevel lock lever out and rotate it to the left. Then release bevel lock lever and allow it to return to its original position. Rotate to the right again. Repeat this process until bevel lock lever is securely tightened."
Have you tried that?
Alice
Saturday 6th of January 2018
Hi, I appreciate your putting this guide up. I recently bought this Ryobi table saw and I have been trying to align everything. I've was successful right up to the directions in the manual about aligning the riving knife and saw blade. I measured and sure enough, the riving knife doesn't line up. I'm pretty sure I know what I'm supposed to do, but I don't know how in the world I'm supposed to use that hex key they provided. I used a flashlight to verify that there are indeed two hex screws through the slot on the back of the saw, But when you insert the hex key there is only maybe 1/2 inch sticking out. It's hard enough getting the hex key into the screw. I can't hold onto the hex key in order to turn the screw. I'm sure I have a longer hex key somewhere in my tools, but It's one of those things that makes me think, "Surely this can't be right. Why would they make it so hard ?" so I think maybe I'm doing something wrong. Have you actually aligned your riving knife and saw blade? I would very much appreciate knowing how you did it.
Thanks, Jane
tylynn_sattler
Sunday 7th of January 2018
Hi Alice,
Thanks for the question! I did go through and align my table saw when I first got it before writing this guide. I'm not sure why the hex key they provided is so short cus I ran into the same problem as you. I ended up just using a different hex key that I had on hand that was a little longer. Seems to me that they had a little design functionality issue ...