
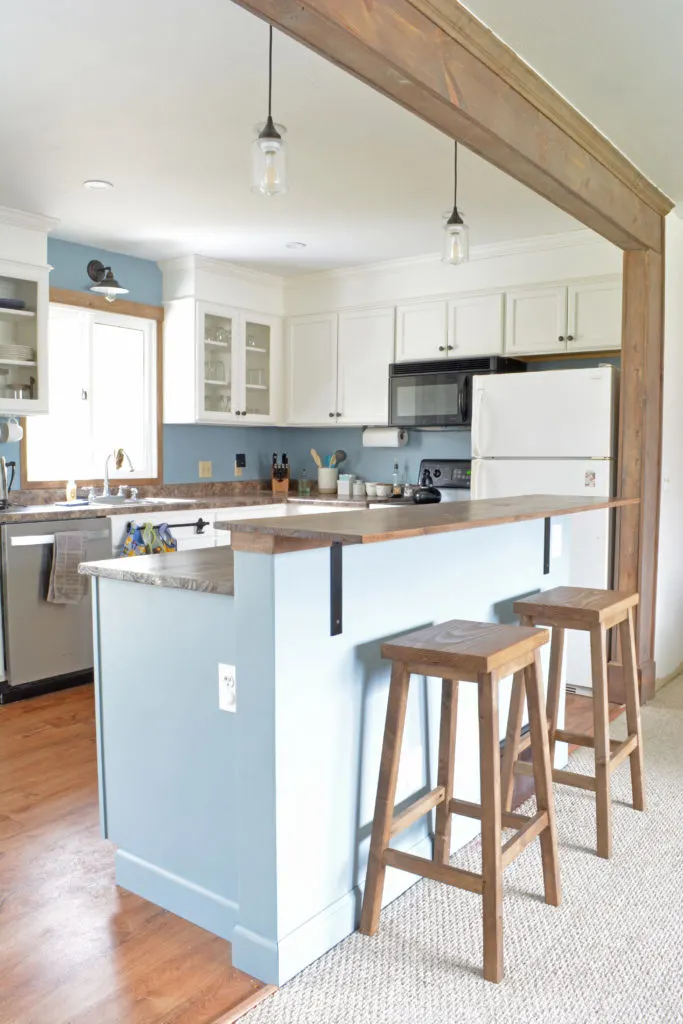
When we first bought our new house, we knew we wanted to knock down the wall between the kitchen and living room and replace it with an island. I had originally planned to build the whole thing from scratch, but as I was shopping around I saw that Home Depot sells extra long (5′) kitchen base cabinets (they have them in unfinished oak or unfinished beech – I used beech). Because the island is so big, it was cheaper to purchase the empty base cabinet and build the inside, rather than build the entire thing. And since I DIY to save money, I went the cheaper route.

This post may contain affiliate links. If you make a purchase from one of the links, I may make a small commission at NO EXTRA COST to you. This helps keep the tutorials and plans free here at Bitterroot DIY. Thank you for your support! See my full disclosure here.
Tools & Supplies
- Unfinished Base Cabinet
- Counter Top
- X-acto Knife
- Construction Adhesive
- Stain or Paint of your choice
- Clear Paintable Caulk
- Caulk Gun
- Metal Shelf Brackets (I bought mine off Etsy, but use whatever matches your style)
- Trim
- 2 1/2″ Screws
- Rev-a-Shelf Garbage and Recycling Pullout
Lumber:
- 1 | 4 x 8 Sheet of 3/4 Plywood or Melamine
Cuts:
- 3 | 3/4″ Plywood @ 23″ x 28 (measure for your specific base cabinet to avoid error)
Step 1.
Let’s take it way back to the beginning of the remodel to start.
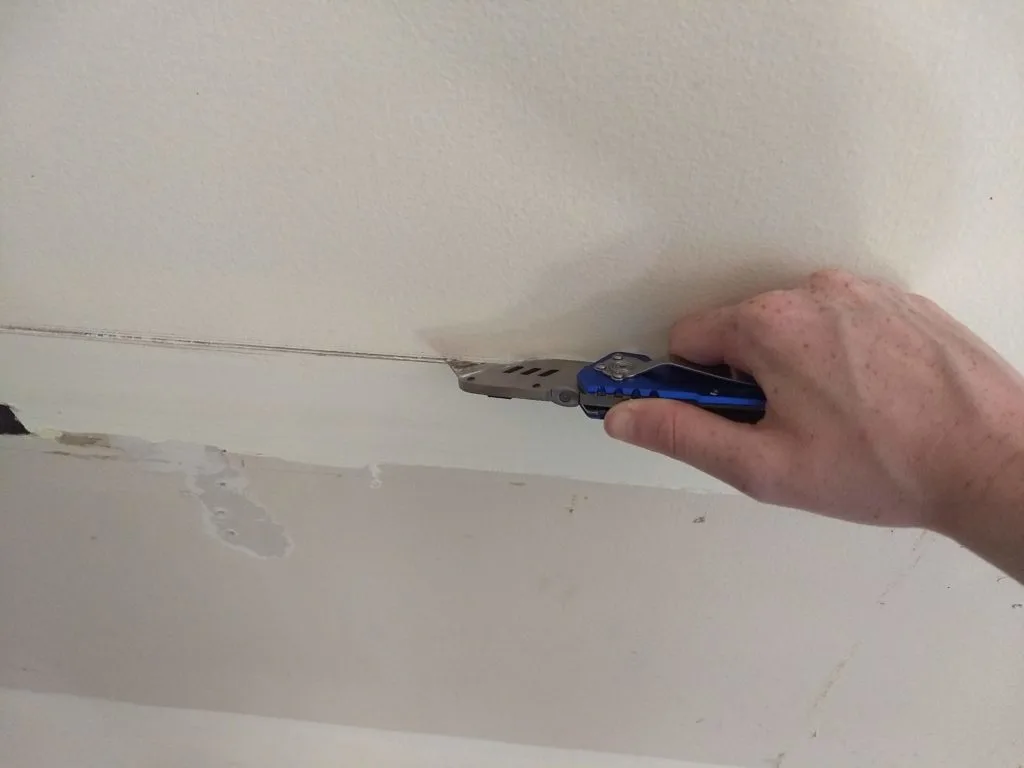
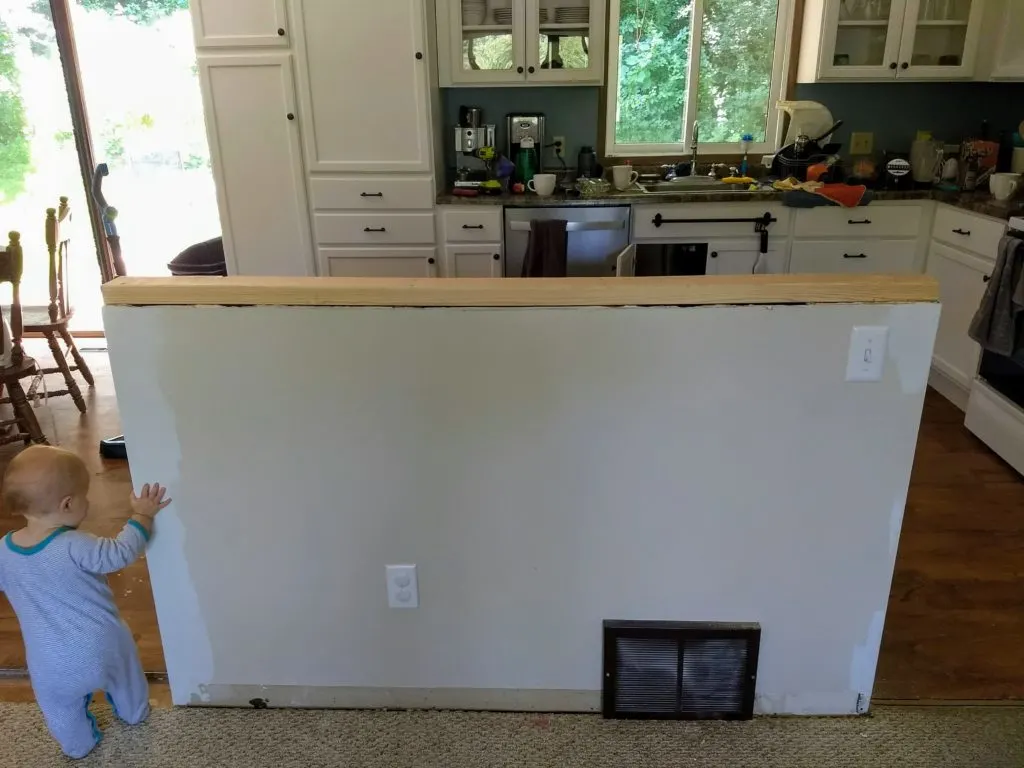
If you have an existing wall that you’re working with, score the drywall at the desired height of the breakfast bar. I wanted the breakfast bar at standard bar height, so I scored the drywall at 39″ – which is 42″ (bar height) minus the width of a 2×4 (1 1/2″) and thickness of the counter top (about 1 1/2″).

If you do not have an existing wall, build a standard frame for the wall with 2x4s and drywall over it. Here is a great tutorial for building an interior wall. Follow the same process and adjust for your kitchen island/breakfast bar dimensions.
This is what it looked like when we got the drywall down:

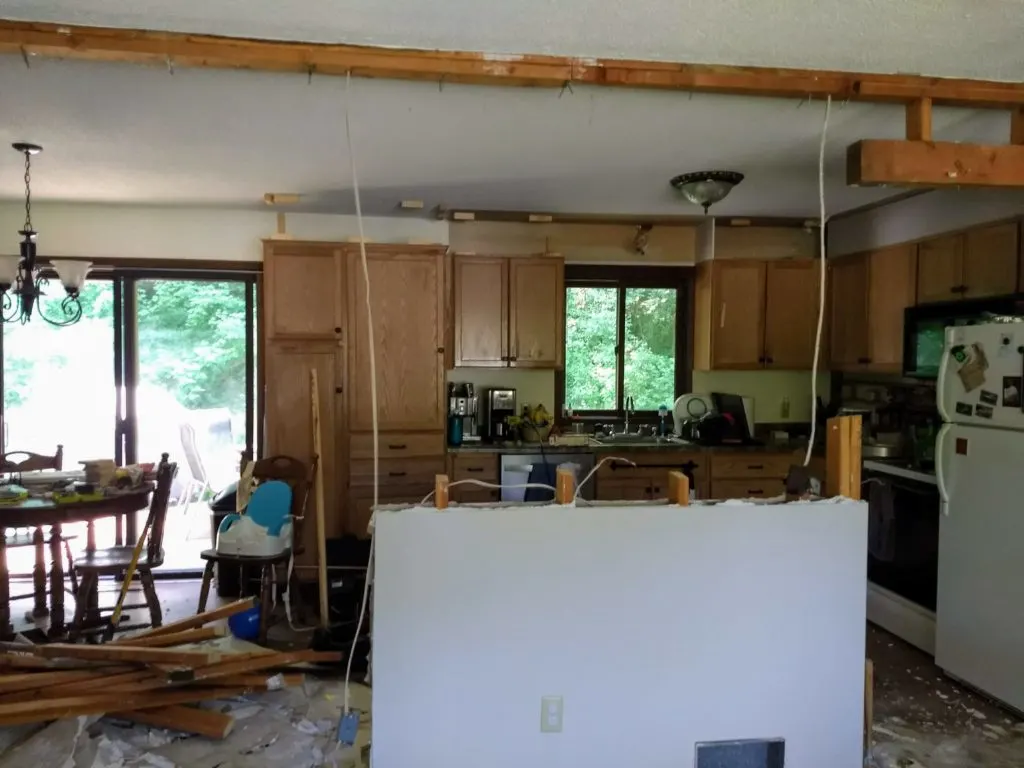
As you can see, the 2×4 studs were still taller than the drywall at this point. We marked them at the same height as the drywall and cut them flush with a sawzall.


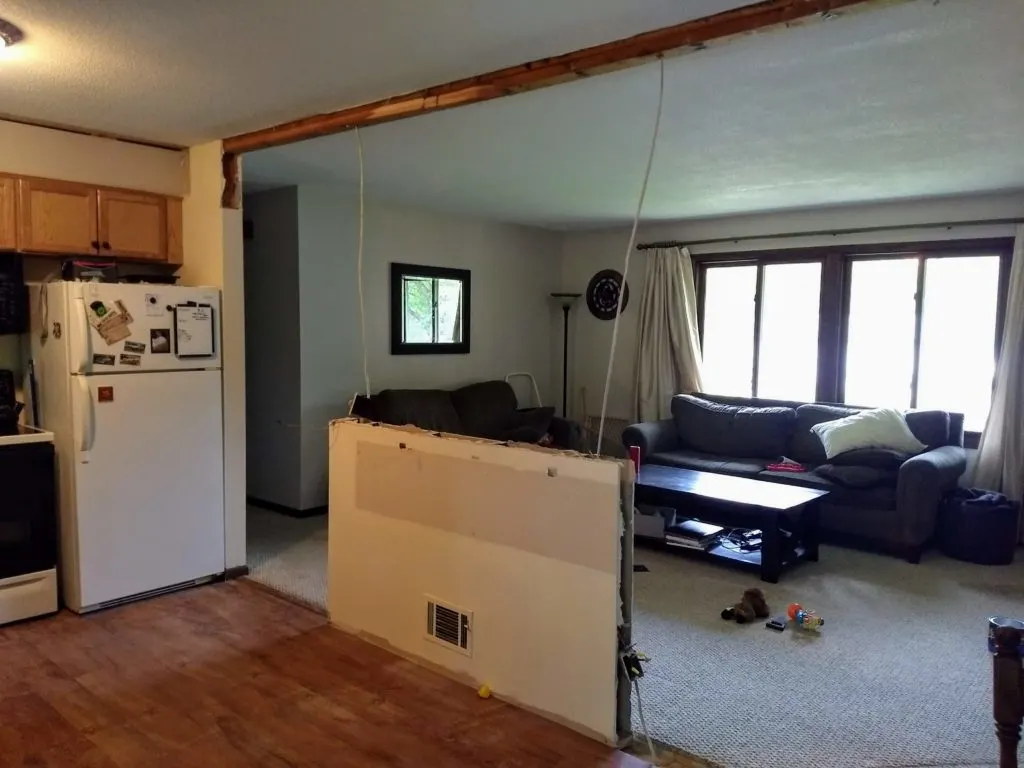
A view from inside the kitchen:

One of our friends is an electrician, and he helped us re-route all the electrical as necessary before adding the base cabinet.
If you’re not dealing with an existing wall, hopefully you can skip most of that shenanigans and just frame out a wall to start with.
Step 2.
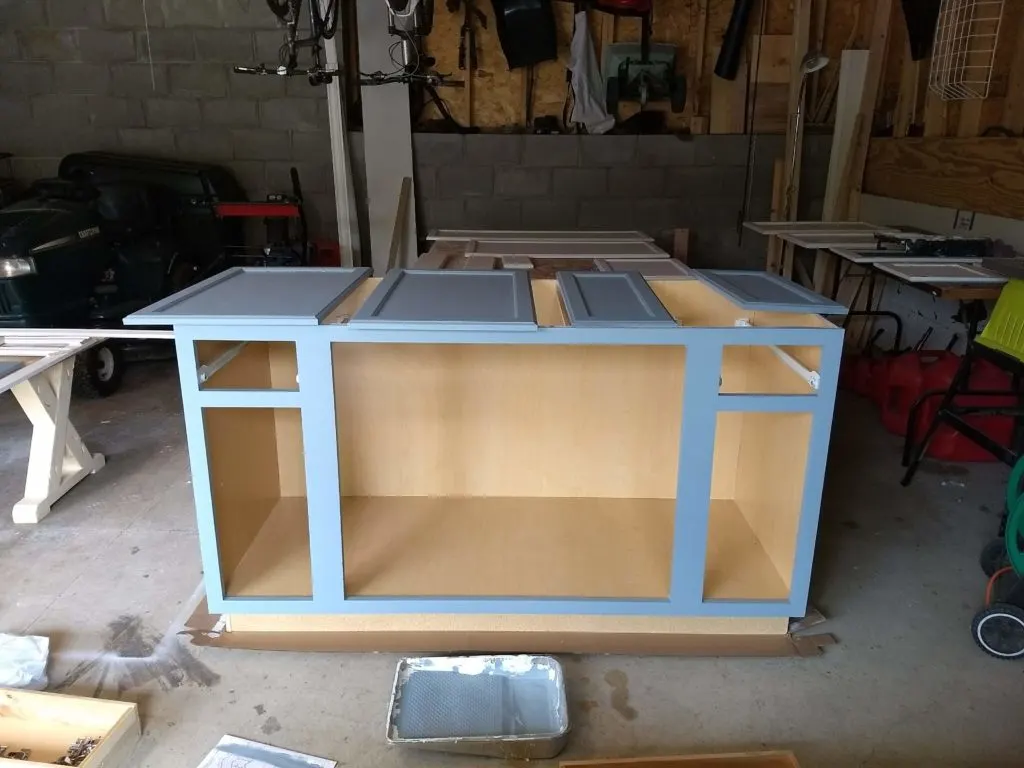
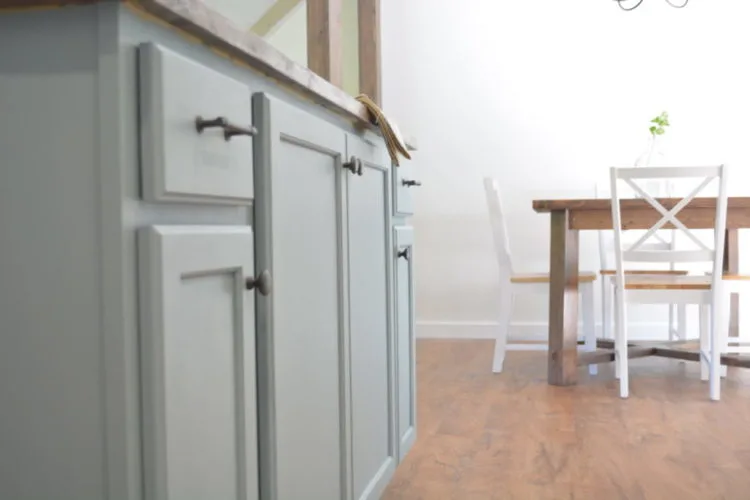
Paint or stain the base cabinet in the color of your choice. I used Sherwin-Williams Debonair (SW 9139) to match the accent wall in the kitchen.
Bring the base cabinet in and attach it to the half wall with 2 1/2 screws through the back of the cabinet into the studs in the wall.


Step 3.
I added a 2×4 cap to finish off the top of the wall frame. If you build from an existing wall, the 2×4 cap will sit above the drywall since there’s no way to cut the 2×4 vertical frames below the drywall without damaging it. The trim will cover this up.

If you build the wall from scratch, make sure the 2×4 cap is under the drywall. It will save you time and make trim a lot easier.
Step 4.
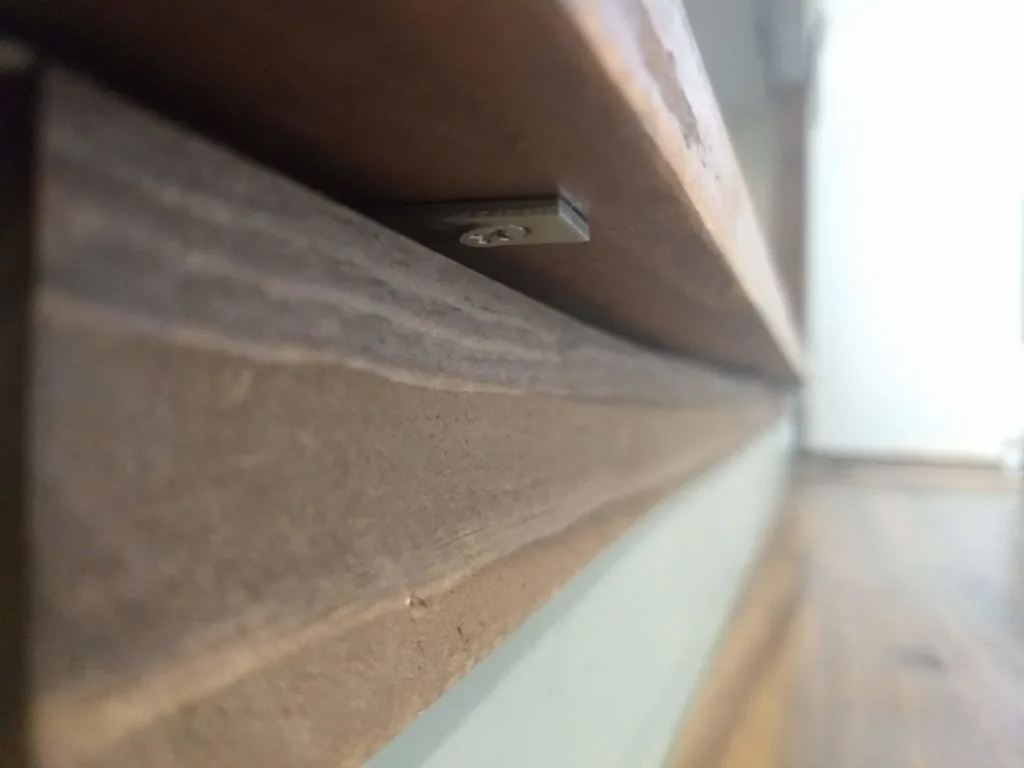
Attach the metal brackets to the studs along the breakfast bar wall. Position the counter top, apply construction adhesive along the 2×4 cap, and attach it to the brackets.

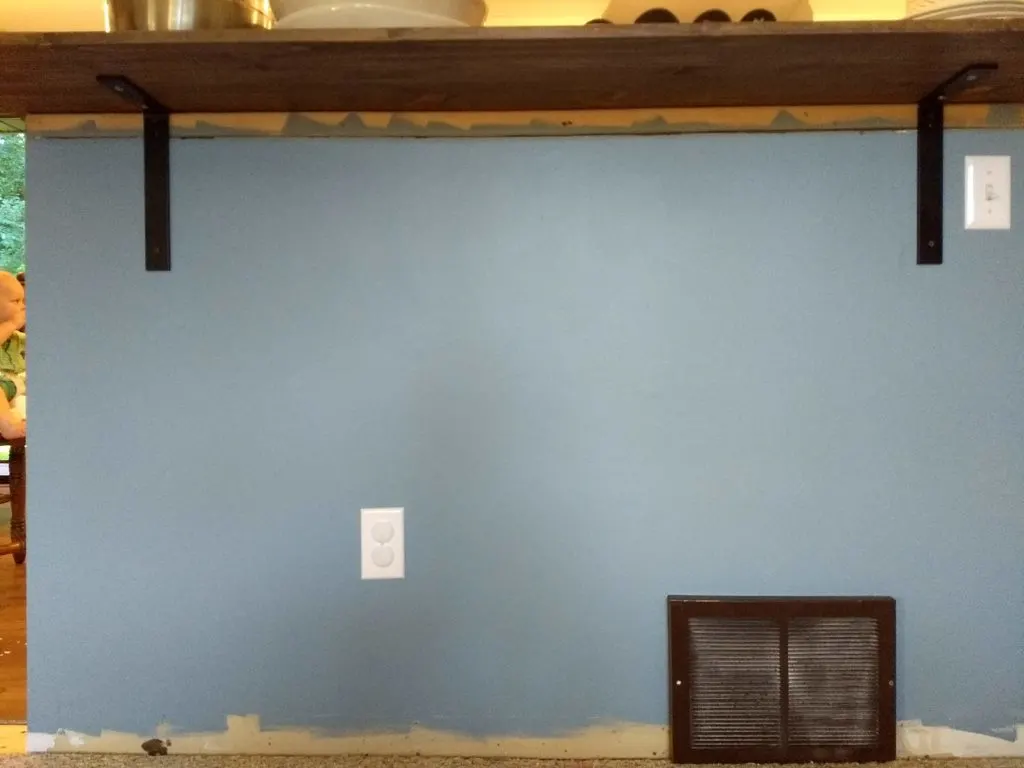
I also put small right angle brackets on the front side of the breakfast bar counter top to make sure it doesn’t wobble at all.

Step 5.
Attach the main counter top with construction adhesive.


I used 1″ thick edge-glued pine from Menards for the counter tops, and so far it’s holding up fine. I stained and sealed it really well before attaching it to the cabinet.
Overall, wood countertops are not as durable as other options – concrete, granite, laminate – but I like how rustic they are. I plan to use butcher block if I ever replace these, so it will still be rustic but more durable. There are a few great options for butcher block countertops from Home Depot – this finished maple one or this unfinished maple. There a few different species of wood you can choose from as well, but the maple is beautiful. I used an unfinished maple top for the kitchen island I built for some friends a couple years ago.
Feel free to use whatever countertops match the rest of your kitchen -the options are endless!

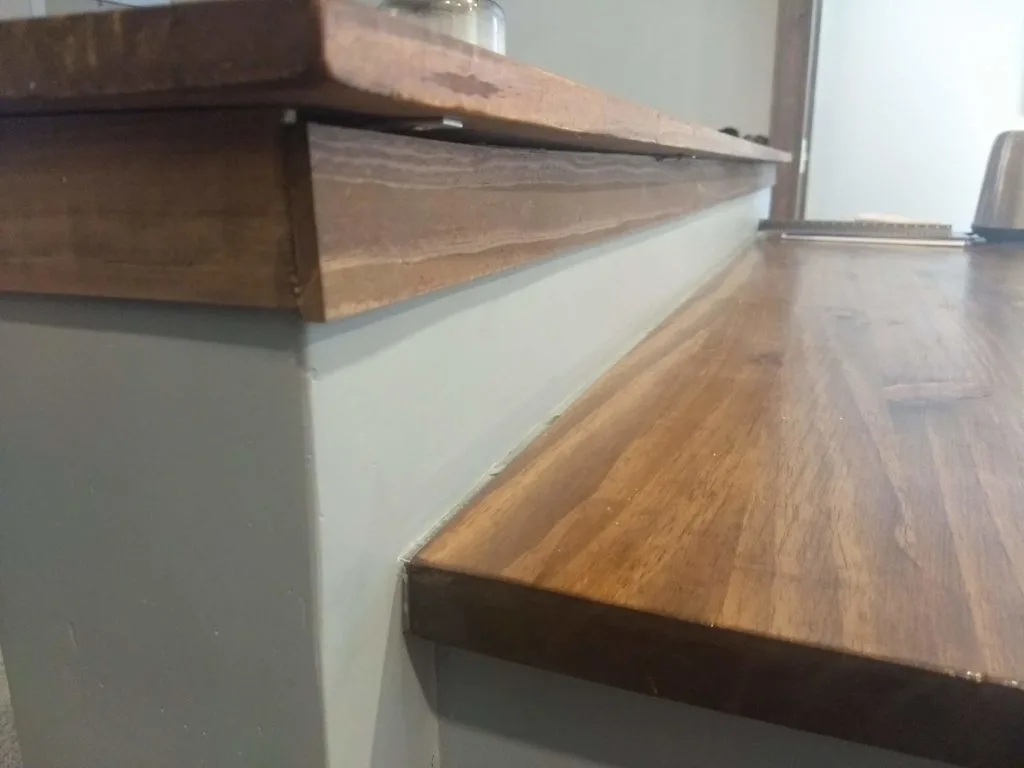
Trim the breakfast bar counter top. I used wood lathe trim (available at Home Depot or Menards) and then sealed all joints with clear paintable caulk.

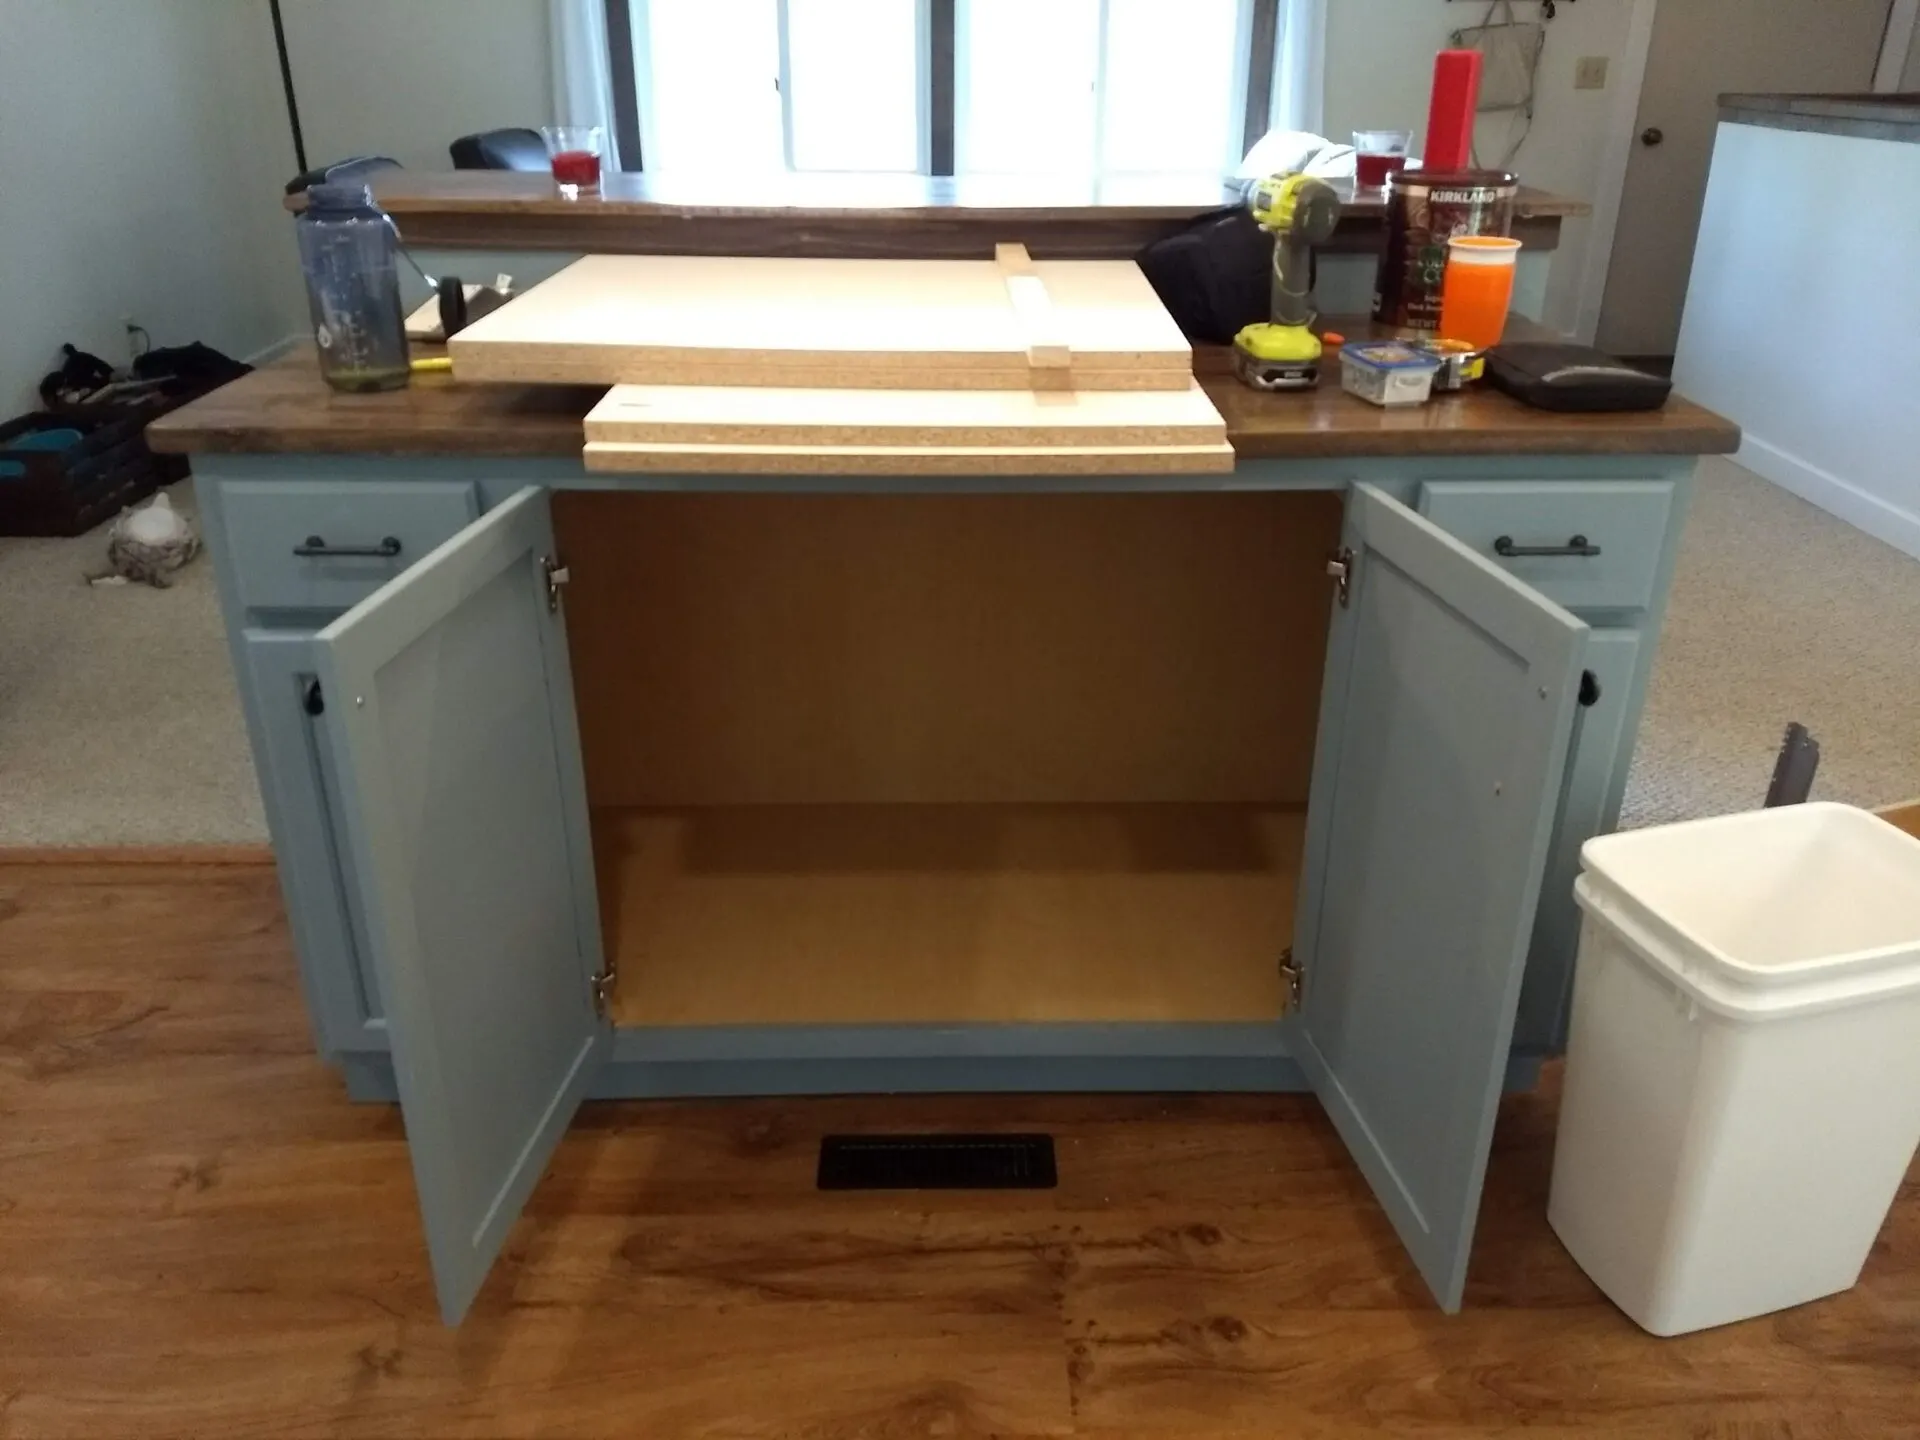
Once I attached the counter tops and painted the half wall/breakfast bar, it was time to build out the inside.
Step 6.
Dividing the cabinet is completely up to personal preference and how you plan to use it. I’ll share what I did, but make any modifications you need.
First, I added 3/4″ melamine dividers on either side of the large middle cabinet and attached it to the back wall and front face frame with 1 1/4″ pocket hole screws. A sheet of melamine is cheaper than plywood, but 3/4″ plywood would also work.

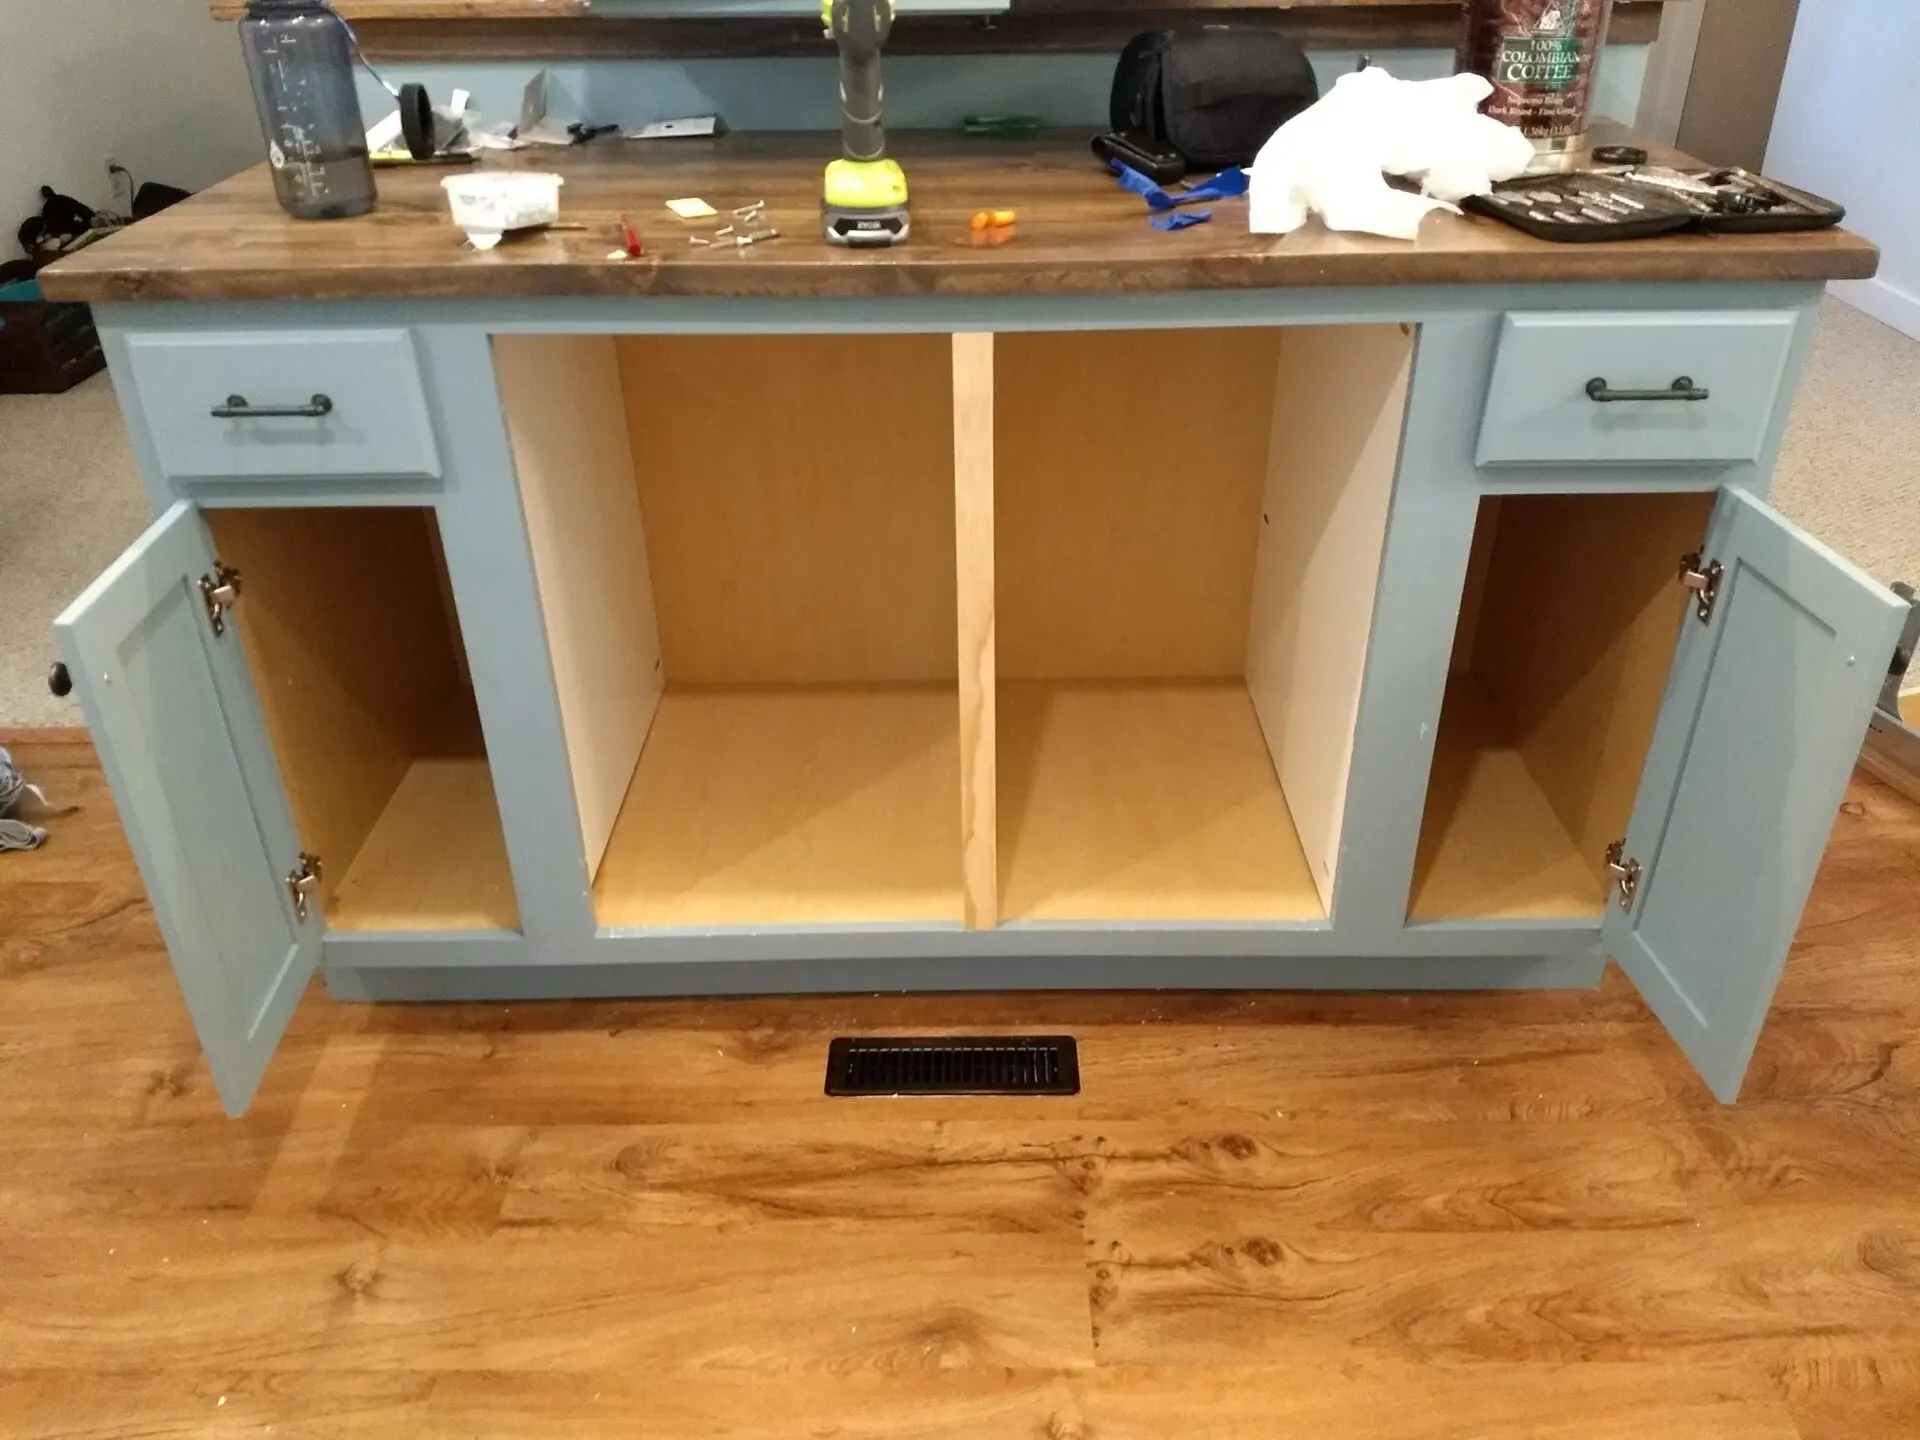
Next, I added a face frame along the middle of the center cabinet and one more melamine divider. I attached it to the back wall and new middle face frame with 1 1/4″ pocket hole screws.


To finish it up, I sealed all the seams with white caulk.


Caulking the seams is optional. I wanted to seal them off because I put the garbage and recycling in one side of the center cabinet and wanted to contain any bad smells, which brings me to the next step …
Step 7.
The Rev-a-Shelf garbage and recycling pullout. This has been one of my favorite additions to the kitchen. It’s so clean and organized and keeps the garbage nice and hidden. Plus, we’ve started recycling so much more now that it’s right next to the garbage.

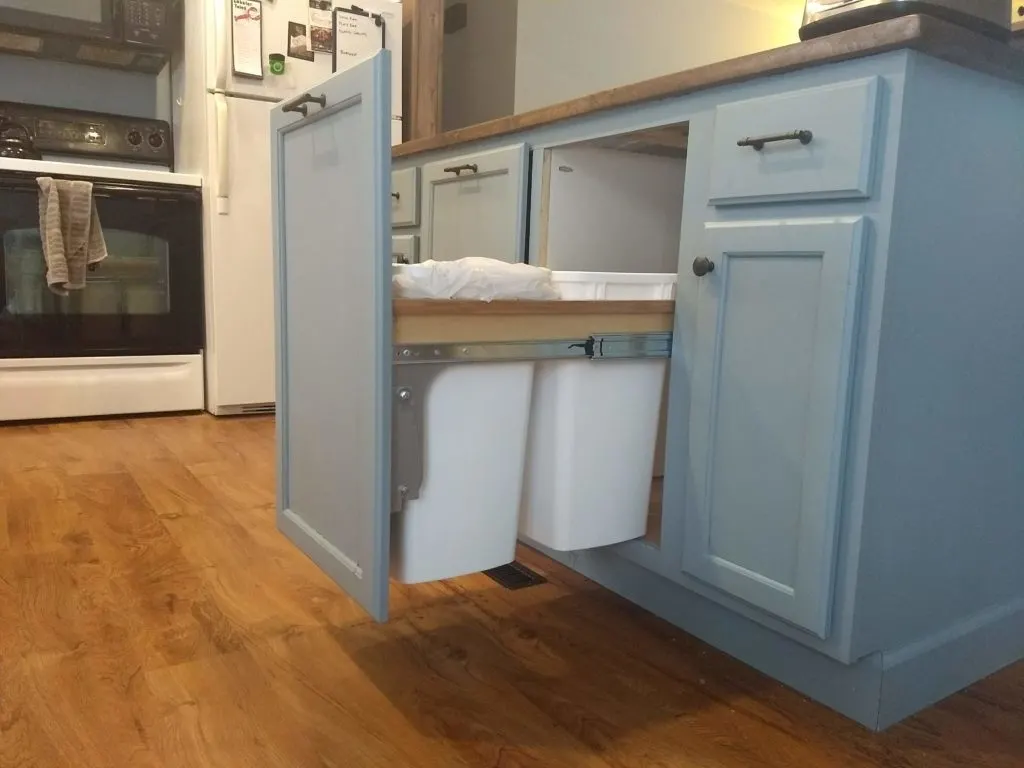
There are a wide variety of styles available: bottom mount, top mount, singles, doubles. Just make sure to select one that fits your cabinet dimensions exactly so the drawer slides work smoothly.
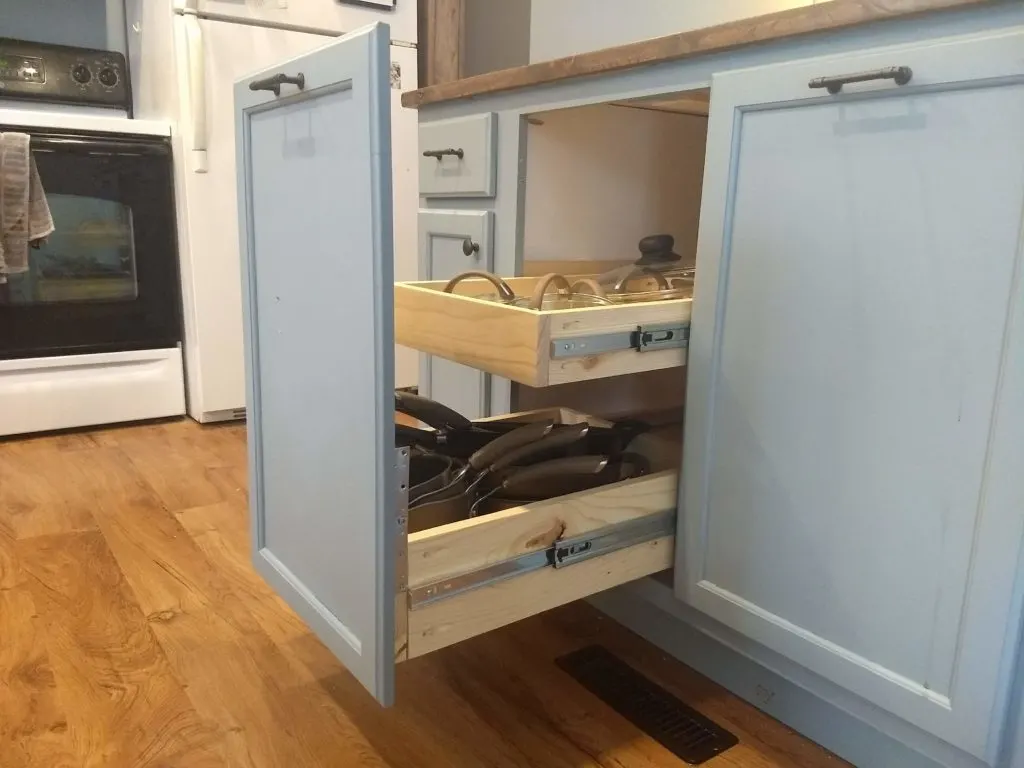
Step 8.
The last special addition to the island was my DIY Pots & Pans organizer.
Head over to check out the full tutorial and plans to make one of your own.

And the best part?
It’s completely customizable to fit whatever cabinet space you have … or don’t have, as is usually the case with kitchen cabinets 😉

What started as an empty base cabinet is now my #1 favorite part of the kitchen! It would be simple to build the whole thing from scratch, but I’m so happy I decided to purchase the base cabinet. It left me some extra time and money to be able customize the whole thing.

Please let me know if you have any questions and I’ll get back to you as soon as possible.
And good luck with your new kitchen island!
![]()
![]()
Thanks for stopping by!
For more project ideas, you can find me on Pinterest. And to stay up to date with the latest shenanigans, follow me on Instagram.


Debra C
Friday 29th of January 2021
Can you please tell me how wide the wall is? I see the cabinet is 5' but the wall is a little bit wider, correct? I am getting ready to do this exact thing to my kitchen and I absolutely LOVE the way yours turned out.
tylynn_sattler
Saturday 30th of January 2021
Thanks! I left about 1 1/2" of the wall extending to either side. But I'm working on redoing it again right now and just cut the wall even to the cabinet, so it'll end up being one big rectangle.
Erica
Sunday 20th of September 2020
Thanks for this very helpful tutorial! About how much did it cost?
Matt
Monday 14th of September 2020
Did you use a standard base cabinet, or a sink base? What size?
We are looking at doing a DIY island in the center of our kitchen, but only have 5ft of length to work with.
tylynn_sattler
Monday 21st of September 2020
We used a 5' kitchen base cabinet from Home Depot. I think it was a sink base one, but they're not built any different than the other ones - they're just bigger. Looks like they're sold out now cus the link doesn't work anymore, but here's a similar one - https://www.homedepot.com/p/Hampton-Bay-Hampton-Assembled-60x34-5x24-in-Sink-Base-Kitchen-Cabinet-in-Unfinished-Beech-KSBF60-UF/302970443?MERCH=REC-_-searchViewed-_-NA-_-302970443-_-N.
Adjust the size of cabinet for how much space you have.
DAVID JONES
Thursday 20th of August 2020
HI I REALLY LIKE TO DO THIS PROJECT WOULD I BE ABLE TO PURCHASE THE PLANS. THANK YOU YOUR DAVID
tylynn_sattler
Saturday 22nd of August 2020
Hi there, I don't have plans available for purchase for this. The tutorial is just written in the post. Hope that helps!
Jess
Thursday 11th of July 2019
Hi there! I am so excited to try this! I am wondering about the thickness of the lumber for the counter top.
Thanks!
tylynn_sattler
Friday 12th of July 2019
I'm so glad you're going to give this a try! It really worked great for us. I used a 1" thick edge-glued pine slab and cut it to size for the counter. Another option is a butcher block countertop. Home Depot sells them in different sizes. I used one for a different kitchen island I built for some of our friends. I think the butcher block is a little more durable, but you have to take care of it (oil regularly, sand when the grain starts to rise - it comes with instructions for care). The pine top has worked well for us so far. I made sure to seal it really really well.